


kngfisher
-
Posts
626 -
Joined
-
Last visited
Content Type
Profiles
Forums
Gallery
Events
Store
Everything posted by kngfisher
-
First thing that was done was I covered the new 150H with a self adhesive black background. I do not like looking threw the tank at the misc wires and plumbing. It really distracts from the show of fish, coral, rock, inverts, etc. Next I shut off the return pump from the 90gal tank. I left a pump running in the display and a heater as to not stress out the livestock until I had to. I am trying to just make it as close to a big water change as possible for them. Next, I unplugged my co2 tank, the skimmer, the UV unit, the auto top-off pump, my kalk reactor and lights. Next I pumped all the water out of the sump into a pond liner that I borrowed from a flowerseller friend of mind :-). After the sump was emptied, I was able to slide the sump out of the stand and remove the skimmer and return pump and transfer them to their vinegar bath where I let them soak. I also placed vinegar into the kalk reactor and then used that to hold my tunze pumps and AC3 probes. I started with 4+ gal of vinegar. Before this, I had not been very good at soaking my pumps and probes so I just let them soak as long as possible. I used a 4:1 vinegar to water mix for everything and that seemed to work well. That and a tooth brush for the stubborn parts that the vinegar could not just eat off. With the electronics removed, the sump out of the way, and the plumbing disconnected it is now time to start the real work. Start by lowering the water level in the tank until the rock work can be started to the broken down. You want to get the rock and coral out before you try and catch the fish. Less places for the fish to hide the easier it will be to catch them. Do not disturb the sand yet if possible. I drained the tank water into two 30gal trash cans, a 15 gal pond liner, and the sump I removed and cleaned. I saved all the existing tank water this way. I put all the existing rock and coral into the pond liner. As most of my rock was out, I caught all my 7 fish and placed them in the pond liner too. Once all the livestock was in pond liner I removed the rest of the rock. Another reason why it is a good idea to weight is that by disturbing the sand you could potentially release a large ammonia or other toxic substance into a very small body of water stressing the livestock and potentially causing issues. This tank move is stressful enough on your livestock.
-
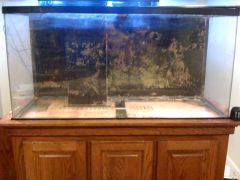 used 90gal glasscages acrylic tank and stand (front view)
 -
From the album: 90 gal reef
-
90 gal reef
-
-
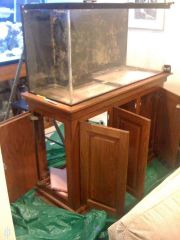 sed 90gal glasscages acrylic tank and stand
 -
From the album: 90 gal reef
-
This tread attempts to explain how I upgraded from an existing 90gal (Glasscages acrylic) tank that had been running for three years to a 150gal (Marineland corner-flo glass) tank. Things you will need ahead of time 1) gather as many containers for water as possible. I used 4 30gal trash cans and a 20gal solid pond liner to hold my rock,fish, and coral 2) grab some small pumps for each of the containers. once the containers are full of water be it from the tank for fresh mixed, its a good idea to keep the water moving in order to keep the o2 level as high as possible 3) grab some heaters for the containers that will hold the water from the tank and the fresh mixed. When you are taking the old tank down and putting everything back into the new tank it is a good idea to have all the water temp match. Less stress on the coral and fish. 4)Plenty of fresh salt water pre-mixed. I was going from a 90 to a 150 so I had about 100gal of fresh pre-mixed salt water on-hand and 20 gal of fresh unsalted water. 5) plenty of vinegar. It is a good idea to take this opportunity to clean you pumps, power-heads, probes, etc while you are upgrading. Also a good idea to check to make sure everything is working as it is supposed to like float-valves and that wavysea that always stops rotating 6) misc plumbing parts like extra hose clamps and flexible tubing. I needed to build two 1.5" dursos and have 8 feet of flexible 1" PVC for the return pump. 7) a friend or two. It always helps to have an extra set of hands and eyes. In my case with a tall tank (30" tall) and a tall stand (36" tall) it really helped that my neighbor was tall. We also needed a ladder. 8) time. setting up a tank is not a quick process neither is upgrading. Make sure you have the time and a patience of the others living in the house while this is going on. I did this upgrade in the middle of a snow storm. It snowed 20" the weekend of this upgrade. Glad we did not loose power in the middle of this ordeal. 9) plastic drop cloth. You are dealing with potentially lots of water and with that is the potential for lots of drips, drops, and basically a big mess can happen quickly. It's going to be a mess upgrading the tank so it's better to protect the carpet, floor, any furniture in the area that can or might get wet in the process.
-
I have a biocube 29 in storage but was going to use my old turboflotor 1000 on it. now, that should be a good combo :-)
-
I dont think you need 4x4 or even 2x4 is you build it right. My current stand is 1" x 2" and 1" x 4" solid oak and put together sim to diagram on post #3. On top of the stand is another piece of 3/4" plywood. very sturdy. It holds my 90 acylic just fine. My new stand that chip and I have been working on is of the same basic design but used solid 1" x 2/4/6" maple with again, 3/4" ply sheet on top for my new 150H. Have seen store bought stands out of particle board and MDF and those hold if taken care of. Granted, maple is harder then pine but again, it all comes down to construction methods ( of pocket holes / Kreg Tools are a great way to construct a stand.)
-
guess will try again and change from blue. last time is had it on any pulse modes, the wet side would fall off after about a month then it ate itself and had to be sent back. When it is on pulse or crest, I tend to find the wet side at the bottom of the tank. When it is on blue and then night mode it is alot more stable.
-
Wow 900 is very low....how is your coral growth...slow i would imagine. I too am battling bryopsis by my Mg is at 1450 and am seeing no change in the health (deep green color) due to the high Mg level. I am using the BRS Magnesium pack for their 2-part setup (mix of 5c Mag Chloride and 3c Mag Sulfate). I used that to bring Mg from 1250 to 1450 then got some kent Tech-M to target the bryopsis clumps with 5-10ml of Mg directly onto the foliage. This seems to have slowed the spread but has yet to really kill it off. I am judging the health of the bryposis by it's color. Thick Green being healthy, light green/gray/white and thinning meaning death/dying. Been running at 1450 for about a week with no harm done to SPS or LPS. The only change to the SPS is that some of the SPS colonies are extending their polyps more then usual especially on my red table that I got from Ric well over a year ago (mine never really tabled however, only conformed to the rock but that is another story). I did have great luck removing bryopsis from one of my rocks by removing it from the tank and leaving it outside in the snow. Upon close inspection, there is no bryopsis on this rock. :-)
-
have you checked out GSA cone skimmer? I would suggest you look into one. I have a Deltec but wished I has seen the GSA cone before i bought the Deltec.
-
this is a great thread. thanks for all your work documenting this
-
i have an orange spot and tux urchin and neither can keep bryopsis at bay. Will try drect application tomorrow. Will be redoing the tank in the next month or so because of bryopsis. Cant believe it is even growing on my nano-streams..... Die you PITA Die :-) Mag 1500 dKH 12 pH 8.02 Cal 380 Mag 1600 P04 0 Sal 1.024 N03 .5 temp 80
-
you sure that it is a 125? those dimensions are for a 150H tank
-
very nice aquascape. The only issue I forsee is that it looks like your rock work is resting/touching the back glass.
-
wish I know about this before I bought a new 150H corner-flo tank. atleast none of the panels are tempered. This reminds me of flowerseller's (main display) tank setup. like how no need for huge bulky overflow box.
-
I use an apple airport express for mine. works like a champ. take advantage of the wireless network at you house if you can and have one that is.
-
I am having good luck with a tux urchin. I have to stil siphon the hair algae but the urchin is eating it too. I may just get another tux urching. Try looking at the Julian Sprun Algae problem solvers guide for helpful hints. Kent Tech-M is supposed to help too. Have you checked Mg levels?
-
There used to be one via reefnook.com but it looks like they took it down. There is one for the AC3 controllers for use on the iPhone that works but if that is not an option. What are you looking for? What kinds of things are you looking to monitor via the widget? maybe there is an application that can do the same thing.
-
suitable t5 lighting for 90 gallon sps & lps
kngfisher replied to astroboy's topic in General Discussion
if you are interested, I have a Hamilton canopy with 2x250 watt MH and 2x65 watt T5 setup .... I had it running on my 90 before upgrading to LEDs -
planning on being there. not sure yet what I will be bringing but will be there
-
nice. one one question....does the reactor tend to fall over when filled with media/water? Is the media supposed to tumble inside the reactor or do you use something like filter-floss to make sure water flows threw the media and not around it if this reactor was placed on it's side.
-
I have a 90 w/ 30 gal sump mixed SPS/LPS and have been running DNW-150 and cant get the skim the my licking...turboflotor 1000 multi beats is hands down.
-
Big trouble brewing for the future of aquarium LEDs
kngfisher replied to kngfisher's topic in General Discussion
then delete this thread....must have missed it