.png.b54251de094ebf561cf26d6af243697a.png)
AlanM
-
Posts
7,185 -
Joined
-
Last visited
Content Type
Profiles
Forums
Gallery
Events
Store
Everything posted by AlanM
-
wow, no one can accuse you of not having enough pods.
-
.thumb.png.40db71e145957fbc22a7d873e5f3065b.png)
Julian Sprung will be in our area on October 30
AlanM replied to Origami's topic in General Discussion
Here's my Julian library. I got him to sign some of them when he came to give a talk a few years ago.
-
when I was first thinking about getting started I visited Congressional Aquarium in Rockville. They had a saltwater section, but are mostly freshwater. The guys working there advised me to just use tap water to make up seawater and for top-off because it already has minerals in it so why should I spend money to remove them and just put it back with dosing and salt mix. /shudder
-
Sure, plenty of people start the cycle going with dirty old rock in a brute trashcan of saltwater with a powerhead and a heater in it. Feel free to run the lights or not. The bacteria won't care, but it might help you get used to how it all works. It'll probably be cloudy for a while. You probably didn't want to rinse the live sand because it was live, maybe? It'll have some dust in it. The rock might also be dusty if you started with dead rock. It will all settle out eventually. Even the really fine stuff will get slimy and clumpy from bacteria film eventually and will stick together or hang out in the corners where the powerhead doesn't hit or the tiny parts of the rock. The tank will keep cycling for months (years really) as various things grow and die off in it. It's way more than just nitrogen processing bacteria that make a reef tank mature, although the ammonia test coming up good is an important start. So the point is to not go whole ham right from the beginning.
-
Feel free to pick up where you left off. It won't hurt anything to just have the wavemaker running instead of also the return pump into the sump. Point it higher if you don't want it to stir up the sand, but you're going to have to run it anyway and now is a perfect time to get it running where it won't mess with the sand. I'd wait a while for fish, though. Get it all working. Add some bacteria if you want. Do some ghost feeding with pretty much anything you have on hand. Take your time to do the cycle and wait for the uglies on the rock to come and go. It's better to learn how a new system works without fish than learning it when you're trying to keep your new pets alive.
-
I was just browsing info about large aquariums and found this one: https://en.wikipedia.org/wiki/AquaDom I know where I'm staying if I ever get to Berlin.
-
Nice. I'm looking forward to hearing more about these tanks. I'm especially interested in the seahorse one. It's an unusual one for the club.
-
Alan's 180 Reef Tank (feedback welcome)
AlanM replied to Beefcake's topic in Dedicated Tank (Build) Forum
That should get quieter too with time, but you could always make the durso one higher in order to make the overflow not fall so far. The distance your valve is open determines how much flow you get, the height of the durso determines the water level in the overflow box. Also, if you terminated the drain pipe slightly under the water line, even 1/4" or so, in the sump that would make it quieter too. You can just slide on a coupler with no glue to the pipes facing down to get it to exactly the right length and either adjust the coupler up and down or cut a little off it. Friction will hold it on basically forever and you don't have to worry about it leaking. -
Alan's 180 Reef Tank (feedback welcome)
AlanM replied to Beefcake's topic in Dedicated Tank (Build) Forum
The durso trickle should quiet down as it slimes up over the next couple of weeks. -
Alan's 180 Reef Tank (feedback welcome)
AlanM replied to Beefcake's topic in Dedicated Tank (Build) Forum
I really like those pedestals and places for fish to swim around. It's going to look great. -
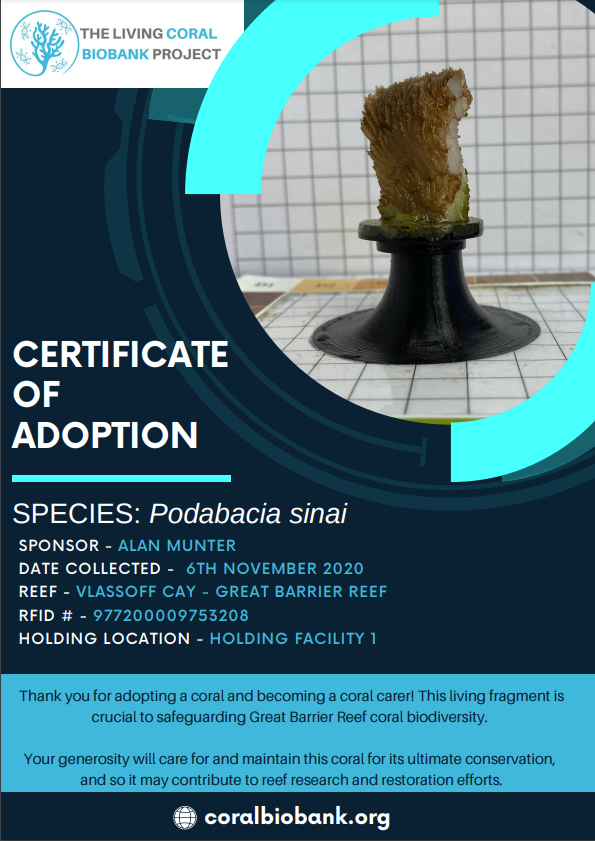
Living Coral Biobank, Adopt a Coral pitch
AlanM replied to AlanM's topic in Conservation & Sustainability
yeah, Google search tells me it's a species identified by Charlie Veron and grows like a plating montipora. I don't know how old the photo is if it was collected in 2020. Seems like it would look way different now. -
Living Coral Biobank, Adopt a Coral pitch
AlanM replied to AlanM's topic in Conservation & Sustainability
Not sure if this will work, but here's my coral. Not the most photogenic on, heh. I think they need some more blue lights on it. Alan Munter Podabacia Sinai.pdf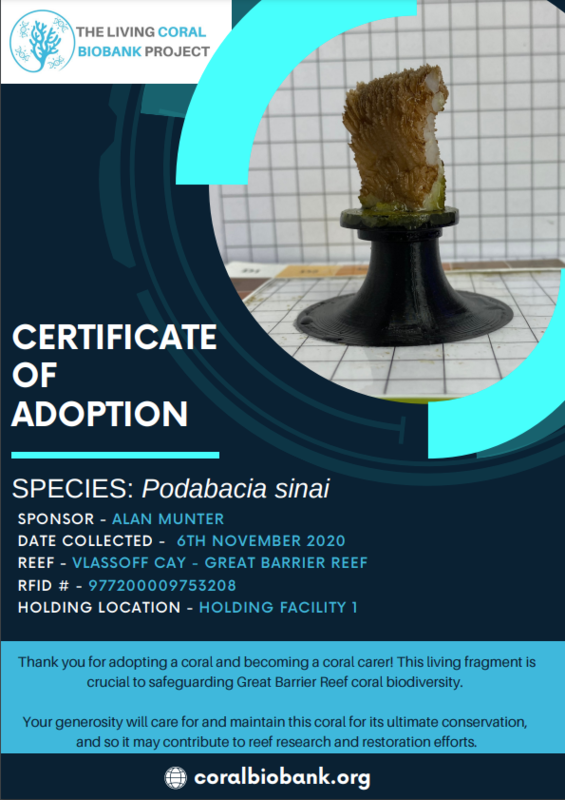
-
Alan's 180 Reef Tank (feedback welcome)
AlanM replied to Beefcake's topic in Dedicated Tank (Build) Forum
Instead of those two Durso's with skinny emergency pipes I'd do two "Herbie" style drain boxes. The skinny one in that scheme is the main drain which you run as a full siphon that ends underwater say halfway down the overflow box. You put a gate valve on it just before it enters the sump and use that valve to tune how fast the water leaves. Even if the skinny one is only 3/4" you'd be surprised how much water will go through it when it's in a siphon mode, and it's quiet because there is no air. The wider one is an "open channel" which is kind of your Durso, but it gets very little water through it during routine operations. It gets set to the normal height of water in the overflow box and you want water to just barely trickle down the side of it. So little that it's silent (once it slimes up). It's safe because if the skinny one ever clogs the wider one will absolutely handle the water flow because it's bigger and has no valve. Once the level rises it will convert to a siphon as well and will flush the box. -
As we heard today from Dr Miller, one of the best ways to support the Living Coral Biobank run by the Great Barrier Reef Legacy organization is to adopt a coral frag. They keep a tremendous amount of data on their coral frags and say that they'll share that data with you for "your" coral frag. Reliable monthly automatic contributions is the bread and butter of funding any non-profit. It's even better than public funds which come and go with differing priorities of whoever is in charge. Monthly contributions let a non-profit make long term plans because they know they'll have money to carry them out. The frag adoption page is here: https://coralbiobank.org/adopt-a-coral if you're interested and able. They also have a page to register interest in hosting a coral frag in your home aquarium at some point in the future when they have scaled up to that point. To register interest go to https://coralbiobank.org/ and scroll all the way down to click on the "Register Your Interest" button.
-
Now live in Coral Magazine: https://www.reef2rainforest.com/2022/08/01/wamas-donates-20k-to-the-living-coral-biobank-project/
-
Nice. I keep kind of looking at the UNS tanks for a peninsula next to my desk. I'm an experienced tank driller at this point, but it will still be stressful. I don't think I have the patience for lily pipes, but yours look really great.
-
Did the CPVC pipe arrangement that gets included with the PAR meter these days work ok? It's my attempt to make it convenient for people to hold it steady where they need it.
-
Hah, actually it popped up on Zillow Gone Wild today, and it was so laser targeted at our kind of crazy that I felt like folks here would appreciate it. Is that a sand shark / ray touch tank in the basement or some kind of inside koi pond?
-
Anyone moving to Michigan in the near future? If you are, and you want a house full of huge and odd saltwater tanks this might be the house for you. The pics are pretty amazing. I'd like to meet the reefer that lived here. https://www.zillow.com/homedetails/11957-Canterbury-Dr-Sterling-Heights-MI-48312/83614660_zpid/ I can't even figure out some of these tanks. Could this really be a half-inside/half-outside cylinder tank? It must have cost a fortune. Amazing.
-
Facebook guy comes back to fix it. Job done!

-
monkiboy's 450g display + 250g fish room
AlanM replied to monkiboy's topic in Dedicated Tank (Build) Forum
I love that the line of 5 bulkheads next to the filter mat roller is not permanently attached. It's a great idea to keep things contained and clean while allowing for easy maintenance. -
It's great that whatever was messing with the LPS is behind you. I'm also looking forward to more pics.
-
monkiboy's 450g display + 250g fish room
AlanM replied to monkiboy's topic in Dedicated Tank (Build) Forum
Those guys must find little chips everywhere when they go home. -
Do you have the ability to measure the diameter of the power cords? If so, I can measure the channel in the larger size 80/20 we have at work to see if maybe the cord would fit. Then you could route them in the channel that wasn't being used for mounting and make a nice box of black anodized 80/20 that might fit it fine.
-
More likely that the BTA is hiding under a rock somewhere, I'd think. If you can look behind things maybe check that out? They can get surprisingly small when they're feeling stealthy.