


.png.b54251de094ebf561cf26d6af243697a.png)
AlanM
-
Posts
7,156 -
Joined
-
Last visited
Content Type
Profiles
Forums
Gallery
Events
Store
Everything posted by AlanM
-
I really do think he did a really nice job, just not one that I would have chosen, heh. For user interface I meant something with buttons you might expect to push or need to look at to see a display. On his panel I'd keep his toggle switches (which are just inputs to the Apex breakout box, I think), the battery voltage display, and the iPad accessible and put everything else inside a box, including the EB832 all modules and the Vortech controllers. He has a way to access the box anyway with those flip hinges if he ever wanted to unplug or replace something. He doesn't need to look at his fancy Neptune-stickered extension cords each day, lol. He's controlling the vortechs with the Apex, and if that fails he will have bigger problems than needing to get immediate access to change his vortech modes. I suppose seeing the vortech lets you see the color and therefore what mode it's in as verification, though. Maybe that could be accomplished with a light pipe. Also, I guess I'd have the tablet on the outside of the door rather than on the inside, or maybe have it in a slot that charges it and lets you pick it up and remove it to see the status if I wasn't keeping it permanently on and facing out showing the status at a glance. Actually, on the side of the hood would be better. Is he planning to sit criss-cross on the floor to use that iPad?
-
It's cool, but I believe it's really unnecessary to have anything that doesn't have a user interface exposed out the door. Do you really need to make custom holes for all of the modules, the battery backup, and the EB8, for instance? How much controller porn do you really need on a daily basis? I feel he would be better served by putting all of that stuff in a watertight box with watertight grommets going into it for the cords and holes in the front of it for the things with buttons or displays.
-
Looks great!
-
I'm playing with the placement and orientation of it. I may eke out a few more PAR, but I think it will be totally sufficient for how I plan to use it. I did an 80 percent water change today, mostly as practice. In the process I discovered that there's a little slot really low down in the overflow chamber that keeps the water level the same height in the filtration part as in the tank. No wonder it doesn't do any surface skimming. I think inTank sells a little plug for those AIO slots. I'll see if that would work or else I'll squirt a small amount of superglue gel on it next time I have it empty. I also want to reduce how low those slots go. I know inTank sells things that do that too, but I may just try to use a piece of plastic to do it.
-
Sounds great. I'll go in on it with you if you're willing whenever you're ready. I don't think you have to wait any cycle time with your system to put in an order. The live rock comes with the bacteria on it already. 8) It's still wise to wait a bit before adding livestock, though, even if you went with fully live rock and sand just to get used to running the system and how you'll do water changes and things like that. Get used to moving buckets for a while before committing to life in it.
-
Yes, Rob Gunnett gave me a sweater box filled with old sand and muck from his decade old system that he was taking down at the time. I just stuck it in my sump and ignored it for the most part. I attribute a huge part of the success of my 75 gallon tank to that box of stuff. It's a point of view that Paulb preaches on here, but I do believe starting a system with all dry is tough and the more diversity you can get in there the better. Even pests seem to kind of go in cycles. tpallas, for my pico I would love some real, from the ocean, rubble, sand. I don't have opinions on the places you mentioned. I always wanted to start a tank from Tampa Bay Saltwater, but Richard doesn't seem to be in business during COVID. Those companies have minimums which I wouldn't meet from my pico, but if you do decide to order sand and rock I'd pay you in advance for the ability to come with a small bucket of new saltwater to get some broken up chunks and/or sand if you wanted to add a few pounds to your order.
-
i always wondered if purple pvc primer would work and look good and be safe on dry rocks. The solvent is very highly volatile, so I'm sure it wouldn't stick around, and whatever the pigment is, it seems to stain clothes very effectively, from my experience.
-
I have an old T5 retrofit reflector in good condition. I wonder if I could carefully flatten it and make a cone template out of paper that I could carefully cut out and bend around into a cone. The lens assembly on the bottom of the A80 has two little screws that I could probably use to attach it. The lens opening on the A80 is 42mm, or 1-5/8". I'd also have to do the angle calculations to figure out what angle to make the cone to avoid launching light all over the walls in an even wider spread from it! Or I could just decide to live with it. 8)
-
Thanks for the info. Mostly I was curious about the diameter of the hole in the narrow reflector to see if it would fit well over the LED hole in the A80 without losing too much light which would defeat the purpose. I'm also interested in the outer diameter of the piece to decide if it would defeat the natural cooling fins on the A80. Footprint is very small over my pico. 10"x10" After posting this I asked the guys at saltwateraquarium.com if they had one if they could see if it stuck to the A80. I assumed the magnets would be in the reflector, not the light, but they said that it doesn't stick, so you're right about it not sticking. I suppose I could use foam double-sided tape or I could try to design a clip and get it printed. I'd totally use the normal Kessil mounting arm with the full angle adapter to put the light much closer to the lid, but I couldn't find any diagrams of how it would work. The arm doesn't say that it supports the A80. How does that ball joint go into the mount arm and still attach to the flange on the back of the A80? It didn't look like the adapter could go up to 90 degrees to let the A80 sit horizontally. Do you have a sketch or something of how it would work?
-
Does anyone have a Kessil A360x with the narrow reflector that could do some quick measurements? I'm using a Kessil A80 over my pico and the light kind of spills all over the walls. With the gooseneck I can't get it down closer to the water, and I don't think the normal Kessil mount arm works with the A80. I wonder if the A360x reflector would just pop on to the A80 since both lights are the same shape and the mount is magnetic anyway. It would get more light into the tank and would reduce spill, maybe. Anyone got one to measure?
-
The water cleared up, and I think it looks nice. My rock arrangement is growing on me. I'm doing ghost feeding to start the cycle. It'll be a couple of months before I put life in it unless I score a bunch of pest free rubble from someone's established system to fill up the back chambers. I probably won't run the light too much during the cycling period. All it can do is grow algae from the ammonia, nitrite, nitrate during the cycle and I'd rather handle that with water changes. The Kessil A80 is about 7 inches over the water. It's only a 15W light. On full brightness it gives 140 PAR on the top rock and 100 PAR on the sand bed. It drops about 5 PAR when the glass lid is on it. I think that's plenty for zoas and even some LPS, but might not keep good color on most SPS which I know I'll be tempted to put in there. The air/water interface makes a massive difference on PAR. With the sensor 1mm below the water surface I get 160 PAR. If it breaks the surface I get 250 PAR. Amazing. The spin stream made a quiet gear noise for the first few days, but now it's totally silent since some slime has had a chance to build up.
.thumb.jpg.02f3ae7bcf443093464447bc783e99d2.jpg)
-
I like that reverse durso. I bet once you have the skimmer going you're not going to hear it at all. If you want to convert to a herbie at some point the 3/4" will probably handle it depending on how much you're pushing in with your return pump. Schedule 40 3/4" PVC has an interior diameter of .804 inches, cross sectional area of 0.5 square inches. Assuming you have around 48 inches from the water level in your sump to the height of the water in your overflow box with a full siphon (Bernoulli's law) you'll have water moving down it at Sqrt(2*g*48) where g=386 inches/sec/sec or 192 inches per second. Since your pipe is 0.5 square inches you can get a maximum of 96 cubic inches per second or a maximum of 1433 gallons per hour. This assumes you have 48 inches of pipe height, but that's just a guess. You'll get less than that because of wall friction and fittings. Not sure how much less with those barbed fittings, but they do narrow the cross sectional area a bit. It's probably fine because you'd be putting a valve at the bottom of the herbie anyway and 1400gph seems extreme for 100g total water volume. As you know, one big advantage of herbie is that it's quiet. Other advantage is that you have that emergency drain as a safety.
-
I mean, I won't deny that I do know the dimension of that little table and I've looked online to see what kind of aquariums would fit nicely on it filling it up...
-
I was thinking three to start, but I'm sure I'll have to rehome them soon. 8)
-
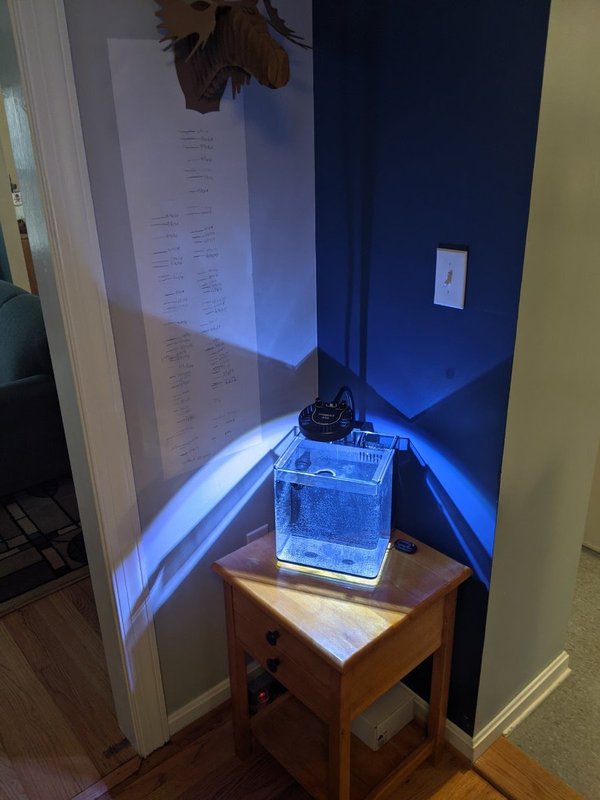
The controls are in the drawer so no cords are out except for the one plug in.
.jpg.d4261839cf8011e369eb194370fc5c5c.jpg)
-
Salt water, fiji pink sand, and Caribsea Fragzone rocks. The tank is so small that I just glued some of their frag holder rocks together with superglue gel into a cave pile. I think it looks pretty good for what it is. I'm not sold on this rock yet, though. I'll visit some LFS and see if I can pick through their cycled rock to find a good piece that I can carve up into a nice shape. One good rock to hold zoas and ricordia maybe. It's cloudy at the moment from sand and new saltwater. It'll clear up eventually. Now the wait begins, heh.
.jpg.ce36ff2082c2e7f3a372e9dbb18dfba7.jpg)
-
Found it: This one has two pipes going up. It's possible that just putting a media bag on the end would quiet it too. One other possibility is that your barb fittings to flexible hose are causing turbulence which makes the bubbles noisier by making the flow less laminar. It looks like they're moving around in there quite a bit. could you use spaflex and PVC external couplers instead? https://www.lowes.com/pd/EZ-FLO-1-in-Inner-Diameter-x-1-ft-PVC-Spa-Flex-Hose/1000365071
-
it may quiet once you get some slime in it, but it may be just the air in the lines causing a lot of turbulence and bubbles at the bottom. If you plug the hole partially with a finger or some tape does it move faster? Eventually as it gets small enough it will turn into a siphon and then will flush the box, so maybe if you made the hole big enough to put a small valve in it to make it tunable? Rob Gunnett (zygote2k) advocated using a "Drain box" at the bottom of a Durso drain to avoid the noise and salt spray caused by having a drain full of air bubbles. It's essentially an acrylic box with three sides and a top, but no bottom. The top has a hole drilled to the outer diameter of your drain line so it pressure fits in. The fourth side of the box just goes loosely against the sump wall. The idea is that the bubbles pop in that drain box and the noise and spray is held in, but the water can go freely out the bottom. It isn't air tight, so the bubbles don't build up in it. I'll try to find a picture of it. I had one on a tank in an elementary school and it made a huge difference.
-
It's wet! I just have RO water in it for now. It's so small. It's 9"W x 6.5"D x 9"H. It's small enough that if I go on vacation I can just bring it with me in the car. 8) I put the Sicce Syncra Nano in there as a return pump and put an Innovative Marine Spin Stream on the exit nozzle. It slowly turns and makes a full rotation in about 30 seconds. The pump says it puts out 110gph, and it's about the minimum that would make the spin stream work. I had to move the spin stream around to make sure I really got all the bubbles out before it would go. It has a 10W Sicce Jolly heater, and an Inkbird temperature controller. The light is a Kessil A80. I just have it plugged in right now, but will install a Kessil wired light controller to run it. It kind of floods the area with light, so I may look around to see if anyone is 3D printing shrouds for it to try to keep the shadows in.
-
Yes, by hand. It has a glass top that fits over the entire top of the tank with a small gap along the sides and back so I don't expect too much evaporation. Plastic clips on the side hold it up inside the rimless tank. It's a cruddy picture, but you can see it here:
.jpg.fc5946afb098498121768eb856e59749.jpg)
-
Tank 2 arrive intact! This one wasn't packed in any external box, just a shipping label slapped on the aquarium box. I think that's probably better because UPS knew what it was and that they couldn't toss it around. Lights and everything else are incoming from saltwateraquarium.com. I ended up ordering a Kessil A80.
-
This tank, sump, stand, lights, everything are such a pleasure to watch. It's so satisfying to see someone doing it right and not cutting any corners. The rock structure looks great. Lots of negative space for corals to fill.
-
Here's what comes with it for filtration/plumbing. It also comes with a glass lid and a light that would work for just fish, but not for corals. The filtration is a sponge, some large grain carbon under that mesh pictured, and some sintered glass beads bacteria media, common in freshwater filters. It's not a bad setup. There are slots in the first chamber for the beads and carbon to slide into. The sponge goes in the second slot, the return goes in the third. I'll probably just put some floss and thermometer in the first slot and a heater in the second.
.jpg.acdbbe8d5c8118e8b1d2b679e8d612e9.jpg)
-
It comes with a 40gph tiny pump and some tubing and a nozzle, so fully plumbed.
-
Yep. It happens. They're sending another one. UPS again. This one goes in the trash. If the second one comes broken I'll just ask for a refund and go get one from the store locally. I'm surprised at how thick the glass is on this little tank.
.thumb.png.40db71e145957fbc22a7d873e5f3065b.png)
.jpg.20426094d2225a3a714f212b24aba95f.jpg)
