treesprite
-
Posts
10,605 -
Joined
-
Last visited
Content Type
Profiles
Forums
Gallery
Events
Store
Everything posted by treesprite
-
BTW, when I tested with the pump which I just turned off a few minutes ago, there was no leaking from that joint, but there was a leak in a joint that I thought was well fitted and glued (I have an empty 10g on the floor behind the tank, so no water on the floor). I guess I will have to re-do that joint too.
-
It isn't a standard lease arrangement. I don't want to cause any worries for the owner, and I don't want to cause a disaster as I'm really afraid I would do. I need to construct something not ugly to keep the cat from going behind the tank, so maybe I can incorporate a light holder somehow. When I took down my 50, I found very obvious evidence that a cat was peeing in the sump, which explains most of what was going on with that tank. This 75 is about 18" from the wall.
-
It is a horizontal pipe on one side of a SCWD, on the SCWD end (the other side is a horizontal elbow). It isn't on my main pump, it's a mini CL with a non-drilled intake (a pipe with a couple hundred holes in it, painted black). I just have to stick a plug in the return to turn it off, then cut/splice the pipe, but have to go to the hardware store for the connector and the adapter that I ruined. I'm just too tired from spending the last 4 days just working on switching tanks (in my PJs the whole time, haven't gone out, got dehydrated and forgot to eat most of the time... you know how this hobby can be). I tested it out with the pump I need to sell. (FYI, I have my main return on a Sea Swirl, so I needed to use my return holes for something. It is actually a convenient situation, because I wanted flow down low in the tank and can't do that with an open loop return.)
-
I think the owner wouldn't really want me to try hanging from the ceiling, certain enough that I ended up not actually asking her. I also am afraid I'll drop the fixture on the tank, because that is how my luck is.
-
Looking for opinions about my conclusion. The PVC cement set the pipe and fittings together before I could push the pipe all the way into the fitting and twist it (it's 3/4" pipe). The pipe is in the fitting maybe a half inch. I imagine it is never going to separate, and I used enough cement that it was dripping off, but still I am worried about a leak because of the short connection without the twist. I put silicone around it, thinking any leak is going to be minor enough that the silicone will stop it. Do you think I'm underestimating Murphy, or that this will be okay? The pipe was already hard plumbed on the other end, so replacing the entire thing is impossible and cut-and-splice is a big pita in such a tight spot (location and plumbing-wise).
-
Thank you to all who serve and protect.
-
The only thing I've ever put in the ceiling is some tiny screws for a fake bird that flies around the room for the cats to chase. That application didn't require anything really going in the drywall. For the light fixture, would I just use those spring anchor things that open on the opposite side?
-
Think I’m going to stick the LPS for a while.
treesprite replied to John-Solo's topic in General Discussion
Consider the air in the room the tank is in. There might be things getting the into the water that are harder on sensitive sps corals than other types. Even what comes through the HVAC vents could pollute tank water enough to harm corals. -
Think I’m going to stick the LPS for a while.
treesprite replied to John-Solo's topic in General Discussion
It's always better to hear someone say they will stick to (whatever easier livestock) for a while rather than see someone post all their stuff for sale. -
I can't put holes in the ceiling due to renting. The fixture does have hanging wires on it already.
-
I need to make some kind of holder for my light fixture. It is a t5 Tek light with 8 bulbs. Any ideas? I am still debating whether to make a hood for the tank, not sure I want to do it.
-
Paint color for wall behind a tank
treesprite replied to SixtyFeetUnder's topic in General Discussion
An apartment I moved out of about 9 years ago, had some damage to the drywall behind the tank, which I attribute to the cheap flat paint used there. Still, I was able to fix it myself well enough that I heard nothing about it after I moved. Salt eats right through 35 layers of cheap flat paint on drywall. Since that apartment, I have always put something behind the tank to protect the wall. -
Congratulations! Don't let the tank take too much time from your growing family!
-
Usually the same for me, but when I drilled holes recently for an external overflow box, the bit kept wandering which led me to use a template when I did the holes in the tank. I was going to help someone else practice drilling, but I didn't because I am inclined to believe the wandering had something to do with the bits themselves. I never experienced bad wandering like that, and I've done a lot of drilling over the years. The bits I used were part of a new but cheap set off off eBay. I wonder if the particle sizes in the diamond coating are different/more or less consistent in size depending on quality of the bit (would inconsistency in particle size cause the bit to move irregularly at times). Something I do when the shape/size of the tank will allow it, is to drill from the inside of the tank. I put a wood board down under the glass, covered by a towel and then paper towels. There are less vibrations, I can drill while sitting on the floor, and any water that escapes the putty dam either stays inside the tank (if a rimmed tank) or gets soaked by the towels. I do have to be careful about drilling into the towels, and so far have never had a problem. The sound of the drilling changes as the cutting gets deeper, so you should really pay attention to the sound.
-
Use some kind of template when you drill, to help you stay on the correct spot and to prevent the drill bit from wandering off the initial groove. Drilling isn't difficult, but your hand and arm might get tired.
-
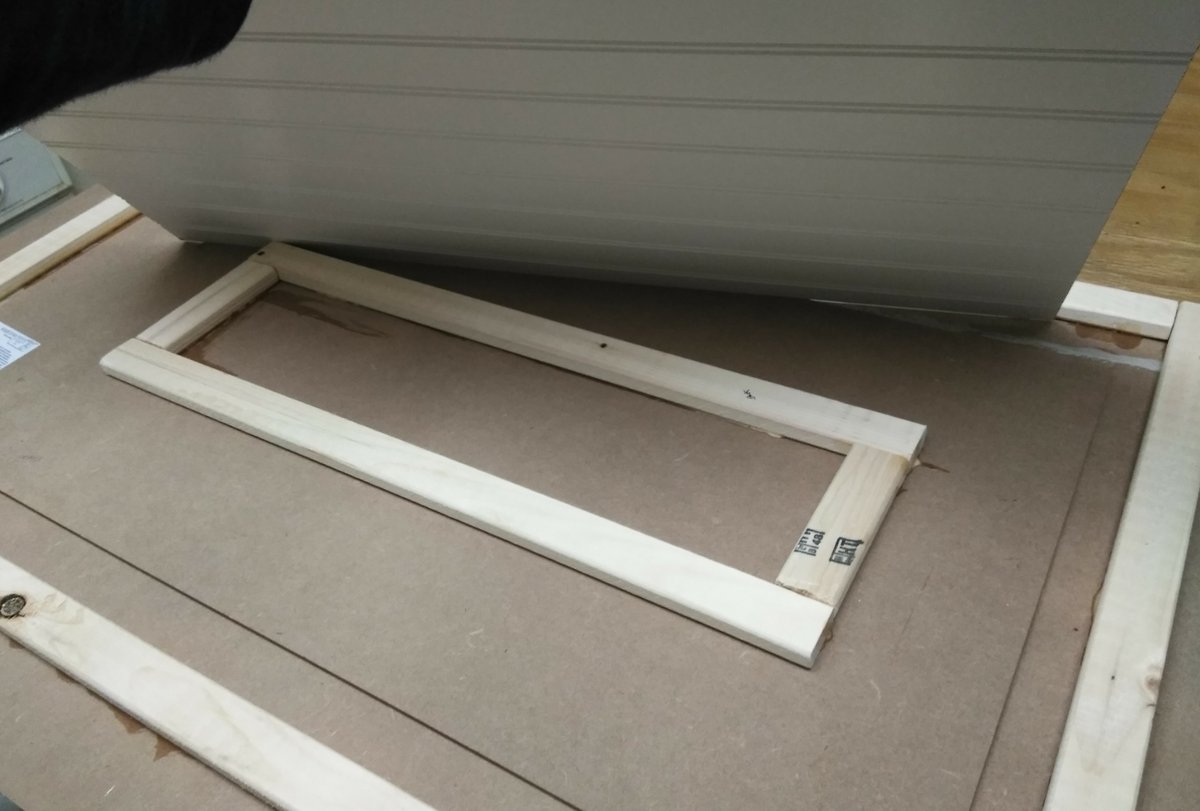
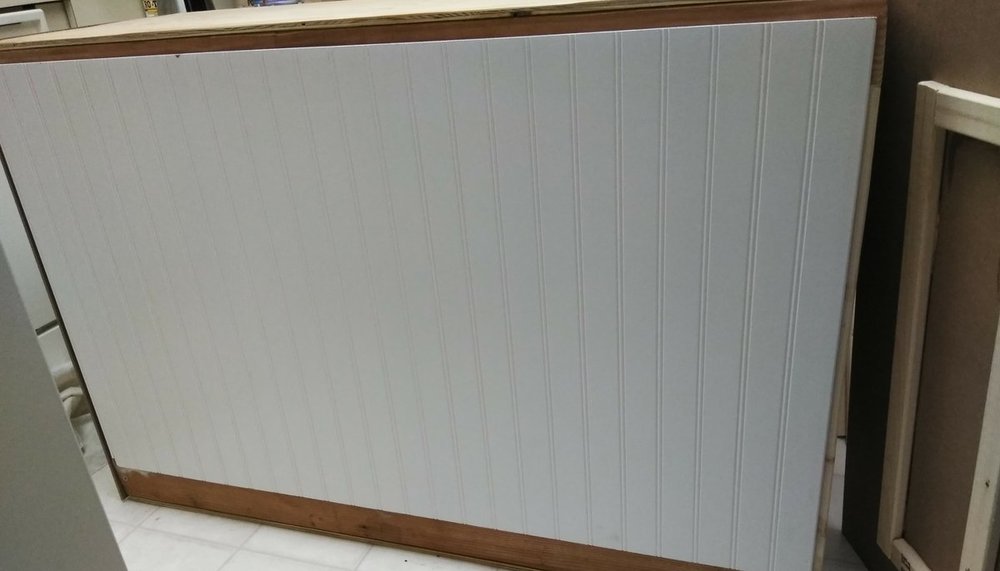
Pics of the panels. Still have to waterproof and paint. I'll paint with same dusky blue color I used on the other stands I have (2 are pre-made ones that needed re-painting, and the third one is something I put together from scraps to have a place for electrical stuff that would also fit my 12g Aquapod on top).

-
I decided to make removable panels instead of an attached skin. I put frames of 1x2s on the backsides of Wainscot panels to make them fit nicely snug into the stand front and the stand ends, but I forgot to allow for the thickness of paint, so I may find myself having to sand down some edges. After that is done, I'll get some moulding trims. Those things are rediculously expensive, so if anyone has suggestions regarding the mouldings, please share them. The paneling is MDF, so I know I can't miss any spots when doing my waterproofing and painting. I can't do anymore work on the stand until probably Friday, because there is just too much else going on.
-
This is good stuff to hear, thanks. I'm worried some bunch of people will post that I have to ultra fine sand like I did when I used stain and polyurethane. I was already almost done with the medium grade before posting. The color of the wood is lighter just after medium grade, so it was definitely needed even if just to remove warehouse dirt.
-
I really hate sanding. My question is, how much do I really need to sand the bare stand if I am: 1. using paint not stain; and 2. covering the stand with stuff that doesn't require sanding?
-
Nice. I wonder how those would work out on carpet.
-
I took the thing out on the cement and am now very relieved. I was getting height variations as big as a quarter of an inch depending on where and which way the stand was turned on floor, and wouldn't get the same measurement every time. Out on the cement, the only issue is with one end that is 1/16th of an inch taller than front, back, and other end. A big problem is that I can't work with electric tools out on the patio because of the lady who lives behind me. I will have to mark the floor inside and measure the high end from there, then just sand down 1/16" from whatever that amount is, making sure the stand doesn't move out of the marks.
-
Any thoughts on the slanting of long OF boxes?
treesprite replied to treesprite's topic in General Discussion
What I am imagining is something that still has a flat bottom, but has a slight angle that is not as drastic as the slant of a typical "inbox". -
As the title says, I'm wondering what people think about the slanting of the front walls of long overflow boxes rather than having the standard perfectly vertical front walls. I'm wondering if it would reduce waterfall effect and if there would be any other benefits depending on the degree of the slant.
-
I did some calling around. Quotes ranged from $78 to over $100. That is for the main piece, base piece, and a piece for above the OF to keep critters out, 1/4" glass. I'm seriously not going to spend that much money to do a DIY overflow. The last two me I did it, the glass total was only like $40 and that is the place that quoted the lowest. I really like the idea of there being a slight slant to the overflow like the inbox has to it, though the inbox slant is more than I would want. I'd like to see more conversation about slanting of long OF boxes.
-
Frozen food or pellet trained Mandarin?
treesprite replied to John-Solo's topic in General Discussion
I'm not getting a Mandarin until I have a guarantee that it will eat regular fish food. I really want one, but won't take the risk. However, ocellated dragonets, other than not being bright colors, are super cute in pairs and are much easier to get eating regular tank food. I'm going to get a trio of them after I've had the 75 running for a few months.