

scott711
-
Posts
3,223 -
Joined
-
Last visited
Content Type
Profiles
Forums
Gallery
Events
Store
Everything posted by scott711
-
Power outage solutions: generator versus solar + battery
scott711 replied to roni's topic in General Discussion
One thing to note about solar city is that you have to buy the panels (loan or cash) in order to claim any tax credits. If you lease the panels from them, you can't claim the tax credits. I have solar panels from solar city. The electricity I generate goes back to the grid and I get a credit from Pepco for whatever I produce. I can't store it for use at night or on a cloudy day unless I get the powerwall. Before my tank, my electric bill was often negative. My panels have produced 712 Kwh year to date. Last year they produced 5,200 Kwh. The panels have been on the roof since Nov 2014 and total energy produced ~17,100 kwh. ~5 kwh/year. right now at 10:35am they are producing 3,400 watts @ a savings of $0.51/hour -
very cool Tom. I have contemplated buying a 3d printer, just not sure how much I would make with it.
-
Here is a link that compares the difference between them: https://www.neptunesystems.com/downloads/sales/models%20comparison.pdf
-
Have you read this? http://blog.coralvue.com/icecap-3k-gyre-pump-assembly-installation-operation/
-
very nice acans
-
Ok, now you are geaking out on me. I will take your word for it that all it is is an solid state optoisolator. Yes, I just got some more because I wanted to add more to my setup and put them in different places. They are less prone to failure than the regular float switches. Yes, they can be submerged (that is how my existing one is). When I was testing it, i was using my android phone through the webpage, so it wasn't an instant change. I would imagine if you use the actual app on an iphone it might be a lot quicker. I have my old ipad that I am going to try with the actual app and see how fast it changes state.
-
I cut the terminal off the optical sensor and replaced it with a male 3.5 mm connector. I posted the info here: http://wamas.org/forums/topic/84756-apex-users/
-
do you have the module for the gyre to connect it to the apex?
-
Mine is attached to an FMM (I changed the title of the post and edited it). I don't believe they will work with the breakout box because they have more than 2 wires.
-
Tom, They seamed to be sealed pretty well. So far I have not had any issues. The one I am using is in my top off container so it isn't exposed to saltwater. You could always add heat shrink tubing or epoxy/silicone to the end (there were a number of people who did that in my research). I also haven't put too much stress on the cable. There is some give in the cable. I made my own magnetic mount and so far so good. In Neptune documentation, they discusses the proper orientation of the optical switches. Mounting them in the vertical position(sensor pointed down) posses an issue when the water level drops below the sensor and clings to the sensor which could cause a false reading. It was recommended to mount them horizontal or vertical (sensor pointed up) to avoid any water remaining on the sensor. I haven't tested this to see if it actually is true or not, but I figured Neptune would have more resources to test this hypothesis. They way I have it mounted (sideways), I have not witnessed any issues. With your 3d printer you could make a magnet mount and encase the magnet (I would recommend 2 magnets to keep it from rotating). If I had a 3d printer, I would make one myself. Plenty of designs on thing universe or instructables. I just googled optical water level sensors and found lots of different places (ebay, amazon, etc) that have them. I obviously can't say for sure, but I also have a couple Apex ones and they are appear identical. I have never had an issue with salt creep collecting on them. I bought a bunch of components to make more, just haven't had time to make them.
-
Thanks for your hard work with this Tom.
-
The bonsai rock formation on the left I bought from a member here. The other structures I made myself with dry rock and mortar. The sand is actually epoxied to the bottom and the rock is set into it which will keep detritus from settling under neath of it. There is a thin layer of loose sand on top for burrowing fish.
-
wipe with fresh water until you get all the salt off. Dry, repeat. Make sure the carpet AND the padding are dry. You don't want mold to grow.
-
Graham and I have been talking for some time. It started when I was trying to create a DIY version of the KH monitor. I was doing a lot of research trying to figure out the components and to see if they use PH to calculate alkalinity or color change. Then figuring out the stepper motors and programming them. Then I got to trying to figure out what the reagent was after discovering how easy it is to test for Alkalinity. Chemistry is definitely not my cup of tea, but calculating Alkalinity is not rocket science. It is more complicated than this, but you need an strong acid (HCL or H2SO4(sulfuric acid), a water sample, and a lab grade PH probe. Add the acid slowly to the sample until you reach a PH of 4.2. Then calculate the amount of acid you used to bring the sample down to that point, run another calculation and you have your alkalinity. Salifert uses the color change method which adds a I have read that some people have used generic muriatic, but as Graham pointed out you don't want to dump unknown stuff into your tank.
-
Tom, You are correct. It needs to be a 4 pin connector. I was just doing a quick search and posted the wrong piece. In all the threads I have seen they have used 4 pin connectors. The FMM from the looks of it is probably just a solenoid and a DC24 input and power supply input. The power supply input lets you power up to 36W 24V DC piece of equipment. The optical sensors range in price, it just depends on how long you want to wait. I have seen some for as low as $2.30/sensor.
-
We need to walk before we can run, so with the new apex controller as well as the old there are a bunch of commands that one should understand. Let me point out I am not a programmer. I copied most of this information from Neptune's site: Here is a link to all of the neptune documentation: https://www.neptunesystems.com/support/docs/ Here is some of the more useful/common commands that one should be familiar with: Fallback statement: https://forum.neptunesystems.com/showthread.php?8510-All-About-FALLBACK How to incorporate 'AND' in your programminghttps://forum.neptunesystems.com/showthread.php?7057-How-to-incorporate-AND-in-your-programming Virtual Outlets: https://forum.neptunesystems.com/showthread.php?57-Virtual-Outlets Defer and Min Time statementshttps://forum.neptunesystems.com/showthread.php?52-Defer-and-Min-Time-statements
-
Somehow I missed your post. I sure can. There are not too many parts. You need an optical sensor: https://www.ebay.com/itm/Optical-Infrared-Water-Liquid-Level-Sensor-Liquid-Water-Level-Control-Switch-5V-/142236835583 you also need a male 3.5 mm connector. This goes into the FMM. Something like this: https://www.amazon.com/3-5mm-Stereo-Male-Plastic-Connector/dp/B000I94EV4 Then you need to wire the optical sensor into the male connector with the proper pinout. Here is the pinout of the neptune optical sensor: Pin one (closest to base of plug) Red Pin two Green Pin three Black Pin four White The generic optical sensors will probably have different colors on them, but generally Green is the Blue wire, and the Black is the Yellow Then once you have the optical sensor with the 3.5mm connector you are all set. Then you can insert it into the FMM. It will be new so it won't be visible until you unlock the tiles. The new sensor should be in the unused tile section. Then you can start coding. I ordered a bunch of optical sensors and connectors to build a few for other things I want to do. If there are any other questions, ask away.
-
yeap, the fan plugs into it and cycles the fan on and off.
-
FRP is what I used. Just make sure you glue it down well. It also gets really heavy when you put glue on it. I took a huge spill when I was hanging it from a ladder. dehumidifier- get a really good one. Look for large capacity ~70 pints/day. Some have built in pumps if you want to pump it to a drain. Others you just have to dump it. I have a sink near mine, so I just dump it. Window unit dehumidifier are not very good. Humidistat and extractor fan- here is a link Extractor fan: https://www.amazon.com/gp/product/B00M04B4EU/ref=oh_aui_detailpage_o07_s01?ie=UTF8&psc=1 Humidistat: https://www.amazon.com/gp/product/B01FQKXRXA/ref=oh_aui_detailpage_o07_s02?ie=UTF8&psc=1 I have a window in my garage that I installed the fan. The fan has a damper that helps minimize heat loss. It hasn't gotten below 50 degrees in my garage. Humidity is kept in the 50-55% range with no problems.
-
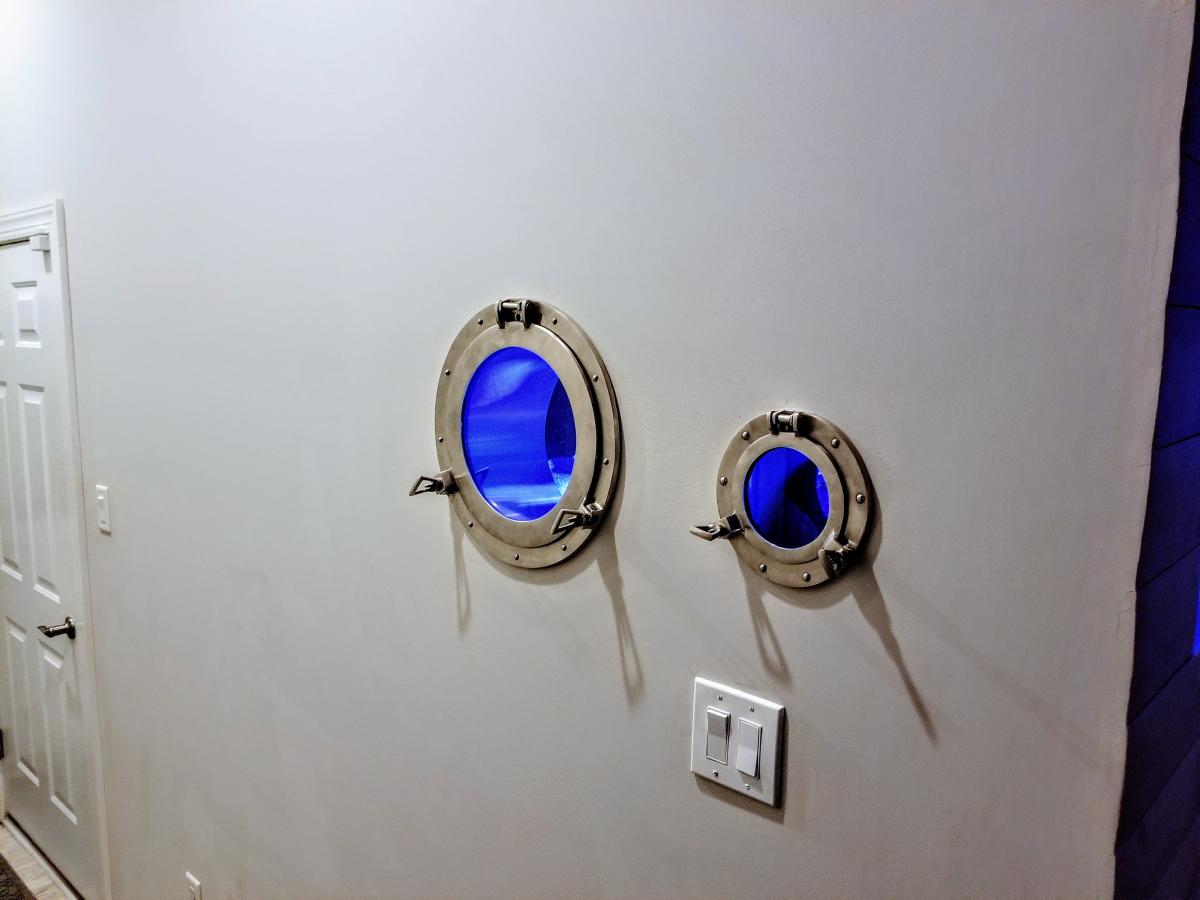
I thought I had taken more pictures. Here is a shot of my portholes.
-
I did a lot of research and planning for my tank build. If you look at my tank build, my tank sits in a corner of my garage. I covered all the walls near the tank with the plastic wall board. I had the benefit of having a 60 amp circuit in my garage that I repurposed. I installed a sub panel and ran new electrical and plugs around the area. Each set of outlets is on its own circuit in the sub panel and of course each outlet is gfci. Proper ventilation is key. I have a dehumidifier and an extractor fan tied to a humidistat. It keeps the garage around 50-55%. If you have any questions, let me know.
-
APEX DOS Tracking volume of large containers for AWC with no DDR
scott711 replied to rioreef's topic in Controllers
Ha ha. It just takes some reverse engineering and a little elbow grease. Making everything semi automated makes things so much easier. -
APEX DOS Tracking volume of large containers for AWC with no DDR
scott711 replied to rioreef's topic in Controllers
very cool Chris! -
Yes, you can manually add measurements and track them in Apex fusion. I do the same with Alk. It charts it, gives you a max/min/avg.
-
If I understand your question, you are asking if you get that type of program and "add" it to Alexa or do you have to code it? In very high level terms you have to do both. You start with building an Alexa "skill". Once you create that you have to do the coding so Alexa can communicate and interpret the Apex Fusion API.