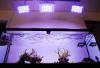
chucelli December 22, 2009 Share December 22, 2009 After the first prototype was built and testing completed, I set out to build a few more. I realized that the first build was over-engineered in the cooling department and only half of the original heatsink was needed, so I designed the Gen2 with that in mind. The advantage is that the pendent is half the size of the original while putting out identical output. Here are some pics of the second build... I did not have a free hand, so it was difficult for me to document as well as I wanted.. but it does show how much work is involved with prepping the heatsink (my least favorite part). Cutting main stock to size: completed cut: jagged edges to be finished: a template was created to facilitate the building of multiple units: drilling the 72 holes needed to mount LEDs for each unit. Mount holes complete: polishing surface for better LED/heatsink mating: fan mounts are cut and refinished: mounting begins: mounting complete and soldering begins: finished and hung on rails over display: The orginal prototype on the left and the Gen2 on the right: I mounted all pendents on wheels so they can be moved if needed: another FTS... All exposures were lowered to prevent washout, hence the seemingly dark surroundings: These have been over the display for almost two weeks now. I have read from most on RC using Cree emitters that it seems to put out more light than expected. I think my PAR readings reinforce that. As such, I am slowly acclimating the display to these lights with very short cycles. All three pendents overlap no more than ≈3 hours a day, and they are staggered so that there is light on the display for 11.5 hours a day. So far, all corals seem to be responding favorably with new tips, and in the case of the plating montis, more folds are developing, and surface is becoming more textured. As far as costs are concerned, I find it a moot point when you consider the costs of MH bulb replacement. In my case, I replace bulbs every six months as I find that output decreases dramatically by then and spectrum changes. I notice because my corals almost stop growing. At 3x250, that's at least $210 per year. Nevermind the shock the corals have to go through each time I change bulbs. Temperature: My display used to increase anywhere for 2-4˚F during the day when the halides are on, causing unavoidable temp fluctuations. Now, there is no fluctuation. AT ALL. Frankly, I don't understand the apprehension with LED technology. It is here and ready now. Costs are not higher than a comparable MH system when considered over 3 years (fixture/ballast and bulb replacement costs) less if you are using HQI pendents, as they tend to be more expensive. Environmental impacts: In addition to using only a fraction of the energy of any other reef lighting available to us, these emitters have a projected lifetime of 11 years running around 12 hours a day before light output decreases to 70% of original output. They contain no toxic materials, unlike florescents and MH, which contain mercury and other toxic materials. I encourage anyone with the means to try this. You will be pleasantly surprised. Also, I want to add that these pictures really don't capture the quality of light these LEDs output. It has to be seen in person! -Robert Link to comment Share on other sites More sharing options...
ctenophore December 22, 2009 Share December 22, 2009 Looks great, Robert I am still considering using them too, but I am thinking of retrofitting my main display tank first rather than the other stuff we talked about. I am due for MH bulb replacements in a few months, so if I go the LED route I would probably go with a combination of a few of these units you're making combined with some PAR38 spotlights. I already have the rail in place so swapping out lumenarcs for LEDs would be pretty easy. Link to comment Share on other sites More sharing options...
chucelli December 22, 2009 Author Share December 22, 2009 Justin, you are close by, let me know if you want to stop by to check out these units in action! I would love to check out your coral farm sometime... -Robert Link to comment Share on other sites More sharing options...
Boret December 22, 2009 Share December 22, 2009 Great job!!! Thank you so much for sharing. I am with you on all the advantages of LED over MH. I ran some numbers and this is what I came up with: If you go MH. $100 for Ballast, $125 for a good Reflector and $85 for the Light Bulb if you get a Radium. That's $305 initial investment plus yearly bulb cost ($60 to $85) and 10 hours of 400W consumption of electricity. The electricity would be 400W x 10hrs x 30days = 120 kWhr @ $0.157/kWhr in NoVA comes up to about $19 per month or $228 per year. So your year expenses would be about $300 to run a single 400W MH. Add to that the Chiller. If you get a 1/4 HP and only have to lower the temp 10 degrees you are looking at 600 Watts and about 800 if lowering 20. My guess is that the chiller would run about 30% of the time during the day depending on how hot do you keep you house in the winter and about 80% of the time in the summer. So 600 Watts for 8 hours per day for 8 months and 800 Watts for 18 hrs per day for 4 months. That's $23 per month in cool months and $68 in hot months. You are looking at $184 for Autumn, Winter and Spring and $272 for summer. For a total of $456 per year. You are looking at $756 per year to run a single 400 MH and a 1/4HP chiller and $305 initial investment. In my case I have to add 4 x 75W VHOs that run for about 3 hrs/day. That comes to about $5/mo and $60/yr. Plus $100 to replace bulbs. So I look at about $916 per year to keep my tank lit up and cool. Do you have Watt consumption numbers for the LEDs? What is it, 3watts each? Let's say 3.5Watts to account for about 85% efficiency. It's probably better but lets be conservative here. If I can get away with about 120 LEDs (100 whites and 20 blues) that's $20/mo or $240 year. I save $676 the first year alone! 120 LEDs would cost roughly $1,000 to $1,200. Without selling my current equipment I can pay for it in 2 years. Link to comment Share on other sites More sharing options...
ctenophore December 22, 2009 Share December 22, 2009 I think what's also being overlooked is the concept that the entire tank needs to be evenly lit. In my case, if I went LED, I would use a few of Robert's broader fixtures to hit the general area of my pillars, then the little 23w spots to focus on my large colonies. That way, PAR is concentrated on the corals that need it, while the rest get by with the spillover and what my T5s put out. I think you could argue even more savings as less LED watts and fewer bulbs needed to cover even a large display tank. It definitely makes sense, I will probably move my MH lumenarcs out to the greenhouse for supplemental light duty (where a nice even spread is desireable/necessary) and upgrade the DT to LEDs. Now I just need to come up with the cash Link to comment Share on other sites More sharing options...
El Camaron December 22, 2009 Share December 22, 2009 WOW Robert, Nate told me he went to see it and it really does look sweet. Link to comment Share on other sites More sharing options...
jason the filter freak December 22, 2009 Share December 22, 2009 funk -astic I love the way that looks Link to comment Share on other sites More sharing options...
luceneck December 22, 2009 Share December 22, 2009 I love that last pic! So what tank footprint does your 4 x 6 array cover? Link to comment Share on other sites More sharing options...
rainbowfish December 22, 2009 Share December 22, 2009 +1, I saw it as well, really looks great! WOW Robert, Nate told me he went to see it and it really does look sweet. Link to comment Share on other sites More sharing options...
chucelli December 23, 2009 Author Share December 23, 2009 Thanks guys.. Luceneck, same coverage as first unit. As you can see, the actual LED arrangement is almost identical. The heatsink is smaller. Jack, this is the Gen2 unit, what you saw was the Gen1 first prototype. It was twice the size! -R Link to comment Share on other sites More sharing options...
lanman December 23, 2009 Share December 23, 2009 Looking good! Is that the height you intend to leave them suspended at? Looks like 4' above the tank! Can you vary the color at all? Or is it pretty much 'set'? What does the color look like? 14K phoenix? 20K? 10K? bob Link to comment Share on other sites More sharing options...
Origami December 23, 2009 Share December 23, 2009 Beautiful work, Robert. How about a parts list, distribution sources, and current component cost for your implementation? Link to comment Share on other sites More sharing options...
chucelli December 23, 2009 Author Share December 23, 2009 here you go.. copy pasted from my RC thread: This project was a culmination of 3 months (weekends) experimentation with different parts and combinations. The most recent units were built with materials I bought in bulk months ago. I don't have time to search through the various invoices to gather part numbers. I can however, give you a list of vendors from which I acquired parts. The following is a list of items needed to build this unit: -Heatsink: Heatsinkusa.com The size I used for the latest build was ≈6" X 8.5", with fins running on the longside. I purchased some 17" stock and cut them down to size. -Aluminum flat bar used for fan mount and connectors: HomeDepot -0.25 inch Self tapping stainless screws (sizing is something like 3/38 thread) This was a major source of headache for me, because I had originally found some screws at a local hardware store which worked beautifully, but could not figure out the correct scale measurements. It would have been nice if everything was metric. -Nylon washers for "M2" screw MCMaster.com I also purchased the aluminum channel from them. -Cree Royal Blue and Q4 cool white LEDs -Meanwell non-dimmable drivers LEDsupply Rapidled Both of which I've had good experiences. As far as pricing is concerned, I think it they are about the same. However, I like how Rapidled sells packages now which contain almost everything you need to complete an array. -cooling fans These are just case fans from Newegg.com. 80mm fans for the Gen2 build, 120mm for the original prototype. -DB9 connectors male/female Radio Shack. I know there are cheaper places online, I just haven't gotten around to finding them yet... -wires for LED I used a 24 gauge solid copper wire roll I had from a previous project. I think it was purchased from RadioShack. tip on that: the wire shielding needs to be strong, as fishing the wires in and out and around the heatsink can cause problems with the jacket if you're not careful or are not using quality wires. That's it! I think I've spent more time experimenting than actual building. But all the experience gained from trial and error definitely makes the actual build much easier. -Robert Link to comment Share on other sites More sharing options...
chucelli December 23, 2009 Author Share December 23, 2009 BTW, as far as I can tell, the only component which is an addition or different than builds found on nanoreef, and RC, is the use of the DB9 connector. I have to look for a cheaper supplier online, as RadioShack is a bit expensive. Here are some actinic pics I took when only the center blues were on: side shot with center actinic on only. exposure was short to preserve clarity. It is much brighter in reality. top down actinic No post processing was made. The reds/pinks are really that. -Robert Link to comment Share on other sites More sharing options...
jaesun December 23, 2009 Share December 23, 2009 (edited) Nice build! I also second LEDSupply. They're in the US, so it's quick shipping. I used standard shipping and got my items in about 2-3 days. Their customer service is also top-notch. I started my project weeks after I ordered my dimmable buckpuck drivers, and I had no problems getting new ones when they died. (It's a common problem with buckpucks, but I think I had a short somewhere in my circuit which caused my problems.) I doubt that you'll get the same service if you ordered from DealExtreme, which ships out of Hong Kong. I believe that it took about 3 weeks to get my order shipped to Maryland. There's also a noticeable difference aesthetically in the soldering on the starboards and the LEDs from LEDSupply and DealExtreme, but I haven't noticed any performance issues. If I had to do it again, I wouldn't bother with the really cheap stuff coming from Hong Kong and China. Saving a few bucks isn't worth it. I have a small fan on my heatsink and added a permanent thermometer on it. I've noticed that the heatsink never goes above 100F in the summer and stays about 90F in the winter. With an open design, the LEDs stay well below 150F, which is the recommended upper temp. Edited December 23, 2009 by jaesun Link to comment Share on other sites More sharing options...
chucelli December 23, 2009 Author Share December 23, 2009 I don't use buckpucks, but I know you can avoid an extra power supply for the fans, since you can run it off the same power supply that runs the LEDs. I am using Meanwells. While they are reliable, I have to use a dedicated power supply for the fans. This makes wiring kind of a pain... -R Link to comment Share on other sites More sharing options...
chucelli January 11, 2010 Author Share January 11, 2010 (edited) Some updates on coral color: Here is a small brown acro colony I got from David (coralhind) a while ago. It has always been dark brown, until now: small frag in the center (developed tips within the past week): same brown acro species mounted on frag tiles (i did not frag these, my hippo did) : 1st and 2nd from left: The 1st greenish one has lived close to the center bottom of the display for about 3 weeks. The 2nd from left has been mounted and placed in same location for about a week. Mother colony: still largely dark brown (in low light area), but seems to have developed more colorful tips: purple acro center right also lightening (same coral far left of pic in lower light area): another FTS from couple days ago: -Robert Edited January 11, 2010 by chucelli Link to comment Share on other sites More sharing options...
George January 11, 2010 Share January 11, 2010 Just saw this thread, Robert, absolutely fantastic! I bought one of the Solaris fixtures several years ago and I absolutely adore it. The power savings, absence of heat, and effects are worth every penny. However the savings over MH goes beyond the cost of chillers and bulb replacements, etc. I was able to have my tank at 79 degrees and my ambient temperature in the house at 78 degrees with my Solaris. Before, it was a fight to keep temps below 81 and I had my HVAC at 73-74 to keep up ambient temp. The reduction in evaporation also lessens the burden on cooling as well which lowers your power bill further in addition to prolonging the life of the system. Any chance you'd be interested in doing some custom work? Link to comment Share on other sites More sharing options...
davidm January 12, 2010 Share January 12, 2010 gotta agree, it looks great and made me think about changing. I hope you don't mind some questions - How far apart are the LED's spaced? Did you consider the heat-conducting silver glue they sell - it would save a lot of drilling and effort, but obviously would add cost? did you use any of the reflectors paired for each LED or just use the LED by itself? thanks, David Link to comment Share on other sites More sharing options...
steveoutlaw January 12, 2010 Share January 12, 2010 Robert - Looks great. So what is the cost of the Gen2 pendant? I have a 2x2 cube that these would be a nice addition to. Thanks. Link to comment Share on other sites More sharing options...
Sharkey18 January 12, 2010 Share January 12, 2010 I second George. I have a 54 bow front corner tank that needs a lighting upgrade.... Can I place an order? Laura Link to comment Share on other sites More sharing options...
chucelli January 13, 2010 Author Share January 13, 2010 George, I don't have much time to build these for people as is, so I can't commit to any custom work outside of the templates and tooling required to make these Gen2 pendents. However, I am interested in what you may have in mind. PM me and we can discuss further. davidm, The LED spacing is 1.5" from emitter center to center. I never considered using the "glue" you speak of. It would have actually saved me much time and money if I had used the "glue". Instead, I chose to mount all LEDs with stainless steel screws so that they may be removed in the future for upgrades or repair. Also, mounting with screws allows me to use high quality thermal paste, which is a much better heat conductor than the "glue". That "glue" you are referring to, is actually a thermal epoxy. Once cured, it is very difficult to remove. It is also not the best heat conductor. I'm not sure I completely understand your last question, but hopefully, this will answer that question... All LEDs on my pendents have secondary optics which gather and focus light. Different angle optics can be used to suit individual needs, ie. mount hight, light intensity, etc... Different optic combinations can also be used to further customize light quality, including color (for a more white or more blue appearance). Pendents can also be run without optics for more traditional light output at the expense of intensity and reach. I would not recommend running without optics, since much light is wasted when run without optics. Steve and Laura, prices for these pendents were posted in the "for sale" section as requested by the moderators a while ago. I'm not sure where that thread is now, but you guys can PM me if you are interested. Thanks, -Robert Link to comment Share on other sites More sharing options...
chucelli January 13, 2010 Author Share January 13, 2010 (edited) For anyone with technical questions, or any other questions, including total cost of materials, technical specs, please visit: http://www.reefaddicts.com/ This is Marc Levenson's new site (Jan2010), which features articles and other useful information for reefers. There is an article on my LED pendent currently on the front page. It contains most relevant information discussed in this and other threads, including the first prototype build and some test documentation. Thanks, -Robert Edited January 13, 2010 by chucelli Link to comment Share on other sites More sharing options...
moga January 13, 2010 Share January 13, 2010 For anyone with technical questions, or any other questions, including total cost of materials, technical specs, please visit:http://www.reefaddicts.com/ This is Marc Levenson's new site (Jan2010), which features articles and other useful information for reefers. There is an article on my LED pendent currently on the front page. It contains most relevant information discussed in this and other threads, including the first prototype build and some test documentation. Thanks, -Robert wow this is great..one of amazing innovative DYI lighting i saw..wow.. I want to have small LED lighting system for 7 gallon.tank.~ Link to comment Share on other sites More sharing options...
fry_school101 January 13, 2010 Share January 13, 2010 How much are the fans doing to cool it? Have you tried running it with only the heatsink? Link to comment Share on other sites More sharing options...

Recommended Posts
Create an account or sign in to comment
You need to be a member in order to leave a comment
Create an account
Sign up for a new account in our community. It's easy!
Register a new accountSign in
Already have an account? Sign in here.
Sign In Now