


Reefoholic
-
Posts
1,206 -
Joined
-
Last visited
Content Type
Profiles
Forums
Gallery
Events
Store
Everything posted by Reefoholic
-
 UPDATE Finally I could hook everything up and start the water flowing. I had to tweak the plumbing some and still fixing some things with the skimmer - I found out the muffler was leaking in air since the silicone on the seals got warped over time. I took that apart and glued it back together. Questions: 1) Since I am curing the BRS DRY rock, I expect the cycle to be longer. Having said that this morning the water is still very cloudy. I have carbon in the sump and a filter sock. It has been around 7 hours since those were placed in the Sump. Anything else I need to do? 2) Should I have the lights on or off when cycling. I read many conflicting things online regarding cycling the tank with or without the lights on. Some people say that having them on will early start he algae bloom cycle so that you can get rid of the algae early in the game. Some people think that algae due to the lights being on will compete with the bacteria for nutrients and it could prolong the cycle time overall. 3) Do I need to do water changes while cycling since I am also curing live rocks? 4) There are way too many micro bubbles in the return dump of water. I am not sure if the skimmer is sitting too deep in water or I need to give it time to break in. Any ideas, comments, stories from past experiences are greatly appreciated! Thanks! Sent from my iPhone using Tapatalk
 -
WOW WOW WOW This is such an amazing build thread, I am so impressed! DUDE, well done!
-
manual removal would also help. hopefully it won't get that bad. i had to pull them out every now and then for a while. It might also be that your tank is maturing. good husbandry is the key. it will sort itself out. Sadly, no fish or crab worked for me before. they could not have been less interested
-
Our aquaforest cube
Reefoholic replied to GraffitiSpotCorals's topic in Dedicated Tank (Build) Forum
Great info and pics! Thanks for sharing! Welcome to the club and eagerly waiting for more pics. -
Welcome! I like AVAST Marine Works skimmers. They are very efficient, small footprint in the tank and made in the USA. Also, they are one of our sponsors at WAMAS. Also, I like building my equipment myself so a perfect match for me.
-
Thanks bud! I am all for water flow and hiding places. I think this setup is going to be fish lite and coral rich. I moved the powerhead halfway down the side of the tank, and it is kind of pushed to the back for better flow. Since this is a bare-bottom tank, I can easily achieve a good water flow under the rocks. Still gotta make a boat load of water... ugh
-
UPDATE Pluming is done. Received my BRS order and setup the rocks in the tank. Have been making water; so far only 10 gal in total produced Any ideas how I should cycle the tank? Blue lights or no lights? Sent from my iPhone using Tapatalk
-
Last night was very productive BIRTHDAY night. What better way to spend one's birthday than setting up a fish tank? (hehe) I changed the filters on my RODI unit (a huge shout-out to Air Water and Ice - they are awesome!) The RKL is now setup and affixed to the stand. I will still need to upgrade the version and rename the channels. BTW, I cannot find my temp or salinity probe. I strongly think that they got lost during the move. I will need to buy those. If anyone is looking to get rid of theirs, pls let me know ATO setup - Complete Protein Skimmer - Complete. New pinwheel arrived yesterday (a huge shout-out to AVAST). The skimmer is setup and peacefully sitting in the sump. I ran a tube from the air intake and affixed that to the stand too. In the past, the air tube has gotten water in it which results in a high pitched weird noise. Hopefully, the new setup will prevent that from happening. Return Pump - 80% Complete - I still need to put together the pipes. Pics to come...
-
BUMP
-
Polyshades worked great for me! No bubbles what so ever! However, I sanded all the surfaces and cleaned them before I put on the paint. The shade you see in the picture is after 4 coats of paint over a week. It certainly tested my patience. I used the royal walnut shade. It gives a nice old feeling to the ordinary 2x4s. Burlap was an excellent choice for the doors since I could really stretch it to fit properly and it adheres to the rough surface somehow. Also, i could use nail pins with no trouble on the plywood. I agree that it is also easy enough to paint over OR change it out if it gets old and/or dirty. All in all, I am very content with the results. We have a mid century modern design in the living room so the colors and the texture with burlap fits in quite nice. Let me know what you decide to do with your build. I will be more than happy to help out with ideas and questions.
-
Stand is complete minus minor tweaks like attaching the power strips and the reekkeeper lite. Here are some pictures. I installed magnet strips on the doors and on the cabinet frame to hold the doors closed. Sent from my iPhone using Tapatalk
-
Looking for advice on the below. BRS Dry Rock - Pukani or Reef Saver? Red Sea Reef Mature Pro Kit - Thinking of this to kick start the tank cycling, anyone has experience with this product? Thanks in advance.
-
Check out my stand build. I used support beams across the top to evenly distribute the weight. I think one of the first things to decide is how big or how small you would go. Then you could easily build something that could accommodate all those stands. 2x4 is pretty sturdy. it doesn't bend too easy; however if you are really concerned about weight and want to account for a wide range of tanks, then I suggest having the stand built from metal not wood.
-
The plywood frame that I made for the SUMP door is too heavy for the magnets to carry. I am thinking of improvising something from burlap. I might end up making cabinet doors covered in burlap. Any ideas? I could also cover the burlap with paint. Check this one out below. He made the doors with burlap in the middle and covered the burlap with gold-leaf.
-
Here is an update after this weekend. I enjoyed working outside on my porch (getting eaten by mosquitos most of the time) and finished most all the build. 1) Build the stand - DONE 2) Build the SUMP - I am planning on using a 20 gal. I will need to compartmentalize it with the acrylic sheets I got. DONE 3) Setup the SUMP - So far I cleaned the pumps. I am planning on soaking my PS in vinegar overnight and giving it a good clean. DONE 4) Setup plumbing - materials purchased, need the overflow box in place to start the build. 5) Build the canopy - This will be a very simple canopy since I am using 2 AI Primes (Prime and HD) and I love the way they look. DONE I am looking to tackle the plumbing and electrical wiring tonight. I am going to build a return with back syphon safety by turning it into a U in the Display tank. Should I paint the PVC pipes black? Anyone knows if coralline algae will grow on the PVC pipes? Will post pictures.
-
UPDATE SUMP build is complete. I will place the PS in the first chamber. Filter media and maybe some refugium things in the main chamber and finally the return pump in the last chamber. The doser pump will be placed on top of the second chamber where it will deposit Alk and Cal. Finally I am done with the canopy for the AI Primes. I love the fact that since it is a bare bottom tank, the light goes right down into the SUMP. Sent from my iPhone using Tapatalk
-
Added the 20 gal sump. It is sticking out in the back maybe 1/2 inch due to the support studs in the front but I think that's ok. Sent from my iPhone using Tapatalk
-
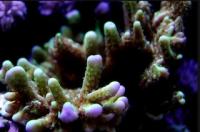
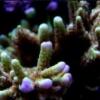
Great job with the rock work there! Those are lucky clown fishes! I would really like to see the monti's cover that board. Keep the pics coming please.
-
I changed the rock work and that totally threw off my Clownfish McBully and he stopped acting up. At that point, you would like to introduce the new fish (if that's the case). Because, only 1 week later, Mr. McBully established his territory again. Good luck!
-
I like that idea! Are there any bio-benefits to that? Should it be edge-to-edge? I am afraid that after the addition of the starboard, the pressure points might change and result in a crack underneath.
-
Dude, you read my mind! I am really trying to take this new setup slow and digest every step (unlike all my other builds which the tanks were up and running around 4am the next day. PLS DONT JUDGE, we have all been there, done that!) Here is my plan for the next months: 1) Build the stand - Almost done 2) Build the SUMP - I am planning on using a 20 gal. I will need to compartmentalize it with the acrylic sheets I got. 3) Setup the SUMP - So far I cleaned the pumps. I am planning on soaking my PS in vinegar overnight and giving it a good clean. 4) Setup plumbing - materials purchased, need the overflow box in place to start the build. 5) Build the canopy - This will be a very simple canopy since I am using 2 AI Primes (Prime and HD) and I love the way they look. 6) Design the LR and fasten together for stability 7) Make saltwater - LOTS AND LOTS 8) Setup the equipment, fill in the tank, etc. All above should be accomplished by September. ----- at this point, I would like to cycle the tank for at least 6 weeks ----- Somewhere around the 2nd week of October 9) Start adding Live Stock (fish first) 7) Start adding Soft Corals 8) Cycle for at least 8 weeks 9) Start adding SPS Ideas? Too long for a new setup?
-
Oh I see, do I need a refugium setup or could they be in the dark?
-
Have you seen a noticeable reduction in bio waste nutrients in your system? Also, it says it is reusable, how so if they turn into sand after some time? Also, how does one calculate the quantity needed? Given that I will have a 29 gal display and 20 gal SUMP, I will probably need something for about a total volume of 35 gal (give or take with the LR in the tank)
-
Great idea dude! I like that! I am varnishing it now. I need to put the second coat on to make it darker.