emissary December 31, 2005 December 31, 2005 I'm just beginning my plumbing at this juncture. I have a variety of PVC parts and am just doing what seems to make sense to me. So my mileage will vary If you haven't seen any of the pictures of progress so far, they all start here: http://reef.korff.org/pictures/Tank-In-WallProject I use the strainers as shown here: http://reef.korff.org/pictures/Tank-In-WallProject/100_3913 http://reef.korff.org/pictures/Tank-In-WallProject/100_3914 What I like about this is that it prevents critters from getting in and it's all black (or at least very dark) so it'll not be so obvious. Chip -- you mentioned something about these strainers being very restrictive: thus loud. Alternatives? That's a 1.5" mpt strainer. Also, this picture: http://reef.korff.org/pictures/Tank-In-WallProject/100_3921 Shows what the overflow contraption will look like. Haven't started plumbing it yet because I'm a bit concerned. Will probably use 45 degree elbows to get the pvc closer to the tank so I can secure it to the tank stand. My wife is extraordinarily eager to get the existing tanks out of their temporary location in the rec room.
emissary April 16, 2006 Author April 16, 2006 After much debacle with my current 180G tank, I expect to get a new tank in by the end of this month. In the meantime I had to move my 55G holding tank out of the way.. which meant moving the contents somewhere. For now, that somewhere is the sump! So, my sump is now set up and ready to go, complete with gate-valved fuge & auto-top-off by float valve. Inital sump drilling: http://reef.korff.org/pictures/Tank-In-WallProject/100_4204 Installing bulkheads & loc-line: http://reef.korff.org/pictures/Tank-In-WallProject/100_4210 Sump/fuge set up: http://reef.korff.org/pictures/Tank-In-WallProject/100_4255 Also complete is my 40G freshwater resevoir with ball valve: http://reef.korff.org/pictures/Tank-In-WallProject/100_3886
Guest alex wlazlak April 17, 2006 April 17, 2006 wow. any pictures of the main tank setup or what? is this the same thank that had the chip in it? BTW, its looking great!
Jon Lazar May 13, 2006 May 13, 2006 Congrats on your new tank arrival! Enjoy putting it all together, and take lots of pics.
emissary May 22, 2006 Author May 22, 2006 Tank is in the wall. Have started plumbing. Here are some pics from this weekend. And the pictures at the bottom of page 6: http://reef.korff.org/pictures/Tank-In-WallProject?page=6 And page 7: http://reef.korff.org/pictures/Tank-In-WallProject?page=7
emissary May 27, 2006 Author May 27, 2006 Ok, the plumbing for the overflows is basically done minus a few minor bits: Other details about the plumbing system are here: http://reef.korff.org/pictures/Tank-In-WallProject/100_4605 (same pic as above) http://reef.korff.org/pictures/Tank-In-WallProject/100_4607 (close-up of the complicated part) http://reef.korff.org/pictures/Tank-In-WallProject/100_4609 (the pieces that make up the system)
Sugar Magnolia May 27, 2006 May 27, 2006 Very nice job! That's going to be awesome once it's filled up.
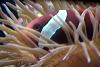
emissary May 29, 2006 Author May 29, 2006 The return is plumbed! MAG 12 goes straight up to a SCWD: Then the lines from the SCWD become loc-line jiggers and enter the tank. Finally, you may be interested in the fish's eye view.
emissary May 29, 2006 Author May 29, 2006 WHat diameter tubing did you use for the return? 3/4" all the way.
HowardofNOVA May 30, 2006 May 30, 2006 Yanek, Awesome pics and congrats on the new tank. Called the folks up, about $700 for what I wanted. Too much for my bloodline for now! Thanks! Hope to stop in and see the beast in action!
emissary June 3, 2006 Author June 3, 2006 Howard -- you're welcome any time of course. Just gimme a holler first to make sure I'm here. Today's work involved building out fuge #2 -- the over-tank fuge & stand. Stand is painted but paint is not dry yet.
emissary June 11, 2006 Author June 11, 2006 Some progress in recent weeks, got my various odd stands built & painted. The stand holding up the 10g fuge is painted, another stand built into the wall to hold light ballasts up & out of the way. Plus, I installed new lights over the fuges and decided to try to use some chaeto to calm the bubbles a bit.
emissary June 11, 2006 Author June 11, 2006 Wow, nice setup! Thanks, I've got your snail in my fuge. I need to add more rocks to my fuge soon, I think
emissary June 19, 2006 Author June 19, 2006 Got some snails from BRK last week -- the large nassarius kind. Those guys are AWESOME. My fuge sandbed (SEVEN inches) is regularly COVERED with ... diatoms? Cyano? (brownish/reddish coating) at the end of a photoperiod. By the next photoperiod, the sandbed is almost completely bare white. Yeah I know I do have to fix the water quailty, and I'm working on my mixing tank so I can start with the water changes. Anyway, here are some pics of the snails: http://reef.korff.org/pictures/Tank-In-WallProject/100_4868 http://reef.korff.org/pictures/Tank-In-WallProject/100_4871 And I found a leak on the wrong side of my float valve the other day. Turns out the little plastic gadget I was using around the 1/4" tubing was the wrong one (shrug) and I replaced it with another I had handy. In order to do that, I had to disconnect all my overflow plumbing, drain the sump a reasonable amount, and pull the sump out. Plumbing design decisions validated! As it turns out it was a breeze to do the disconnects and fix the problem. Took a little while to get water out of the sump and figure out what the problem was, but I was able to focus on that instead of re-doing any plumbing work. Reconnecting everything was a cinch too. I owe you one Chip -- you're the one who said "Whatever you do, use plenty of unions." Or something like that. So I did. Plumbing Disconnected. Plumbing in the utility sink. Sump drained a reasonable amount.
emissary June 22, 2006 Author June 22, 2006 Mixing tank done. http://reef.korff.org/pictures/Tank-In-WallProject/100_4934 I know, I'm slow Lumenarcs should be coming in shortly ... then I can build the lighting contraption.
emissary June 24, 2006 Author June 24, 2006 Thanks to BRK, I now have Lumenarc A3 minis! I've gotten them mounted, along with (thanks to BRK) wire hanger contraptions. Had it running tonight but took it down again so that I could have more over-tank freedom while I'm doing aquascaping. Pictures: Additional pictures (with flash): Same as above. Same set, with flash. Single Lumenarc A3 "Mini"


Recommended Posts
Create an account or sign in to comment
You need to be a member in order to leave a comment
Create an account
Sign up for a new account in our community. It's easy!
Register a new accountSign in
Already have an account? Sign in here.
Sign In Now