sheac12
-
Posts
375 -
Joined
-
Last visited
Content Type
Profiles
Forums
Gallery
Events
Store
Everything posted by sheac12
-
-
-
From the album: for sale
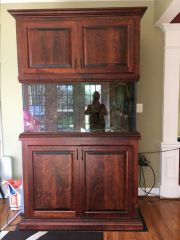
Current 120Gallon tank -
I ended up winning a 120 (4x2x2) gallon tank with two Kessil a350w tuna blues led lights, approximately 14" off the water line. I have never owned or used these light sources before and I am looking for suggestions on what I should set the two dials to. Before this I had the Radion xr30w on my old 180, which was dead simple and very well documented. My plan on stocking is a mixed reef, lps/sps, and an anemone.
-
I just want to say how helpful, responsive and customer focused the guys at AWI are. They emailed me to follow up on my recent order and took the time to explain what was needed. Thanks guys for making my re-entry to reefing even more enjoyable.
-
I hope you have very good sump water level control. I was running a EV-240 for many years with a mag 18. It was a PITA to keep it working correctly. I always had a ATO on my sump but constantly had to fiddle with it to get it to work properly. At one point i emailed aqua-c to get advice on how to properly maintain and adjust it. The customer service at Aqua-c is great, just didnt love the skimmer.
-
ice2cool why are you running t12? why not supplement with the UV leds? "you forgot to add with Halides.... " have them now, want to try something else.
-
Are you using all Royal blues or a mix of Royal and Blue? Thanks! Colin
-
Thanks for the input Rob. Any suggestion on the mix of Cool White and Warm/Neutral White? What about a general mix of blue to white leds? I am looking for a 12-15K look. Thanks! Colin
-
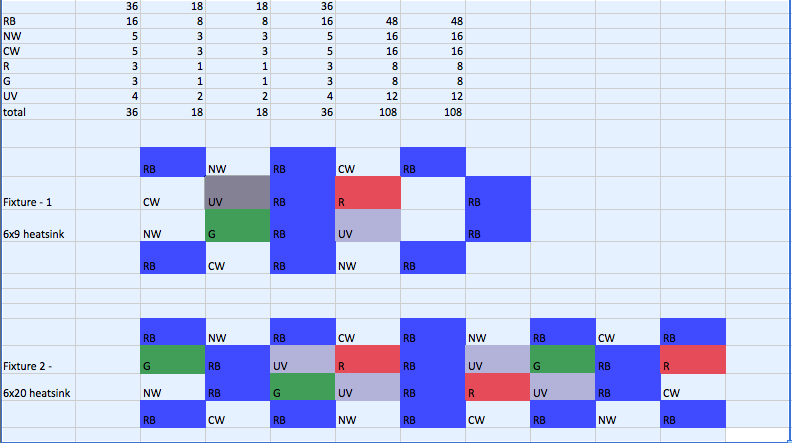
I have decided to move to LEDs for my system and I am looking for some advise on the choice of colors and number of LEDs. After reading the "discussions" on LEDs on reefcentral have come to the following conclusion, you need variety and you need to be able to swap out leds easily. My design is a little different due to the layout of the tanks hood. I have a center brace on the hood that stops me from using 3 equal sized fixtures. My design uses 108 LEDs 96 "normal" and 12 UV LEDs. The design uses two 6"x20" and two 6"x9" heat sinks. I have included the layout and number of leds below. Please provide me with feed back!

-
great question, never thought it about it but tagging along.
-
Hey Jason I can help you out. I am about 2.5 miles from you. I will shoot you a PM with my number. Colin
-
What do you use to scrape the sides of an acrylic tank
sheac12 replied to epleeds's topic in General Discussion
+1to credit cards. Metro cards work great! -
If they turn on for a sec and then off, that means there is a bad connection. My guess is the two that don't light up are connected to each other. If not then you really need to make sure you followed the wiring diagram correctly.
-
What is the difference between the red/green/brown seaweed?
sheac12 replied to MBVette's topic in General Discussion
Used google's preview -
What is the difference between the red/green/brown seaweed?
sheac12 replied to MBVette's topic in General Discussion
That is an excellent question. I feed all three to my tank and never thought about it before. With google's help I found this reef central post http://www.google.com/url?sa=t&rct=j&q=what%20is%20the%20difference%20between%20different%20colored%20seaweed&source=web&cd=5&ved=0CEUQFjAE&url=http%3A%2F%2Fwww.reefcentral.com%2Fforums%2Fshowthread.php%3Fp%3D9145994&ei=qCzrTtaCGMnm0QGpuNC7CQ&usg=AFQjCNE7cRCS7E1Qn9cVM_tu0MaBM1CHeA, sorry about the long link, rc is down at this time. Turns out each seaweed has different nuturional values...who would have thought! -
Funny, I found that exact same site. I have been looking into culturing my own copepods for my mandarin. The price of copepods in a bottle is crazy! After my tank crashed I have been attempting to restock my tank. My wife got me a mandarin for my birthday and now I need to make sure he is well feed. The first thing I started looking for was a way to make sure i could feed the copepods. I went ahead and have setup a, like melev's http://www.melevsreef.com/phytoplankton.html , for phytoplankton, so far so good. I just set up the 10 gal for the copepods, with the divider, and need to purchase some copepods for starting the culture. From everything I have read so far I am going to go for a mixture of copepods species for the best results.
-
ARRRRRRRRGH! Help me with my leds please
sheac12 replied to jason the filter freak's topic in General Discussion
Jason, If you are still having problems, I am not too far from you in, I am in Columbia too. If you still need help PM me and we can work out some time this week/weekend. Colin PS - be good to utilize the degree's in Electrical Engineering I can also help you out with the dimming utilizing the reef angle. -
Is it a bad idea to put a Mandarin in a tank with RBTA's?
sheac12 replied to dano's topic in General Discussion
I haven't had any problems with mine. My RBTA spilt and my mandarin stays far way from both of them. My emperor angle gives the mandarin more crap then anyone else in the tank. -
Who runs an ATS or Algae trough filter of some type?
sheac12 replied to bprinehart's topic in Do It Yourself
I am currently running a DIY algae scrubber on my 180. I have to say I do see a difference in my tank after about four weeks. The system uses a 6"x22" screen with light from both sides. The light is from 4, 2 on each side, 3K T5HO bulbs. I have tried driving the scrubber directly from the overflow and now from a mag 9. My design is based on the SM100, but modified. I use a 1" pipe instead of the 3/4", my lights are the same distance from the algae as the SM. My center container, water box as I call it, is completely removable for easier cleaning. Anyway all my design info and theory come from algaescrubber.net if you are interested I can send you my drawings and build instructions. I was going to post them in the DIY section, but have been too busy. -
My tunze's 7240 burnt out today and I took it apart to find that the transistors are fried. Unfortunately the markings on the middle transistor are melted off. Does anyone have a working or broken 7240? If so can someone PLEASE look at the package marking on the transistors so I can find the correct part? if you have a broken on i might just purchase it. Thanks, Colin
-
sheac12's finally building his 180
sheac12 replied to sheac12's topic in Dedicated Tank (Build) Forum
After dry fitting the hood, we took it down to finishskinning it. With my last tank, my wife -
sheac12's finally building his 180
sheac12 replied to sheac12's topic in Dedicated Tank (Build) Forum
Well it has been a long time since I updated this thread –whoops! I will add I had to take a two-month break from the tank dueto surgery. I had to have my gallbladder, appendix and a cyst removed from myintestines. I was out of work for six weeks and nothing good happened to thetank. Thanks to twinke for helping me while I was out recovering, without him I would have had to shut down the tank. Now back to the build process! The completed hood is 24" tall, which means it is as tall as the tank itself. Looking back I should have had Jeff build me a deeper tank! It is assembled in the same basic method as the base stand.There is a substructure, which is constructed with 3/8" by 1.5" popular thathas been sealed with multiple coats of shellac and held together with pocketjoints. I wanted the hood to mirror the look of the base stand. Dueto the overall height difference I needed to change the vertical dimensions ofthe cross pieces (the long horizontal pieces of wood that span the top andbottom of the front). I ended up cuttingthese down in thickness from 5.25" to 3.5". What I realize now, but didn't thenwas I needed to also order a thinner chair molding so that the exposed woodabove and below the molding would be symmetrical with the bottom. Photo of the face of the hood stained. No build process is complete without at least one revisionto the plans. My next one, after a mistake in build the base stand, was Iwanted the front of the hood to open up. I wanted the ability to open the hoodup and easily change the T5 blubs. This required a rework of the sub frame forthe hood to accommodate the hinges and a series of sliding rails on which thelights would sit and allow for complete removal from the stand. To accommodate the front structure, i.e. weight, of the hoodwhere the front skin attaches to the hinge, the hood needed heavy-duty support.This means the hood is tied into the top of the sub frame using five trianglesfor reinforcement. What we realized after building in these changes was thefront skin of the hood would not be structurally attached to the sides. Thisalso meant that the fluted columns on the side would be attached only to thefront skin. The fluted columns would have to pass over the side panels eachtime the hood was opened and closed. To stop the sub frame of the hood from rotting and fromscratching or sliding, where it meets with the tank, the frame is covered inplastic dip. With all the sub parts in a kind of order, the next step wastaking everything over to my house from twinke's (Kevin) garage. We started byassembling the base stand in place. I added a sheet of exterior gradeinsulation between the tank and the sub frame stand. After affixing the front, sides, and the corners all of theexposed edges where covered with cherry veneer for a more finished look. Once the veneer was in place and stained it was time toplace the tank and test fit the unassembled hood. No tank build is complete without at least one photo of the owner inside the tank. That Buddy with my helper looking at the the camera going, I don't know why he is in there or who he is.... Well that is all the update I have time for tonight. -
Next time instead of treating the whole tank consider using a hospital tank. In this case you would have moved just the sick fish. That way you don't have to one, waste a huge amount of medicine, and two, damage other creatures in the tank. Hospital tanks can be a pain in the arse, keeping the parameters in check sucks. However, there are going to be some medicines that while they claim are reef safe, are not and using might just kill off everything. Anyway thought I would add my 2 cents.
-
see now i didnt feel anything up here in Columbia, MD. I didn't even know until my wife called me!
-
you can check my build page for a picture of my tank. (sheac12 finally started is 180) The stand is my own custom build with twinkle. It is a custom cherry base stand and hood setup.