wade March 20, 2013 March 20, 2013 I've made the leap back into the hobby - its been about 6 years. I've ordered a 180, cabinet, and canopy. I will need to finish them and modify them slightly. I've also purchased a skimmer, ca reactor (avast!), and some other misc equipment. I found about 120lbs of dry base rock that I will use to construct structures for the tank. I ordered salt from another WAMAS vendor as well. Otherwise, this is a placeholder to update images and a to-do list as I go. Still to be ordered: -return pump (looking at watts consumed/gallon moved) - top runner actually appears to be an ampmaster 3500 -controller (still researching) -topoff system -araganite sand -live rock -cleanup crew -cooling fans/evac fans for stand have from previous setup: 2x 1" seaswirls (they still turn!) 2x 400W Jager heaters lots of misc powerheads/small pumps refractometer (2 actually) very old litermeter3 (fairly sure it works, but need tubing) ordered: 180 glass tank (6'x24"x25"high) stand canopy ca reactor regulator skimmer LED lights (3) water motion devices (2) salt new scraping magnet 50g sump I will be offering up my existing custom-built acrylic tank and stand for sale soon. The tank is 7'x30"x24"high - with a large overflow chamber. Stand is black powder coated steel, fully open. I also have an industrial looking 4x 400W halide hood (and the two monster ballasts) that I will sell. Pics to follow.
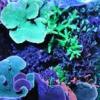
wade March 20, 2013 Author March 20, 2013 (edited) Oh. I should note... I will only be using frags or captively grown corals (in situ stuff is fine) to populate this tank. Here are some pictures from prior tanks (also started with frags): Edited March 20, 2013 by wade
YHSublime March 20, 2013 March 20, 2013 The 7th picture in (with the reflection on the top of the water) is gorgeous. Sorry, I don't know what type of SPS it is, it looks like what I've seen called "pink lemonade" or something like that. I'm going to get into the coral naming business.
wade March 20, 2013 Author March 20, 2013 Thanks. That table was a big coral...over about 5 years it had been trimmed back too many times to count and was still over a foot across with a base about 3.5" in diameter. I used to frag it with a hammer (no kidding). I probably shared that coral with more than 50 people in that time too. I used to keep it from growing too close to the water's surface by dropping the water level in the tank for a day at a time. I also had a corner full of Monti caps (in 4 different colors) that intertwined and from above looked amazing.
Steve175 March 29, 2013 March 29, 2013 Looking forward to the build. Have to ask: why the down size in tank size when you already have a larger tank and lighting?
wade April 1, 2013 Author April 1, 2013 Looking forward to the build. Have to ask: why the down size in tank size when you already have a larger tank and lighting? A couple of reasons, the primary reason that turned into the driver was that I needed a childproof stand to house the gear in. The existing tank was fully open and available and we have a new kid that will be running around in no time. After that, maintaining the acrylic is a hassle and I had to pull the existing tank down to buff it all anyway (it was an african tank for a few years). The new tank is going to be designed and addressed from the ground up so it will be exactly as I want it to be. I will be selling the old acrylic ~240g tank.
wade April 1, 2013 Author April 1, 2013 My biggest hangup right now is finding an electrician to run a new line for the tank. I need another 20A line run to support it.
wade April 4, 2013 Author April 4, 2013 (edited) Started staining the new stand today. Stained it a slight dark color in order to bring out the wood grain. Still needs 4 or so coats of poyurethane on the outside. Using spar varnish on the top, in case of water leakage (I mean, because there will be leakage). Got my G2 radions (3) and two mp40's this morning as well. Just need a return pump and I should have everything I need to start the tank moving. Getting live rock this weekend from ExoticReefCreations to start constructing structures and curing it out. Edited April 4, 2013 by wade
Jason Rhoads April 4, 2013 April 4, 2013 I am in awe at some of those pictures. Great work on growing out frags like that. I look forward to your progress!
howaboutme April 4, 2013 April 4, 2013 Very nice. I like the lip trim detail at the top edge. Question, will you be able to get that sump out if needed? Sent from my SCH-I405 using Tapatalk 2
wade April 4, 2013 Author April 4, 2013 Question, will you be able to get that sump out if needed? Yes, the door/panel on the left side is wide enough that the sump slides in and out through it without having to turn it or anything.
wade April 5, 2013 Author April 5, 2013 What species of wood is that? The grains look very good. Its red oak (the plywood is veneer) stained with MinWax Ipswitch Pine (plus a little hickory). It brings the grain out nicely without making the wood too dark. It will probably turn a bit more yellow after I finish putting polyurethane on it, but not a ton.
wade April 11, 2013 Author April 11, 2013 Update: Stand is nearly done - polyurethane'd the exterior. Spar varnished the inside and the top. Added an additional layer of gloss white to the inside of the stand as additional protection. The canopy is the same - stained and poly'd plus white inside. A little more and then caulking the inside corners and the stand and canopy will be done. Just need to figure out how to mount the ballasts and controllers inside the stand next. I am considering making a panel in the sidewall that can be lifted to access the controllers - vortechs, skimmer pump, and speedline dc-10k pump are all controllable (though I don't think I will need to mess with them much). I designed a static rail system for hanging my radions inside the hood (also cut vents into the top of the canopy) and will post pics very soon when I have it fully set up. Electrician is coming out this weekend to drop a line so everything isn't on a single circuit. Next up: aquascaping/rock design. Then its all about some muscle to get the tank into place in the house. Question for those in the know: Is there a way to make the speedwave dc-10k and my skimmer pump operate via a controller? I see the Apex (with module) can interact with the vortechs, but was wondering if it is possible to move those and their simple push button speed controls onto a real controller?
howaboutme April 11, 2013 April 11, 2013 I am considering making a panel in the sidewall that can be lifted to access the controllers - vortechs, skimmer pump, and speedline dc-10k pump are all controllable (though I don't think I will need to mess with them much). This person's build and idea for just what you're talking about is an inspiration for me in the future. Something like it may be suitable for you too. http://www.reefcentral.com/forums/showpost.php?p=21350156&postcount=65 Interesting..same red as monkiboy's build....
wade April 11, 2013 Author April 11, 2013 Very nice. That is along the lines of what I was considering. I was wondering if I could find an electrical box, paint it and seal any seams (no accidental water drip into where the controllers and strips are located) and mount it in the sidewall of the stand. Great to see others have done similar.
YHSublime April 11, 2013 April 11, 2013 This person's build and idea for just what you're talking about is an inspiration for me in the future. Something like it may be suitable for you too. http://www.reefcentr...56&postcount=65 Interesting..same red as monkiboy's build.... Love the way that looks, was looking into something similar myself!
wade April 13, 2013 Author April 13, 2013 Canopy details. Here is how I handled installing my 3 radions into my closed canopy. I used "C" channel aluminum that I picked up from Home Depot as rails. Cut to the length of the inside of the hood. I then drilled holes for the existing hardware (the hanging M5 bolts they come with) through the C channel with a felt pad between the lamp housing and the rail to dampen any potential vibration. Once I knew all 3 housings fit properly, I flipped the c channel over, drilled holes and then used 1" machine screws to mount the rails to the inside of the canopy. Once that was mounted, I flipped the canopy over and mounted the housings to the rails. From above (not visible to someone viewing the tank). Shows the crudely cut vent holes, that also provide access to the housings/controls on the lamps. Inside view: Front view:
dmatt56 April 15, 2013 April 15, 2013 Have you tasted the 3 led over the 180?? Are there any shaded spots?
wade April 15, 2013 Author April 15, 2013 I have not yet, but I've seen others configured this way. My tank actually has glass braces across the top just beside where the lights are that will cause some loss, but based on the measurements of spread, I'm sure it will provide enough. The Radion's have a 30"x30" spread at 2' of depth.
wade April 23, 2013 Author April 23, 2013 Some early rockwork from base rock... this one (not the best pic, but enough to show my intent) uses some old 'lace rock' that I had from a cichlid tank (its hardened/dense limestone) cemented to some of the highly porous Carib Sea base rock. I created a shelf that sticks out around 15" from a small pile of rock. The blue tape is the tank footprint so I can try to visualize how much space things will occupy.
sachabballi reef April 23, 2013 April 23, 2013 wow thats really different and interesting...definitely can't wait to see the rest! BTW I should have introduced myself at the meeting...you stood next to me at the door through out Todd's speech....so I am sorry! lol
wade April 23, 2013 Author April 23, 2013 Really going for an open floor look (lots of open sand space), but trying to maximize how much surface I have to put fuzzy sticks on. I also have some images taken by a friend of open reefs that I want to try to mimic with the proper placing of various growth forms. This is going to be a long-term project for sure! As to the introduction, no problem! I did note your name tag. I was rather distracted as I was meeting a couple of people and picking up salt, etc (hence the constant in and out).


Recommended Posts
Create an account or sign in to comment
You need to be a member in order to leave a comment
Create an account
Sign up for a new account in our community. It's easy!
Register a new accountSign in
Already have an account? Sign in here.
Sign In Now