


Aquariareview
-
Posts
803 -
Joined
-
Last visited
Content Type
Profiles
Forums
Gallery
Events
Store
Everything posted by Aquariareview
-
I have made over 5 tons of the stuff and there is more to making it right than you might think Here is a formula that has worked for me The mix: • Shredded Plastic 35% • Fine Aragonite Sand 20% • Crushed Oyster Shells or Coarse Aragonite 10% • Portland Cement 27% • NaCl 5% • Na2CO3 1% • Ice (volume ice/1 volume aggregate) (All percentages are by weight as volume percentages vary by aggregate type. Large deviations will definitely be possible) The amount of ice and its size are very important. If you use too much, it tends to make the mix get too wet when it melts and the desired porosity will not be achieved. Too much ice will also make the pieces very weak. The piece will be stronger if you increase the amount of cement mix compared to aggregate and ice, but I don't think it looks quite as good and also seems to take longer to colonize. If the ice is too small, it will not leave holes behind when it melts. If it is too big, there will locations of extreme weakness in your rock. For me, a range from say large BB's to marble size works well. I strongly suggest making very small test quantities until you find a procedure and formula that works for you. I followed this plan while trying to develop the technique. It really cuts down on waste and unwanted rocks. Mixing • Pre-crush the ice and leave in freezer • Pre-mix Portland cement, NaCl, and Na2CO3 and put in freezer • Pre-mix the aggregate ingredients in your cement mixing bucket and put in freezer(I have always kept every thing cooled before mixing to minimize melting during mixing but this may not be necessary. After all, I then add water to make the mix) • Add cement mixture to aggregate and mix while still dry • Add ice to mixture and begin mixing • Add water SLOWLY and mix between additions until you have a somewhat "dry" uniform paste/slurry.(It’s easy to over shoot, as the water you add also melts ice and you get more water than you expect.) • Form pieces in a bed of aragonite sand using shapes you find desirable and sprinkle with oyster shells Do not bury the freshly made rock as the weight will reduce the effect of the ice The curing Cure for at least two days (three is better) before moving the piece. These pieces do not approach their final strength very quickly. I have broken quite a few by losing patience. There is a lot of silicates( see below) that need to be cured out . 3 months in a kiddy pool with a water change every 3 days. Test the ph after 8 weeks, right after a water change and again in 48 hours. If it does not rise start salt water cure for 3 weeks. Then use Portland Cement - A mixture of calcium and aluminum silicates that will hydrate upon addition of water to form crystalline materials with high compressive strength (when properly cured). The major components of Portland cement types one and two are: • Tricalcium silicate - 3CaO.Si2O3 - about 55% • Dicalcium Silicate - 2CaOSi2O3 - about 25% • Tricalcium aluminate - 3CaOAl2O3- about 10% • Tretracalciumaluminoferrite - CaO.Al2O3.Fe2O3 * • Other inorganics - about 2% • Taken from a cement manufacturer's web site but the name given suggests there should be a four in front of the CaO in this formula. I believe type three to be a slight modification of the above compositions.
-
Another option is to go with a shrimp gobie and pistol shrimp. I have them in a nano cube and they are a lot of fun to watch
-
The basic as I got it from JB's study is this A good bulb for growth is a 10,000k MH (like the XM) A good bulb for color is the 20,000k MH (like the radium or xm)
-
I will post a new pic this week
-
I have done a JBJ nano for 8 months now check this out
-
Ben When you are ready I will donate you 3 small tanks
-
My wife just got back from Mall Of America (our credit cards will never be the same). All she brought me was this picture of a 12 ft moray that she took at the aquarium they have in the mall
-
Check out Roozens In FT wash MD They are the biggest in the region. They have 25,000 gals of saltwater tanks in a greenhouse. You have to buy carefuly as they ship a lot direct in from South Pacific and it may still be shocked from the trip, but the selection is without any peers in the region
-
There are some real good plans (for reactors and everything else ) in the diy section of this site. You can find them by going to the links sections then to the DIY page then to the Reactors section. Or you can hit this link Reactor plans
-
I have built a lot of small tanks and It is always cheaper to buy a pre-made tank. You cannot build a tank the size of the nano cube for less than the jbj tank cost. Pro's and cons Pro's for building 1. you get to have the fun of building what you want 2. you can put in what you want in lighting and filtration Cons for building 1. The nano is glass 2. The finish work will be hard to match 3. the cost will be less If you want to build a nano here is a rough plan for one that works. Pet-co 10 gal tank $10.00 CD-517553 - SeaClone Protein Skimmer (up to 100 gallons) - $67.99 CD-900104 - Bio-Wheel 170 $21.99 CD-321066 - Penguin 660 $17.99 CD-519773 - PowerQuad 96 watt SmartLite Retrofit Kit $125.99 You build a small hood out of plywood that fits the top of the tank. Make sure that you have a fan in it and that the back is open Mount the light in the hood. Remove the biowheel from the filter and use it for water movement and media. Mount skimmer and power head. As you can see the cost of this is $250 plus by the time that you build the hood. If you build the tank you will be over $300 A JBJ nano is $99-129 everywhere I have About $200 in my JBJ. I paid 99 for the tank. I added a $67 SeaClone Protein Skimmer and a Aquglobe AQ300f Pump as the orig. pump was just not quit enough. As you can see it all works For a timeline setup of my JBJ Nano
-
did you run into him at the dale city petco
-
Using Baking Soda to raise alkalinity
Aquariareview replied to OUsnakebyte's topic in General Discussion
If you mix it 1 1/2 cups to 1 gal of ro water You have a great alkalinity builder Baking soda is NaHCO3. It dissolves to Na+ and HCO3-. HCO3- is by far the biggest contributor to alkalinity in seawater, and is what corals use. The sodium is the second most common ion in seawater, and just comes along for a free ride into the tank. It can drop your PH a little. Baking it will change the way it works. It will drive off the CO and then the product will raise the Ph To raise 50 gallons of tank water by 1 meq/L will require about 16 grams of Baked (1 hour at 300) baking soda (sodium bicarbonate; sodium hydrogencarbonate). Since a level teaspoon of baking soda weighs just under 6 grams, then 1 teaspoon will raise the alkalinity in that 50 gallons by ~0.4 meq/L (~1 dKH). Some people will recommend Washing Soda but it can contain arsinic (it is not food grade). It is not a good Idea. -
Here is what I want to have done After I die. Eternal Reefs This company takes your ashes and makes them into live rock and puts you in a ocean reef.
-
The jury is still out on Bristle worms, or Polychaeta, (= many bristles). Many reef keepers swear that these are the best scavengers around and many swear at these little guys. They can get very large and the only bad things I have ever had them do was go after a dying clam and eat a leather coral fron the inside out (was an ugly coral anyway). They do a good job at cleaning the left over food up and they are pretty good at cleaning up a dead fish that gets stuck in the rocks where you cant get to it. I would say leave it in but watch to be sure that being good.
-
They using a picture of my Carpet Anemone in Reefkeeping Mag Check it out
-
Here's my hints list 1. First Get A Turkey Baster!!!! If you don't already use one, get a clean new TB; Jack of All Reef Tools! Blows detritus off rocks; sucks up unwanted "stuff"; use it to target feed corals; and the list goes on. 2. Dog toothbrushes are a reefers second best friend (see above for the first). Get the kind with a large and small end are the best, 2 in 1. 3. Want to vacuum the tank without having to do a water change?? Just get some 3/8" flex tubing....or whatever size you want and put a fine mesh bag or a nylon on the end of it and rubber band/tie it on. Then stick the end w/ the bag into your sump. Start the siphon as mentioned below and vacuum away! The bag will filter all deitritus /flatworms/ valonia/ whatever and let the water pass right thru. 4. Start your siphons by placing the submerged end of the hose in front of a power-head. 5. Vinegar is good for soaking pump/power-head impellers--it dissolves the CaCO3 that tends to build up on the internals. 6. If you have a venturi skimmer, drop the air tube into a cup of hot RO/DI water once a week to get rid of any salt creep into the venturi (remove the air line muffler if equipped). 7. I stick a scotch pad (synthetic 0000 steel wool) between my magnets (on the inside of the tank) which I rinse out frequently when cleaning my GLASS TANK. 8. The life of wooden air diffusers can be extended by heating them up in the microwave for 3-5 minutes. So when its time to change the diffuser,, pop it in the microwave and you'll be able to use it again. 9. You can make spray bars out of PVC instead of buying return nozzles. 10. Have clams for dinner. Wash shells, and use them to cover annoying algae patches on you rock...after a week or two the algae will be dead and gone for lack of light. 11. When catching a fish out of a tank use a rose vase. One of the big one's, for dozen roses, which has a large opening curves down for the neck, and then open back up. Put in a piece of food and set the vase on the side at the bottom of the tank. The curve in the neck will stop the food from floating out. Once the fish is in put your hand over the opening and pull it out. Most fish swim away from your hand so even if you are not fast enough to cover it they will probably stay in. 12. Place rubber matting underneath all of your equipment. It comes in 4 foot wide rolls at most hardware stores and is indispensable. It protects the floor beneath and helps isolate vibration. Its grooved surface helps control spills. You can curl it wherever it meets a wall to keep water from leaking out. 13. Save all the disposable plastic containers you get, eventually you'll find a reef use for them. 14. Put a piece of aluminum foil on top of your tank over your overflow to block light, keeps nuisance algae from growing in there and you don't have to clean gunk out of the overflow teeth. 15. If you have a deep tank, invest in a small step ladder. (2 or 3 steps) Instead of having a chair around, use the ladder to access your tank. 16. Finally, and this has been said before, keep a journal!! It doesn't have to be fancy or completely detailed, but one needs to record actions, observations, and perceived results. Water changes, livestock additions (or losses), bulb changes, etc, this things are forgotten and overlooked until something comes up, and then it's too late. Feeding Make your own food • 4oz fish, shrimp, squid, clams, anything from the seafood counter 1/8 tsp CYCLOP-EEZE (Artemia Nauplii substitute from Jehmco) 2 sheets of nori 1/8 tsp Marc Wiess black powder 1/8 tsp Marc Wiess Spectra Vital Powder 1/8 tsp high quality flake food 1oz DTs 1/8 tsp Selco 3 drops free iodine mix in a Food Processer with 1 cup tank water and freeze in small Ice cubes tray (with saran wrap over it so you don’t smell up the freezer) Thaw a cube and direct feed lightly over the coral More Feeding Tips 1. Plastic onion nets...just replace the aluminum binders with plastic zips and stuff with "tang heaven" or other live, loose-leaf macro-algae that your tang likes. Tie one end securely to something so it doesn’t float all over the tank. If the algae pieces are large, tear one or two small holes in the mesh so the tang can haul out bites. Works like a hay bag with horses. 2. Pile up small pieces of rubble / shells / etc in a corner of your tank and just watch the pods multiply. It becomes an in-tank refugium. You may have to rebuild it every-so-often but I setup my pile 2 weeks ago and have TONS of pods of different types as well as worms crawling all around it. 3. For feeding clams with DT. Instead of moving the clams into a container outside your system and worry about temperature fluctuations, use a specimen container and hang that inside your tank. Then move the clams into the container to feed them therefore keeping the temperature constant. 4. Another tip for feeding. Get a 2 Liter Bottle. Cut the top 1/3 off. Drill a hole in the cap big enough to put an airline through. Silicon the connection of the airline with the cap. Stick rigid tubing at the end of your airline. Now, you can pour whatever you'll need to fit into the top 1/3 half of the 2 liter bottle and target feed wherever you point the tubing. Electrical 1. Use timers on all your lighting; get the heavy duty variety with the grounded plugs. 2. A digital timer with a half dozen on/off settings works as a wave maker for smaller tanks. 3. Be sure to use drip loops on all plug connections. 4. I put labels on all my power cords, powerheads, heater, lights and the such, so I wouldn’t have to trace down each power cord to see what it was running, 5. Go to home depot, buy a GFCI outlet, junction box, 15-20 AMP cord with an outlet. Assemble them together and you have a portable GFCI outlet. 6. Computer UPS systems make a good backup power supply; you can usually get used ones for free. People toss them when the batteries die and buy new, check your local Radio Shacks or Batteries Plus or Battery Zone type stores & ask the manager to hang onto one for you, buy new batteries and presto you have something to run your pumps if there is a power outage. 7. Lights Of America outdoor floods are 6500k pc's and work great for refugium. Pick up a spare one and wire it to a switch to light your sump, it's easier to work there when you can see what you're doing. Here some uses for 5 gallon pickle/salt buckets: 1. Water changes. 2. Mixing water for water changes. 3. Mixing kalk. 4. Large kalk dripper. 5. Holding tank for new specimens. 6. Holding tank when exporting algae. 7. Stool to reach into tank. 8. Seat when working on sump. 9. Bio-ball chamber of a trickle filter (or a past use for most of us). 10. Stand for kalk dripper. 11. LR curing vat (small batches). 12. LS cycling container. Local Fish Store 1. If you know the employees at the LFS and they're reefers, bring them a frag or two once in a while for their own tanks. 2. Buy a bag of the crud on the bottom of the LFS rock tank to get critters to populate your rock and sand. They'll probably think you're crazy and give it to you. (esp if you've been giving them frags). 3. When you get really good service from a LFS or small MO place take five minutes to send the owner/manager a note telling him so, and mention the employee by name. A lot of people work in those places because they love the hobby (it sure isn't the money), and they deserve the recognition. Also, here's a great source for test tubes, flasks, specimen containers, bottles, droppers, funnels, and all sorts of other lab equipment you wish you had from your chemistry classes: Carolina Biological Supply
-
Mrs Wages is less fine than Balls and it does not disolve as well. It also seems to raise PO4 levels (this is a problem I don't have with Balls) I us Balls mix 2 tblsp Balls 1tsp white vineger 1 cup fresh water stir for a min then add to 1 gal make up water do not add other additives to this water as the calcium in the mix will bond to them and render the useless. Add to tank in strong current, or add to return pump intake area in sump The first few times you add it you will get some clouding of the water. This is from the calcium bonding to the phosphates in your water . After you use it you will see a big drop in those levels. I have been using this stuff for years without any issues
-
They clean the sand of waste. They are one of the best sand janitors I have ever had. it stays in the top inch of sand and eats the sand. it passes the sand thru it's system and as it comes out it is very clean. It does not dig deep and it moves so slow that all of the sand critters (that you want to keep) get out of it's way.
-
I have used them on small (30 gal or less) Fish only and Live rock fish only tanks with some success. They operate as a wet dry type filter and they do it better than most other styles. I ran a 29 gal system in my office for 3 years it had a emperor 400 and a prizm skimmer. I kept live rock and 6 small fish. I only had NO lighting (3 20 watt bulbs with 2 10,000k and 1 Actinic) After about 8 months mushroms and zo's appeared and grew until there was no uncovered rock. I changed 5 gal every mon morning. and had no problems with nitrates. at one year I took the wheels out and just used the filter for media and current. I guess the answer is bio wheels work for saltwater if you are good at water changes and if you are not trying to do a reef.
-
Here is my a picture I have not been able to get before. this guy hides when the lights are on but was wandering this morn just after they came on. Donkey Dung Sea Cuke (Holothuria mexicana) Range: Tropical West Atlantic. Size: To 20 inches. This guy is 3 years in my tank about 15 inch long. it was 6 inch when I got it at Roozens.
-
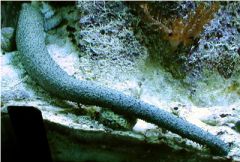 Donkey Dung (Holothuria mexicana) Range: Tropical West Atlantic. Size: To 20 inches. This guy is 3 years in my tank about 15 inch long
 -
Maldives Nurses Its Coral Reefs Back to Life
Aquariareview replied to Gatortailale's topic in General Discussion
I posted it on the news link on the front page -
If you intend to go to the WAMAS Reef Symposium the the registration page is open. There are a limited amount of seats and they will fill up soon. Don't wait as this is going to be the best reef event of the year.
-
• Many of the Blenny familylike the Black Sailfin Blenny (Atrosalarias fuscus) or the Bicolor Blenny (Ecsenius bicolor) make a nice addition, but they are territorial in nature... Opinions are mixed as to whether the Blenny is a peaceful tank member and safe for invertebrates. Some believe the Blenny is not safe with other species members and may pick on gobies and firefish. Others say the Blenny is a peaceful community fish. Some say the Blenny is safe around invertebrates and other sources say it will eat them. The best alternative is probably to combine these groups cautiously. • Watchman goby, with a pistol shrimp (I have these in my nano and they are my favorite critters. • Royal Gramma Basslet or Fairy Basslet is beautiful. • Neon Goby or Red Head Goby are very hardy fish, and because of small size, are a great addition to a small reef tank. They a cleaner species which will service tank mates and help control some diseases. There are many nice reef safe wrasse’ that you can keep • Six Line Wrasse (Pseudocheilinus hexataenia) • Carpenter's Flasher Wrasse (Paracheilinus carpenteri) • Cleaner Common Wrasse (Labroides dimidiatus) • Red Head Solon Fairy Wrasse (Cirrhilabrus solorensis) • Filamented Flasher Wrasse (Paracheilinus filamentosus) • Banded Possum Wrasse (Wetmorella sp.) • And most of the Fairy Wrasse family [tu] read]] Marine Fishes by Scott W. Michael This is the bible of fish shopping
-
The Blue is not quite as blue to the naked eye as it is to the camera. It looks like the reef 25 ft down looks when you dive. very clear with a hint of the water color around you. It looks very natural and it make the coral glow like nothing you have ever seen..