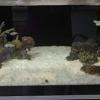
londonloco July 29, 2013 Author Share July 29, 2013 Worked on my scape today. First I laid out all the rock: Printed out pics of scapes I liked: What I came up with after a few hours, left side: Right side: Whole tank: Meh, I feel like it's same ole same ole. Need help here, anyone have any suggestions..... Link to comment Share on other sites More sharing options...
YHSublime July 29, 2013 Share July 29, 2013 Out of all the scapes you printed out, I love the one second up on the left from the bottom. I feel like you're right, it does kind of look same old. Try adding a bit of a scattered horizon to it. And what i mean by that, is it looks pretty uniformed across. On both sides, there isn't a lot of ups and downs. Try and make more arches on the left hand side, or caves, and maybe add some ledges around, if at all possible. Sometimes I find a beer helps loosen me up Link to comment Share on other sites More sharing options...
londonloco July 29, 2013 Author Share July 29, 2013 Out of all the scapes you printed out, I love the one second up on the left from the bottom. I no, right, his tank is beautiful. I found another pic shot from a different angle and printed it out also. I feel like you're right, it does kind of look same old. Try adding a bit of a scattered horizon to it. And what i mean by that, is it looks pretty uniformed across. On both sides, there isn't a lot of ups and downs. Try and make more arches on the left hand side, or caves, and maybe add some ledges around, if at all possible. Sometimes I find a beer helps loosen me up No sure I want larger arches, there are some "hidden" caves in the scape. I think the right side is too heavy, and I need to start breaking some stones to get smaller, not as thick peices for the right side. Great eye on more horizontal peices, will try that too. Oh, and thanks for the quick reply..... Link to comment Share on other sites More sharing options...
londonloco July 29, 2013 Author Share July 29, 2013 Phase 2, grabbed some parking lot rods and a drill, still not a fan: I placed some rocks on the right hand side: Going to I need to add a few peices of live rock, and am going to Quantum Reefs on Weds to pick up a bucket of Neo Marine, maybe I'll find some there. I'm hoping once I mortar the rocks together I'll like the scape better..... Link to comment Share on other sites More sharing options...
londonloco August 1, 2013 Author Share August 1, 2013 After several days of rearranging rock, sore and bruised fingers, I think I've settled on this scape: Everyone in the house knows, touch any rock and your grounded, for life. Also took the drive up to Quantum Reefs in Springfield. Filled up a few RO containers, a bucket of salt: and bought a small peice of live rock, which is in a 5g tank being watched for critters: Tomorrow I start on plumbing, really nervous, I've never done my own plumbing before...... Link to comment Share on other sites More sharing options...
YHSublime August 1, 2013 Share August 1, 2013 I like that structure on the left, good job throwing it all together! I have never plumbed before either, it's daunting, but I'm sure you'll do fine. Link to comment Share on other sites More sharing options...
londonloco August 1, 2013 Author Share August 1, 2013 Thanks YH, I been following your thread, but never read it start to finish, just read all 15 pages of your thread this morning, beautiful tank. Best of luck with your 150. I have almost everything I need for the plumbing, but haven't decided if I was going to hard pipe all the way down, or use flex pipe below the tank. I can't find any white or black flex pipe locally in the sizes I need, so if I go flex, it will have to be the braided clear tubing, which I've used before on my 120g reef and my current 125g mbuna tank. It has never failed me, but looks really ugly after a few months. Meh, I'm using true unions on all five lines, I can always change out the tubing later on if it really bugs me. Link to comment Share on other sites More sharing options...
YHSublime August 2, 2013 Share August 2, 2013 Thanks YH, I been following your thread, but never read it start to finish, just read all 15 pages of your thread this morning, beautiful tank. Best of luck with your 150. I have almost everything I need for the plumbing, but haven't decided if I was going to hard pipe all the way down, or use flex pipe below the tank. I can't find any white or black flex pipe locally in the sizes I need, so if I go flex, it will have to be the braided clear tubing, which I've used before on my 120g reef and my current 125g mbuna tank. It has never failed me, but looks really ugly after a few months. Meh, I'm using true unions on all five lines, I can always change out the tubing later on if it really bugs me. Thanks for the kind words. Sorry the last half of the 15 pages was me complaining and talking about stands. I look forward to watching how this goes, and I agree with your true union concept, you can always change. I think once I have something in place, unless I really hate it, it's not changing! Link to comment Share on other sites More sharing options...
rtsusc83 August 3, 2013 Share August 3, 2013 I built this last Sunday and I used a 2x4 as a base and created vertical support that rests on back of stand. It is now installed. I like the portability of it. I will take pics with the tank lights and light tree. Link to comment Share on other sites More sharing options...
londonloco August 3, 2013 Author Share August 3, 2013 Please post pics, I'd love to see it. Link to comment Share on other sites More sharing options...
rtsusc83 August 3, 2013 Share August 3, 2013 Will do. Link to comment Share on other sites More sharing options...
rtsusc83 August 3, 2013 Share August 3, 2013 attachment=6391:ImageUploadedByTapatalk1375557355.096295.jpg] Some pics of tank and light stand Link to comment Share on other sites More sharing options...
londonloco August 3, 2013 Author Share August 3, 2013 Very nice, I really like it. Did you use 3/4" or 1/2" conduit? Link to comment Share on other sites More sharing options...
londonloco August 3, 2013 Author Share August 3, 2013 Spent the past two days plumbing, and it's done. I hard plumbed the drain lines, and used black vinyl tubing I found at HD for the return lines. I did have 2 small leaks in the return lines, before and after the gate valve where the hard fitting met the barb, guess I didn't put the tape on correctly. It's fixed, and so far, we are leak free, which I CAN NOT believe. I've never hard plumbed anything: Bean Animal is dialed in. It is very quiet. If I still have no leaks in the morning, I plan on draining tank, moving it into house, put elec panel in stand, add sand, rock, water, and start her up. Then I have to figure out the Apex to hook up the zeovit reactor and ps..... UGH!!! Link to comment Share on other sites More sharing options...
YHSublime August 4, 2013 Share August 4, 2013 Good job! It must be rewarding! I'm not far behind ya. Link to comment Share on other sites More sharing options...
londonloco August 4, 2013 Author Share August 4, 2013 Good job! It must be rewarding! I'm not far behind ya. Thank you, and yes, it is soooo nice to be behind me. Link to comment Share on other sites More sharing options...
rtsusc83 August 4, 2013 Share August 4, 2013 I used 1/2 inch. Link to comment Share on other sites More sharing options...
londonloco August 4, 2013 Author Share August 4, 2013 Great, that's what I used. Good to know it'll hold....ty.... Link to comment Share on other sites More sharing options...
londonloco August 5, 2013 Author Share August 5, 2013 She's wet, took almost all day, but no leaks, sp1.023. My camera's battery needs a recharge, sorry for the cell phone pics: Front view: Side view: Sump: Tomorrow I'll deal with the lights, heaters, ps and zeovit reactor. Link to comment Share on other sites More sharing options...
smallreef August 5, 2013 Share August 5, 2013 Freaking awesome! Looks so good..... Link to comment Share on other sites More sharing options...
londonloco August 5, 2013 Author Share August 5, 2013 Freaking awesome! Looks so good..... Thanks! Link to comment Share on other sites More sharing options...
londonloco August 6, 2013 Author Share August 6, 2013 (edited) PS, Zeovit Reactor and heaters in: WP25 in, really puts out a lot of flow: Lights hung, well, sort of. I've got an email into Apolloreef to see if I can buy just the V portion: Worked on the Apex most of the afternoon (electrical board is a plate of speghetti). I have a Mac, which doesn't make it easy, but once I found the cd in the box that came with the controller, it went much faster . I set up my lights to go on/off for now, calibrated the pH probe and stuck it and the temp probe in. I need to figure out if I'm going to buy a "bridge" or move my router closer to the tank. Edited August 6, 2013 by londonloco Link to comment Share on other sites More sharing options...
YHSublime August 7, 2013 Share August 7, 2013 Coming along very nicely. Did you use flex tube for your returns? It looks like it! Where did you get it? Link to comment Share on other sites More sharing options...
rtsusc83 August 7, 2013 Share August 7, 2013 Looks great! I use Airport express to hook up the Apex controller into my network. Let us know how the Zeovit works! Link to comment Share on other sites More sharing options...
londonloco August 7, 2013 Author Share August 7, 2013 Coming along very nicely. Did you use flex tube for your returns? It looks like it! Where did you get it? Thank you, I used black vinyl tubing 3/4" I bought at HD, it was $14.99 for 10 feet and I didn't use all of it. After hard plumbing the drain lines and having no leaks in the hard plumbing, I wish I had hard plumbed then. Buy meh, you live and learn. Link to comment Share on other sites More sharing options...


Recommended Posts
Create an account or sign in to comment
You need to be a member in order to leave a comment
Create an account
Sign up for a new account in our community. It's easy!
Register a new accountSign in
Already have an account? Sign in here.
Sign In Now