


Rascal
-
Posts
1,355 -
Joined
-
Last visited
Content Type
Profiles
Forums
Gallery
Events
Store
Everything posted by Rascal
-
If you use flex pvc / spa-flex you will avoid the restrictions from the hose barbs and get a little more flow out of your pump, . . . but that's a project that can wait for another day. Throw a hose clamp on there and get some water in that glass box already!
-
Sorry, it should be "Spray Injector". You can download the manuals from ASM's website ( http://www.proteinskimmer.com/productsnew.htm). I don't see one for a Nano, but here's the Remora: http://www.proteinskimmer.com/Remorapro.pdf
-
Another option if you want to check out the tank in the morning is to have a bunch of moonlights come at at 0700 but the real lights don't come on until later. I run my VHO for 14 hours, T5 for 12, but MH right now only for 6 total (center for 3, 2 outside MH for 3, with a little bit of overlap. If it's too much light, your corals will let you know.
-
I read a good article on this once, most of which I forgot, but it has something to do with bubble bursting. Oils in the water cause the bubbles in the skimmer to pop before they can form a foam. If it's new, did you rinse the skimmer (hot water and/or vinegar) before putting it into operation? Some of them seem to come with a thin coat of oil on them. Something to do with the manufacturing process maybe. Is it producing bubbles? If not, look to the pump or the spray inductor as the source of the problem. If it is producing a lot of tiny bubbles that mostly fill the chamber (you may need to use a flashlight to check), then I would just wait it out for a while.
-
It would be nice to have someday, but I think it is a bit too much of a stretch for my DIY electrical skills so I'd probably want a real electrician to do it.
-
Agreed. If you have nothing else, you should at least get this. It gives you a lot more capability for not much more $$ than a few battery powered air pumps IMO. More importantly, battery air pumps can't make coffee!! Advantages of a generator and battery back-up are running more equipment (generator), will work when you are asleep or out of the house (back-up), and can be used by a tank-sitter if you are on vacation when it happens (generator, back-up). Might be a bit too much to ask for someone to leave their car running in front of your house full time, especially if they have their own tank to take care of (not to mention a job, life, etc. . . ). For those with limited funds, it's all a matter of priorities in deciding when, if at all, you really want to fork over $500 - $1000 or more on a life-support system. Does it make sense to do that before buying the equipment necessary to care for your reef in the first place (skimmer, RO/DI, lights, circulation, etc. . .)? IMO no. On the other hand it is something to consider before spending a large chunk of $$ on something that will mostly just make reefkeeping easier for you, but isn't necessarily essential to care for your critters (like a good controller, for example). My $.02 as always.
-
I'll try to get a pic if I can this weekend - but it's pretty ghetto, even for me. I basically just threw it together with some scrap wood in about 20 minutes. 2x4s for 4 legs and the top, then 3/4" plywood on the sides and top. There is about 2 1/2 feet of clearance above the generator. The sides only extend down to just above the exhaust. The generator sits on a piece of foam insulation in the carport so the combination of all that and the carport itself cuts down on noise considerably. With the battery back-up in place, I would probably run the generator from 7:00 am to 11:00 pm and then let the battery take over at night -- depending on temp issues.
-
I use both. We lost power for four days during the last hurricaine. That was just before I started this hobby, but it is the reason I have a generator. It happened before, it will happen again someday. I built a sound dampening partial enclosure for it to cut down on noise for the neighbors. I also built the DIY battery back-up, using a Black&Decker inverter I found at HD. I haven't had a problem with mine.
-
My 20 gallon tank thread with pictures
Rascal replied to lletellier's topic in Dedicated Tank (Build) Forum
An even easier solution might be to just rotate the elbow to the side until the water level came down to where you want it. You might as well switch the bulkhead out for the 1" one now though. You'll probably end up doing it later if you don't. A filter sock like Jason said or just wait and it'll clear up by itself. -
I agree with what Dave said about the grade -- it is fine for sandbed dwellers such as those (although stay away from sand-sifting star fish IMO). To add sand, just rinse it as well as you can, put in a container that you can lower to the bottom of your tank, slowly pour it out, and then don't worry about it. The cloudiness doesn't hurt anything and will clear up in a day or so. It will not cause a new cycle. The only thing I would avoid doing is adding too thick of a layer of new sand on top of your existing sand bed all at once.
-
I was wondering how you managed to fit all of that in a 5 Gallon bucket. So far no total losses, but I have a few that are just barely holding on. I decreased the light cycle and gave everything a couple of good feedings today. We'll see if that helps. On the bright side I am really happy with the new aquascaping, and the tentative new coral placement. If everything lives, I think it'll grow in quite nicely.
-
IME it just does this from time to time. Sometimes I have cut off the dieing branch(es) out of concern that it would spread, sometimes not. It usually just runs its course with no ill effects on the colony overall.
-
Update: UHHHG!! :( (and any other emoticon depicting extreme frustation / dismay). Turns out my plan had a few flaws. Checked the treatment tank last night and everything looked extremely stressed - polyps all retracted and several colonies showed bleaching and/or tissue recession. A couple even had flesh pealing off them in spots. I think water changes plus carbon just weren't enough to maintain water quality in that small of a tank combined with all of the stress of treatment. Most of the corals seemed to tolerate the first couple of treatments I did just fine, but a good number of smaller frags didn't make it. My guess is that this started a downward spiral (dead coral flesh --> deteriorating water quality --> more dead coral flesh . . . ). On top of this even the corals that did OK initially were sliming very heavily. I think the 20 gallon will work fine as a QT/Treatment tank for a few frags at a time, but it just couldn't handle that much bioload and waste. Whatever the reasons, it was apparent that this was not going to work. I was afraid I would be looking at a total wipeout within a day or two. So I hit the panic button and decided to return the colonies to the display. As much as I don't ever want to do this again, I would prefer that to a total loss at this point. I dipped again just to be sure and then closely inspected every coral one more time, cutting out anything that looked like it might possibly have eggs on it (didn't see any, but I erred on the side of caution), and loosely placed them back in the tank. A couple of the colonies that were worse off and most of the small frags stayed in the Treatment tank, which will continue to be segregated and treated as planned. As much as I want to think that I did not place any eggs back in my tank -- I highly doubt that is the case. So my revised plan is to keep pulling the corals out for a dip once a week for at least three weeks. If I still see evidence of flatworms I will continue dipping. If this doesn't work I will have to bite the bullet and set up a larger and better equipped Treatment system. How does that saying go? "Sometimes the cure is worse than the disease . . . "
-
I have had success with a variation of this method. I found that an ice cube in 80 deg water doesn't last very long -- big surprise huh? I ended up using some gel-type ice packs we have around for the kids. When one got warm I just switched it out for a cold one. I've done this two times and it took about 2-3 ice packs each time (10 - 15 minutes or so). Eventually it should lift up its foot on the side where the ice pack is touching it. If you wait too long it will just move and re-attach, so you have to get your finger under there once the opportunity presents itself. After that the key is just patience. In my experience sustained gentle pressure will get them to slowly release.
-
Thanks. I guess I just scanned too quickly and thought he bought one that was already in liquid form. I am using this packet: http://www.valleyvet.com/swatches/16572_L_xxx_000.jpg The directions from the web site: I'm not sure what all that means. I can't find the % activity info anywhere. The package says it contains 46.8 g of levamasole activity though, so maybe this will work: [Edit: I think I've got it now } 46.8 diluted to 1000 ml will be 46.8 mg/g. 20 Gal x 3.78L = 75.6L 75.6L x 40 ppm/46.8mg = 64 g or 64 ml Is that about right?
-
The problem is that I got the powder kind not the liquid. The dose is supposed to be something like 1.89 g / 10 Gallons, but how much (in volume) is 1.89 g of levamasole? I guess can just dump the package into a measuring cup and then divide by the grams it says are in there to get a rough conversion if I can't find the info online somewhere.
-
Update Yesterday was a long day. Went from this: To this: I took out every rock that had an acropora on it. Cut, scraped, hacked, sanded, wire brushed, kalked, . . . whatever I had to do to remove every last vestige of acropora from the tank. The main goal was to remove the acros, but I figured I would treat while I was at it. I put 20 Gallons in a rubbermaid container [edit]. Corals went into this after being dipped in a 5 Gallon bucket of Revive / TMPCC, each at double strength. They sat in the dip bucket anywhere from 2-10 minutes. Before going into the holding tank they were swished in a container of plain saltwater. In the meantime I was working at removing all the bases and aquascaping. I ended up taking just about every rock out of the tank and putting them back in, which was quite a chore if you can imagine. Here's a sample of what I found: . The damage seems very localized. Corals closest to the mille pictured above were most affected (definite bite marks and tissue loss on shaded portions). Based on my observations, it doesn't seem like these thing float around the tank. More like they crawl from one coral to the next until they find food. Corals on the other side of the tank were completely unaffected. I almost didn't pull them . . . but I really don't want to have to do this again. When all that was finally done I put them on two racks in my frag tank - turned QT tank. I added a few powerheads and some carbon (and a heater today thanks to rsarvis) . . what a mess: . I don't know how long they will last in there. The best I was able to do is make sure nothing is touching. I did a more controlled treatment today: 15 min of TMPCC and levamasole. I figure I might as well hit them hard now while they still have some reserves. The next couple of treatments will probably be a lot milder. So far all the colonies are ok. I've lost a few of the small frags that had broken off during removal but that seems to be it. Still, I don't know how much of this they can take. Thanksgiving seems a long time away at the moment. :(
-
The reason I thought it would be a good idea is that silicone is what holds all glass tanks together. Silicone alone. Try to take one apart some time and you'll gain new respect for just how strong it is. Peals right off everything else, but stick glass to glass and you will not be able to pull it apart.
-
Yes, but too close to the edges can be bad too. I remember reading the distance from any edge should be at least equal to the diameter of the hole. I also think drilling towards the bottom causes more stess than towards the top, since the water pressure is greater. Acrylic is stronger but bends more. If it bends too much it will start to pull at the seams, possibly causing a leak. Glass isn't as strong but it is harder - so it won't bend as far b/f it breaks. If the glass is weakened to the point it starts to crack it won't be a matter of just losing water down to the bulkhead. You probably don't have anything to worry about with the number and amount of holes you have planned, but if you are concerned there might be a couple of things you can do. One is to add some glass bracing to shore up the side of the tank that has a lot of holes in it. For example, get a 1/2" piece of glass 48" x 4" and silicone it across the back of the tank in between the top and bottom set of holes. I don't know for sure if this will work, so put this in the "seems like a good idea to me" department. Another option is to run your CL returns over the top of the tank instead of having them come through the glass.
-
A shame that happened to such a beautiful tank, but it's nice to know I'm in good company. :( I don't think I will be using the metal can though. I've discovered that coral skeletons, once they are boiled, bleached (literally), and dried, make great decor for my son's hermit crab tank. I remember you posting a while back about some issues with recession from the base. Did you initially think it was just Alk related? Am I correct that prior to this, you dipped in TMPCC but didn't quarantine? Do you think the TMPCC didn't do it's job, or it was just that some eggs made it through? Did you lose the montis too? Nudis? Live and learn, right.
-
Here's a good "how to" on this subject, complete with graphs: http://www.advancedaquarist.com/issues/nov2002/chem.htm If you read everything ever written by that author on the subject of reef chemistry, and understand even half of it, you will be an expert.
-
Turns out that what I had thought was just some tissue recession due to the combination of a drop in Alk and changing all my lights back in August is actually the dreaded AEFW. I think the issues I was having just gave the opportunistic little buggers the chance to get the upper hand. Here's a shot of the coral most affected: A close up (little blurry but you get the point): (Sorry, no cool close-ups of FWs and eggs here -- check Melev's site and reefcentral for that). I took that one out and did an iodine dip on it for confirmation -- no question it was AEFWs. Upon closer inspection, I can see the same pattern of tissue loss and bite marks on at least 6-7 other colonies. I found that the best way to see it is to shine a bright flashlight at the bases of the corals after the lights in the tank have gone out. So, I definitely have a problem. :( Question is, what to do about it? 1st order of business, to those I have given/traded/sold frags to -- sorry. If I had known I had 'em I would not have done it. I didn't see any signs of damage on any of the frags I let go, so hopefully you are lucky and none of those were infested. 2nd -- Did I dip & quarantine my corals before? No. Will I in the future? Yes. Some people just have to learn the hard way. After my bout with redbugs last Jan/Feb, I began dipping with interceptor, but that was it. Other than that I just bought from trusted sources and closely inspected everything before putting it in. I figured I was lucky. Guess not. So looking forward, here's the plan: I am going to use my 20G frag tank as a treatment tank. It is fed by a T from my return and then drains into the fuge. By shutting the ball valve and siphoning off an inch or so I can take it off-line at will. I have 2 mjmodded 600s in there for plenty of flow. I will try to maintain temp with a heater and fan. It is open top and there is a single 150W MH about 10 inches above the water level so hopefully that will work. If not I will have to think of something else. For water quality my plan is to do daily 25-50% water changes, 100% on treatment days. I figure I can just siphon out the water from the frag tank, and then open up the ball valve from the return to fill it back up. That way I will only be adding water from the rest of the reef, not freshly mixed saltwater. This should help maintain water quality and stability (although the latter will probably be tough overall since my Ca & Alk demand is likely to plummet). The most daunting aspect of this is going to be removing every single acropora colony from the tank, including the encrusted bases. Surprisingly, this doesn't make me as sad as I would have thought. I think I have caught it early, so I haven't had any total losses (yet). I am looking at this as an opportunity to make a few changes in my aquascaping, and rearrange the corals to put more balance in the tank and give some of them more room to grow. I am going to remove the rocks with acros on them, cut off all of the healthy parts of the corals and put them in a temporary holding tank with tank water and flow while I work. All dead tissue will be discarded. Any encrusted bases will be scraped off. What can't be scraped off will probably get a kalk paste treatment to kill off any remaining tissue. The rock will then be rinsed in a bucket of tank water and then placed back in the tank. There are a couple of pieces of rock that I may not want to disturb. I will just do whatever I have to do kill any part of the coral bases that remain on the rock. The salvaged coral fragments will be mounted to disks and then placed on eggcrate in the frag tank. The geography here has me a little concerned. I am thinking of creating a holding rack with two removable shelves, and then rotating the corals every day or so to avoid shading issues. Once all of that is in place I will re-acquascape the tank. Since many believe there are several different types of flatworms, I decided to attack on multiple fronts. I ordered some Revive Coral Cleaner based on the reviews I have read, and also some levamasole, and I'll probably hit them with TMPCC somewhere along the way as well, and I may even throw some interceptor in there once just for kicks. I am going to treat every 3-5 days, siphoning all of the water out and refilling with tank water after each treatment. Since the gestation time of the eggs is 14 days my plan was to put everything back into the display after 3 weeks. I figure this should be enough time for any remaining FW eggs to hatch and starve before I put the acros back into the tank. When I do this I will probably take them off the disks again. The only purpose for mounting them this way is to keep them nice and stable during their temporary home. Any comments, questions, suggestions? Does anyone think I need to take out non-acro sps as well? Do these things live on steriatopora or pocillopora? Is there any reason I should remove and treat them too while I am doing everything else?
-
getting there
-
-
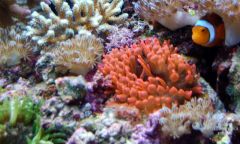
From the album: 8/07 - present
rbta -
12x is plenty, but I think what Dave and Steve are saying is that with 1" outlets your flow will be so dispersed you won't even see or feel it. There has been a lot of progress in this hobby on the aspect of increasing flow while reducing velocity (i.e: maxijets vs. stream-style pumps), but it is possible to go too far on the reduced velocity front. If there isn't enough velocity the flow just won't go anywhere. The only way to be sure is to fill it and test it, but I think there is any easy fix to this issue. On my CL manifold I used 1" plumbing all the way around, but for the T's I found 1" slip - 3/4" fpt fittings. Then I put the 3/4" mpt locline adaptors into those and went from there. Even though you've already plumbed yours you can do the same thing just by using a 1" - 3/4" fpt bushing (or whatever combination of fittings will get you there). Once you get the locline in there you have a lot of options depending on how much velocity you want out of each outlet. You can leave just the regular 3/4" locline on there, or put either a 3/4" or 1/2" flare nozzle on the end, or even a fan nozzle if you want. As far as head loss / size of pump / noise . . . here are my cents: As long as it is a closed loop (outlets submerged) the only head loss will be due to friction in the plumbing. That said, I think it makes sense to limit that as much as possible. You will get some through your super SCWD, but I understand the trade-off there. One thing I think you could do to improve is just go straight into your manifolds instead of dropping down into them. On your CL after the SCWD, you have a straight section -- 90 towards the tank -- then a 90 down into the T, which faces up. If you point this T straight back you could eliminate 1 of the 90's from each manifold. If you look closely at the 1st pic you posted from my tank you can see what I mean. Just to the left of T with locline outlet pictured, is another T facing straight back. This is where the feed from the pump enters the manifold. I don't think it's a huge deal, but it might help. If you can swing it (and I know someone had a great deal on a used one while back), a Sequence Dart would work really well for you. You could get rid of the bushings at the end of your 2" intake pipe, and you could always dial it down if you needed less flow, or in that case maybe you could leave your outlets at 1". The latter is what I would do for a softie/lps tank -- lots of flow but very dispersed so everything was swaying but nothing was tossed around too much. As for noise, I replaced a Panworld 1200 gph circulation pump with a Dart recently and the Dart was 1/2 as loud -- if that. From what I've read the Little Giants are supposed to be noisier than the Panworlds, so I doubt you'd be adding noise if you upgraded to this pump. None of this needs to be done before you fill it up and try it out, though. As long as you will still have access to the plumbing after the tank is set up, you can always tweak it later -- or even completely redo it if you want. I have no experience with non-drilled closed loops, but I do have a couple of questions. I couldn't tell from the pictures, how are you going to prime it? Do you have the intake in your overflow box?