


Soccer4500
-
Posts
100 -
Joined
-
Last visited
Content Type
Profiles
Forums
Gallery
Events
Store
Everything posted by Soccer4500
-
Congrats - can't wait to make the drive out to see the new setup, once you're up and running! Sent from my iPhone using Tapatalk
-
ERC LIVE SALE IS BACK! 3/29
Soccer4500 replied to ExoticReefCreations's topic in Exotic Reef Creations
B89 Sold -
ERC LIVE SALE IS BACK! 3/29
Soccer4500 replied to ExoticReefCreations's topic in Exotic Reef Creations
lol...good to hear ;-) -
ERC LIVE SALE IS BACK! 3/29
Soccer4500 replied to ExoticReefCreations's topic in Exotic Reef Creations
b49 sold -
ERC LIVE SALE IS BACK! 3/29
Soccer4500 replied to ExoticReefCreations's topic in Exotic Reef Creations
Me next...me next! ;-) -
ERC LIVE SALE IS BACK! 3/29
Soccer4500 replied to ExoticReefCreations's topic in Exotic Reef Creations
B7 Sold -
ERC LIVE SALE IS BACK! 3/29
Soccer4500 replied to ExoticReefCreations's topic in Exotic Reef Creations
A98 Sold -
ERC LIVE SALE IS BACK! 3/29
Soccer4500 replied to ExoticReefCreations's topic in Exotic Reef Creations
A57 Sold -
ERC LIVE SALE IS BACK! 3/29
Soccer4500 replied to ExoticReefCreations's topic in Exotic Reef Creations
A53 Sold -
ERC LIVE SALE IS BACK! 3/29
Soccer4500 replied to ExoticReefCreations's topic in Exotic Reef Creations
A49 Sold -
ERC LIVE SALE IS BACK! 3/29
Soccer4500 replied to ExoticReefCreations's topic in Exotic Reef Creations
A29 sold -
ERC LIVE SALE IS BACK! 3/29
Soccer4500 replied to ExoticReefCreations's topic in Exotic Reef Creations
A18 Sold -
ERC LIVE SALE IS BACK! 3/29
Soccer4500 replied to ExoticReefCreations's topic in Exotic Reef Creations
A12 Sold -
Laura, at the rate you had those Zoas growing on the right side of your main I bet you could go bare bottom in this new one and have a zoa carpet across the whole thing in no time ;-). For flow I 'd usea couple Jebao Wp25's. I think Quantum may have some in stock.
-
Howdy - continuing the new stand build...picked up some cedar to use as the drink-rail, but need to make a couple of very quick 45 degree cuts. Anyone have one I can use/borrow? I'll of course come to you wherever you're located, but if you also happen to be near Arlington, that's a plus.
-
Kieron’s 80G Shallow Rimless Mixed Reef Build
Soccer4500 replied to Soccer4500's topic in Dedicated Tank (Build) Forum
Thanks much...appreciate it! I've learned a lot just reading the boards (and occasional horror story) here on WAMAS - made sure it was the first thing I checked when doing the FW plumbing test. -
Kieron’s 80G Shallow Rimless Mixed Reef Build
Soccer4500 replied to Soccer4500's topic in Dedicated Tank (Build) Forum
Nothing...unfortunately. It does siphon back into the sump when the power to the return is turned off (e.g. for water changes/skimmer cleanings). However, fortunately, there is more than enough room in the sump to accommodate for any backflow. And the way the return nozzle is positioned, it can't dip too low in the water...so the amount of water that actually does backflow on occasion isn't too great. Recently, when I purposefully cut power to the system (water changes/cleaning), I just temporarily raise the return nozzle so that it is out of the water and there is no backflow. -
Kieron’s 80G Shallow Rimless Mixed Reef Build
Soccer4500 replied to Soccer4500's topic in Dedicated Tank (Build) Forum
Thanks all! Equipment is under the stand. I have some more photos of the sump setup that I'll try to add at some point along with more recent pics of the tank. -
Kieron’s 80G Shallow Rimless Mixed Reef Build
Soccer4500 replied to Soccer4500's topic in Dedicated Tank (Build) Forum
Simultaneous to the build, I began adding fish/corals...some transferred from the old BioCube + new purchases...here are some photos about 3 - 4 mths removed removed from initial steup: -
Kieron’s 80G Shallow Rimless Mixed Reef Build
Soccer4500 replied to Soccer4500's topic in Dedicated Tank (Build) Forum
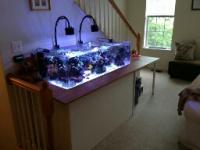
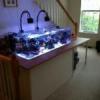
I really liked the idea of a ledge/drink bar around the tank, as seen in Anthony’s (Fazio92) build thread. His setup is currently TOTM...and very well-deserved. Decided to give it a try with some shelving I found, held together by L brackets. It has a bit more depth than I would like (~8”), so maybe I’ll redo it with a thinner (~4”), more vintage looking piece of Oak. -
Kieron’s 80G Shallow Rimless Mixed Reef Build
Soccer4500 replied to Soccer4500's topic in Dedicated Tank (Build) Forum
Enter the Kessil A350w Tuna Blues. Can’t do the fun n' fancy light cycles like the Radions or AI’s... BUT, they still produce an AMAZING spectrum of light...with great tank coverage...and they can be fine tuned manually. I got two of the A350 wides and they cover my 4'x2' tank perfectly. And there's now problem with sufficient PAR hitting the sand bed for clams. The bonus: compact light, that has a very low profile and fits well with the minimalistic/non-bulky look of the rimless. I also got the skin up to mute sound of water trickling into the refugium. -
Kieron’s 80G Shallow Rimless Mixed Reef Build
Soccer4500 replied to Soccer4500's topic in Dedicated Tank (Build) Forum
Time to hook up the Chiller! I got this from the first CL buy as well. Added a SpectraPure ATO w/Tom's AquaLifter hooked up to a 20G Rubbermaid. Turned it all on to see how it went. I keep my house at 70 and the tank temp at 77. The chiller did its job, begrudgingly. It ended up coming on several times a day under the 400w Metal Halides. While the MH gave off great lighting (I mean, I could see the faint blue lighting being emitted from my living room window half a block away on my way home from work) the amount of heat being produced was really tough. Especially in the living room. So... -
Kieron’s 80G Shallow Rimless Mixed Reef Build
Soccer4500 replied to Soccer4500's topic in Dedicated Tank (Build) Forum
Now that the cycle was going, it was time to muffle those sump noises. The wifey would not have them disturbing TV viewing in the living room. Fine tuned the standpipe in the overflow and got to work building a shell for the stand, using materials from Home Depot. I also got some 8ft metal electrical conduits from Home Depot and bent + painted them to hang the tank lighting. As you can see from an earlier photo, the rimless came with a set of dual PFO 400w Metal Halides, running Radiums. I did NOT know how much they could bring up a temperature in a room. Didn't even think about turning on the heat in the house...even though this was Oct/Nov. And, I also saw hints of my old issue with the BioCube...water temperatures creeping up - yikes! -
Kieron’s 80G Shallow Rimless Mixed Reef Build
Soccer4500 replied to Soccer4500's topic in Dedicated Tank (Build) Forum
Awesome. Now...time to mix up some SW and get the cycling process going. I had some base rock that had been curing in the garage in a trash can with a small piece of live rock. I combined that with some of the live rock I acquired from Craigslist, and arranged it into an “M” shape in the display A piece of shimp from the supermarket kicked off the process. And, for in-tank circulation while the cycle is going I threw in a Tunze and a Maxi-Jet 1200. Those pumps definitely got the 'beneficial bacteria' moving around the tank and throughout the rock-work. But, I noticed a big aesthetic problem right away...the Tunze pump flow was SO direct/strong that it was blowing all of the sand around. I got Nature’s Ocean Live Sand thinking it might be heavier and loaded with live bacteria to keep it on the bottom of the tank. But no go...especially in a shallow dimension tank with a pump only 10" off the bottom. I’d need to get a different in-tank pump for flow, unless I went bare-bottom. I’d been told that a Vortech MP40wES wouldn’t work with this rimless tank b/c MP40's are only rated up to ¾” glass/acrylic thickness. More than that and the magnets would fail. My tank is 1” thick. Now, when I bought the first CL setup, it came with an MP40, which I hadn’t yet resold...so, out of curiosity I figured...why not give it a shot... SUCCESS!!! It holds! That is, unless I crank the pump all the way up to 100%. Which is honestly kinda overkill on this size tank anyway. But, I did put a very small amount of glue on the face-plates to attach to the acrylic...just in case I ever do need to crank it way up. On the opposite side of the tank I put a Sicce Voyager 4, which can also create a strong but gentle flow...but not disturb the softies that hate the Vortech's flow. And was a fraction of the cost of an MP40. -
Kieron’s 80G Shallow Rimless Mixed Reef Build
Soccer4500 replied to Soccer4500's topic in Dedicated Tank (Build) Forum
The Living Room Tank Found a gentleman on Craigslist looking to sell his complete 90G setup...standard Oceanic RR 90g tank, pumps, stand/sump, skimmer, chiller + canopy/lights. Made it easy. Then the VERY. NEXT. DAY., in the search for live rock on CL, I came across an AWESOME shallow rimless tank. Really??? You’ve got to be kidding me...after I’ve already hauled this other tank into my garage. But, I couldn’t pass it up. One of the reasons I really wanted a SW tank to begin with is because I saw this incredibly cool “Volcano Tank” video on YouTube (I’m sure guys know which one I’m talking about - ). Soooo, I went and picked up the awesome Rimless setup, and re-posted the 90gal system (minus the pumps, skimmer, chiller) on CL. The Rimless setup that I bought on CL was actually owned by Gene V., a former Wamas member, who had to get out of the hobby. I believe his tank is actually an Adam B./Artfully Acrylic creation. I set the tank up in my living room. It is 48” long and 24” wide...with about 16” in water depth. Very easy to get in and work with. Positioning the tank in place took some work because it is a beast - 1” thick acrylic...no eurobraces... The stand is made of 2x4’s, with a plywood table-top, all primed and painted black. The tank bottom is not resting directly on the stand, but rather a ½” thick sheet styrofoam which is on top of the stand...it acts as a cushion to make sure the tank remains level. I filled it up with tap water to make sure that I had plumbed everything properly between the main and the sump, then I was good to go!