PotomacBoater
-
Posts
417 -
Joined
-
Last visited
Content Type
Profiles
Forums
Gallery
Events
Store
Everything posted by PotomacBoater
-
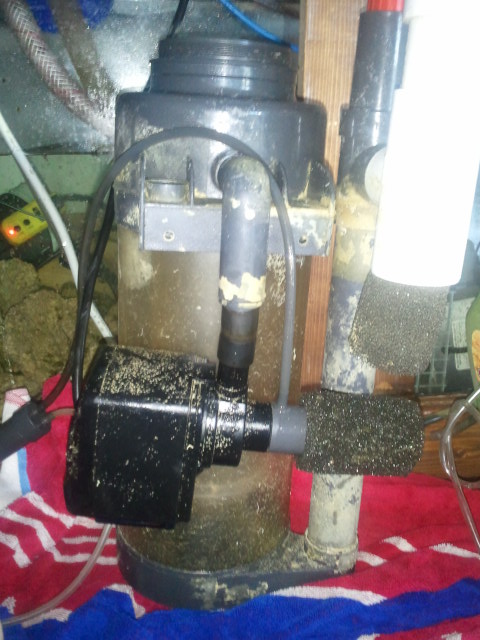
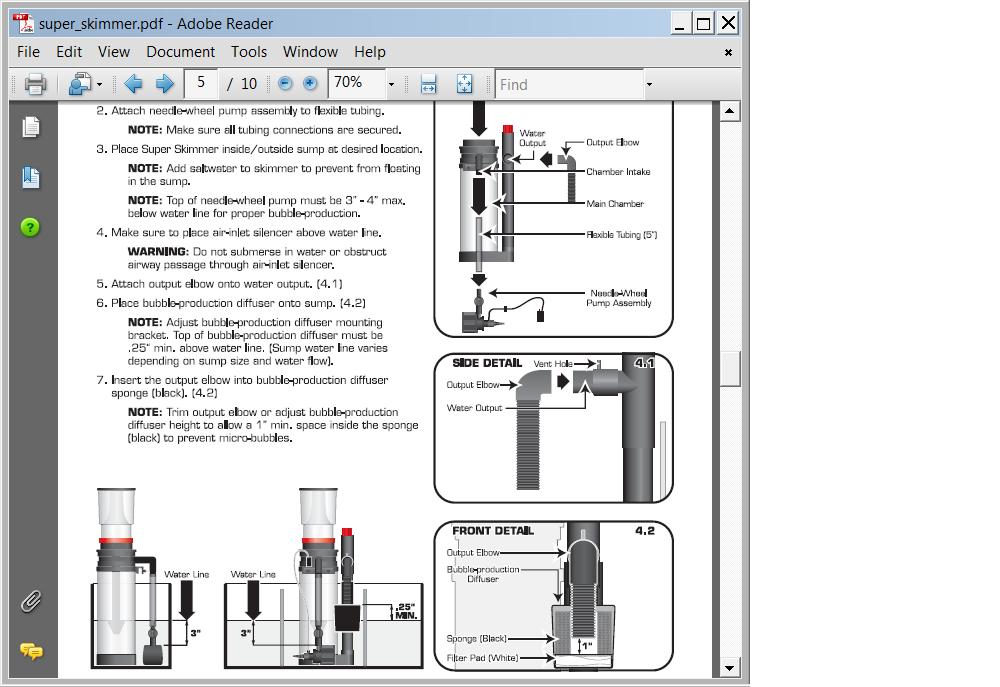
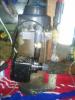
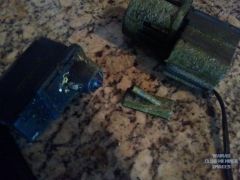
I have a Coralife SuperSkimmer 220 set up in my sump. The manual states "Top of needle-wheel pump must be 3"-4" below water line" O.k. No Problem But it also talks about a 5" flexible tube between the pump and the Chamber Intake. I currently adjusted the water level in the sump to be 3" above the pump (with the pump close to the Intake) or should I lower the pump (is more height better for skimmate?) I also wonder if the sponge on the output is better or worse for the skimmer. Looking at the pictures is the skimmer ready to go in the sump as is, or do I have to modify it. Thanks

-
I want to calibrate my PH and Conductivity probes but the shipping alone from Neptune is almost $15 do LFS's carry it or is there a cheaper place to get it??? Thanks, Matt
-
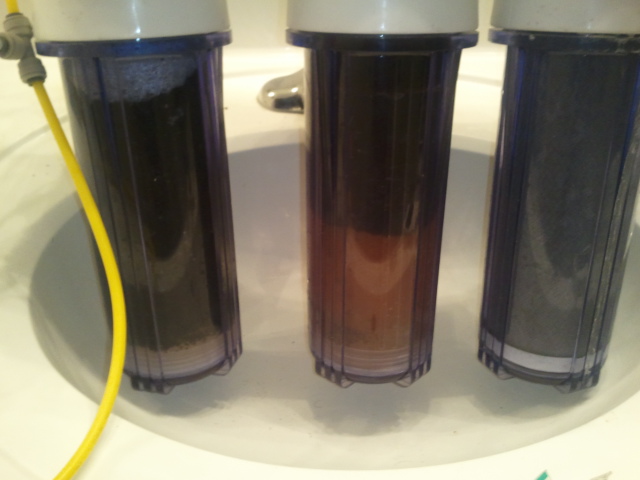
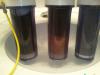
This looks like the system I have ... http://www.purelyh2o.com/index.php/h2o-test-meters.html?page=shop.product_details&flypage=flypage.tpl&product_id=67&category_id=80 First picture shows the full unit second one shows the individual filter cartridges and their order (right to left) I have zero confidence that this was put together correctly before I got it The sediment filter is 1 micron and so is the carbon block reading the website description is shows the Catalytic third Do we think that is incorrect? The RO Membrane says 75 GPD Everything I read says the 100 gpd units are worthless and I think 150 would be overkill for me, so I guess I'm staying with this one Thanks for all the help!

-
Matt's First 90G Tank
PotomacBoater replied to PotomacBoater's topic in Dedicated Tank (Build) Forum
The day of the move did have a few hiccups Hopefully others can avoid them ... It took almost 3 hours to pack a pick up with 90 Gallons of Water, Tank, Stand, Etc (even longer to put it back together since I tried a vinegar bath for most of the submerged components) I kept the existing livestock alive in the 55 G drum if you have more valuable fish, make sure you have a plan to aerate the water With 2 55 gallon drums in the truck, and all the live rock in there We had to put the drums in the truck and then add the water 5 gallon bucket at a time If we didn't have an inverter in the truck (or an outlet in the garage at the destination) then we wouldn't have been able to get the water OUT of the drums with a pump (siphon would still work) A drilled tank can't sit in the bed of a truck We used 2 x 6's under the tank to raise up the tank and not crack the bulkhead keeping the same water reduced the cycle time to about 4 days (It would have been a good idea to test all the water parameters BEFORE the move to know what was normal ... amonia will go up with agitation, but ph and salinity shouldn't change) having pre-mixed saltwater at my house to top off the tank was useful and necessary putting the sump in before the tank went on the stand was also necessary (and had to be pre planned) the stand I have (with center braces) can fit a 28G sump, but couldn't put it in without coming thru the top Remember to keep all your probes wet (paper towels and a little water in a plastic bag worked for me for over a week) I moved the sand in the tank with about an inch of water (be careful of weight on the bottom glass, but again it did work for me) Take a picture of the aquascaping before the move but CHANGE IT 100 times after you get it moved I did NOT clean any of the algae off the rocks (but again, I didn't have coral or fish that it could harm) I considered it natural filtration and great fish food for herbivours By the end of the first day, I did have the return pump going no skimmer no heaters no ato no controller no waver makers (that was day 2) Just a filter sock (changed after a day or two) -
In that case, what is the indicator of the Resin being depleted? Any increase in TDS or 10% as mentioned earlier? Does Resin "slowly deplete" or is it simply "On/Off"
-
I just bought a "used" RODI unit Optima Chlorimine Advanced by PureH2O It has a Sediment Filter a 1 micron Carbon block a catalytic carbon filter for Chlorimine the RO membrane and the DI Resin I'm getting 176 TDS in and 2 tds out. I don't have a hand held meter, this is from the built in meter Whether I test after the RO Membrane OR after the DI, I still get 2 tds I assume this means that I need to replace the DI? (I have no idea how old any of the filters are ... I guess I could replace them all, but if its down to 2 already, I don't want to "waste" money) Which membrane is the one that restricts GPD? Can I look at the mebrance and know if its rated for 75, 100 or 150? Thanks, Matt
-
I notice that the 15W one you recommend only has a 350 GPH throughput, Did you have to add the diverter valve for the rest of the return flow?
-
I wondered about why that line was there, thanks for the update Origami
-
Room temperature is pretty close to my tank temp (its no like this is in a basement or a garage) I guess the heater may be overkill. Atleast its one less thing to worry about Thanks for the help!
-
I have a 55G drum for RODI water and I would like to keep it at the same temperature as the tank. I have an Ebo Jager 150W heater BUT its not submersible Am I going to have to spring for a new one or is the some product (or DIY solution) that I could use to float the heater in the drum? I'm worried about mounting it in one spot because its not always full
-
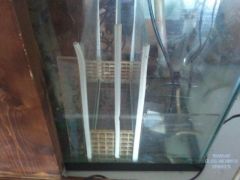
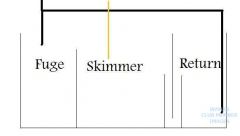
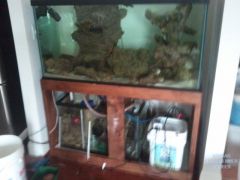
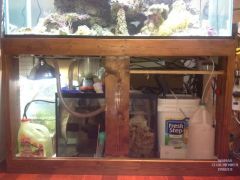
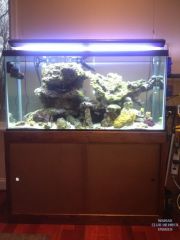
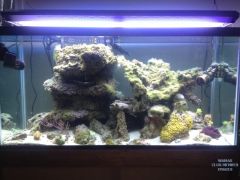
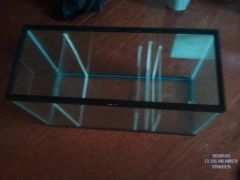
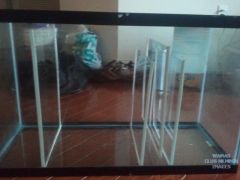
This is my "honest" build thread If I do stupid stuff ... its hopefully to teach everyone else what NOT to do. I bought a new condo in March of 2011, The first thing I noticed was the "Computer Nook", it was an alcove between the hallway and the kitchen. I don't know about you guys, but I certainly don't sit at a "desk" when I use my Laptop I used to run Tropical fish in high school (however many years ago that was) So I thought that this space would be GREAT SPOT for a fish tank but not a simple tropical tank, I'm a glutton for punishment, and I figured it was time to try Saltwater. I joined WAMAS in May of 2011, and it took a full year to find the right setup for me. My Requirements were ... Had to fit in a 53" wide alcove Had to be self contained (everything fits in the stand) and I wanted a nice (enclosed) stand and matching canopy, so this would look nice in my living room The goal was to start with a FOWLR tank Further requirements became 75 is too small 150 might be too heavy (I didn't want to risk it since I know I don't have concrete floors) Since I can't get to the side, or the back - tank had to be drilled I wanted a sump with a refugium for nutrient export and additional filtration I wanted the live sand and live rock to come with the tank, WHY? because a $300 tank and stand is a great deal until you remember that 90 lbs of sand & rock at $2/lbs (minimum) plus the skimmer, lights, all the pumps, plumbing, etc really adds up I visited a few members tanks, and checked out a few for sale tanks in the first year I finally found Pat_13's tank on the Wamas Forums http://www.wamas.org/forums/topic/46738-90g-rr-tank-equipment-livestock-and-extras-harpers-ferry-wv/ He had an established 90G tank with everything I needed PLUS he had all the "Controller stuff" (I had no idea what any of that stuff did, but it sounded cool) I did the purchase in two steps, I went to visit the tank first (so I didn't waste my friends time to drive all the way out there and me to hate it) then I picked it up a few weeks later This gave me time to prep. Things I did before the tank arrived a) put acrylic over the hardwood floors of the alcove b) purchased a larger sump from Muddy that was the maximum size for the stand and added baffles c) bought salt and test kits and "borrowed" some RODI d) read as much as a I could about tank moves, cycling an existing tank, and to find as much about the equipment I was getting as I could Things I learned a) I hate home depot for acrylic- Lowes is better - better selection and they will cut it for you. The floor was a thin sheet, at that was fine. Lowes doesn't carry "thick glass" so I went with acrylic baffles in a glass sump. Good idea or bad? (I'll get to that in a minute) I also used the thickest acrylic they had for baffles - OPTIX - these things won't bow, but are twice the price Sump Design ... The design I came up with was Why did I do it this way? 2 reasons ... I wanted to control the flow into the fuge independantly from what goes thru the skimmer/return (which you can't do with the fuge in the middle) Also, the stand is already plumbed for a left sided fuge. What's going to be in my sump? In the fuge ... Live rock, cheato, pods (not sure if there will be sand or not) Coralife SuperSkimmer 220 skimmer in the middle Mag 12 return pump (with a 4 ft of head pressure, I figure we would get 10x turnover) The method I used to hold the baffles was the "removable baffle design" with EPDM weatherstripping on each side of the acrylic (it needed water to lube it up enough to fit in) I got the measurements for the old sump (which had no refugium) 12.5 high each, with 12" wide for the skimmer and 7" wide for the return I made the bubble trap baffles 13" each with 1" raise for the 2nd trap and a 16" baffle for the fuge to run over I turned out nice looking ... Did the baffles hold the water? NO! They didn't bow but the weatherstripping wasn't tight enough to keep the whole sheet from sliding around when there was water on one side I fixed it by adding spacers (This almost negates the "removable baffle" aspect) There is a problem with the skimmer height But I'll address that in my next post I added the ato sensor A was in the return sensor B was in the plastic bin of rodi water Using mode A I made it work, but then it stopped Still diagnosing why! Next post will cover the move, and the tank itself
-
From the album: Tank Build
-
From the album: Tank Build
-

From the album: Tank Build
-
From the album: Tank Build
-
From the album: Tank Build
-

From the album: Tank Build
-
From the album: Tank Build
-
From the album: Tank Build
-

From the album: Tank Build
-
From the album: Tank Build
-
From the album: Tank Build
-
From the album: Tank Build
-
From the album: Tank Build
-
any idea where to get glass baffles cut?