


dcreefer
-
Posts
541 -
Joined
-
Last visited
Content Type
Profiles
Forums
Gallery
Events
Store
Everything posted by dcreefer
-
If I recall correctly, the center brace wasn't flush against the aquarium's bottom? I remember placing a small box or some testing supplies on top of there once... You could just get another piece of wood that will fit snuggly in place of the brace you sawed out and with a couple of screws drilled into the front and rear the front wall and rear wall should be braced again... You could even do this with your sump already in there!
-
When I moved from a 44 to a 90 I had to test, test and test again the new tank's water to ensure that I was transitioning my fish to like waters. I also kept watch of the temp in the 90 and compared it to my holding area to ensure that my live stock wasn't going to be shocked when I dropped them into the new large and spacious home.
-
DC Reefer's I need help with my 300 Gallon tank!
dcreefer replied to dcreefer's topic in Dedicated Tank (Build) Forum
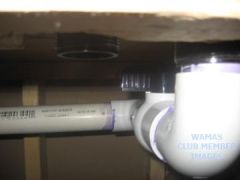
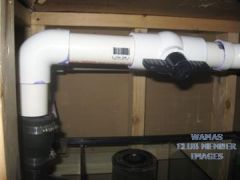
Update Special thanks to Blaze98 (& Fam) and Brian Ward. Well I've got some plumbing done! I have kept smaller tanks pretty much all my life but I have never had the space and ability to keep a large tank, well up until now. Blaze98 and his lovely family stopped by and sacrificed just about 8 hours over the weekend to help me with the daunting challenge of plumbing with PVC! I had previously drawn everything out before he got there, even used MS Visio, but we talked it out and re drew everything again! We cut all of our pieces, assembled everything (without glue of course), made a few minor adjustments, re cut, re assembled, and then finally on day 2 we glued! Here are a few pics of what we have! This is me with the left drain assembly. (Way too Excited!) This is Blaze98 with the right drain assembly. (Super Cool as always!) Left drain being installed. Right drain being installed. Under side of tank plumbing coming from both drains into Sump's bulkheads. We built the returns but by the end of the day both Upper Level Managements were ready for the quitting bell so I will connect those to the tank on Tuesday and start testing for leaks and potential problems. -
From the album: Some Pics
Right Drain installed -
From the album: Some Pics
Left side installed -
From the album: Some Pics
Drains to bulkheads. -

From the album: Some Pics
Blaze98 with the Right Drain -

From the album: Some Pics
Me with the left drain Blaze98 and I made! -
I've been in the the club for a few months and it is great! You can buy and sell with the other members and people will help you so you don't make the same mistakes that others have made! Before I was in WAMAS I would purchase from petsolutions, marinedepot or Dr.Fosters and it was kind of hit or miss (always see what there return policy is)! Some online stores offer a arrive alive guarantee, others may offer a 14 day alive guarantee and some will flat out tell you there is no refunds only store credit no matter to if it were dead when it arrived or not. My advice to you is to be aware of the store's policy before you buy!
-
Congrats Niki, I see you doing big things! I am tagging along also! The stand looks good in black!
-
You should be proud, that looks really good!
-
John thank you so much for hosting this event! WAMAS members you all are some of the warmest people that my family and I have ever come in contact with, it truly makes us feel good to be part of the club! This was our first event and my wife, Upper Level Management, who is only "Aquatic Tolerant" gave the event an A+ and is looking forward to the next one! (Man those burgers were excellent!) Thanks again WAMAS Family, DC Reefer Ray, Monti, Zo
-
DC Reefer's I need help with my 300 Gallon tank!
dcreefer replied to dcreefer's topic in Dedicated Tank (Build) Forum
Thanks you YBeNormal -And yet another mistake! (lol) I have thought about that also, I may create some access panels in the front as long as upper level management approves it! (That would be the Wife) Mrs DC Reefer doesn't understand that sometimes I must go back and cut new holes in the walls in order to accomplish the Dream. All she sees is oh my goodness your tank is destroying my house and it is taking up valuable real estate hurry up and get some water in it already! -
DC Reefer's I need help with my 300 Gallon tank!
dcreefer replied to dcreefer's topic in Dedicated Tank (Build) Forum
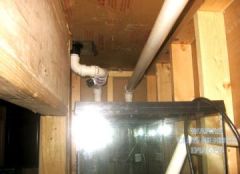
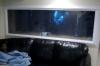
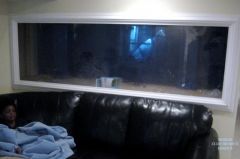
Thank you Maureen! The dimensions are 8 feet long, 24 inches wide and 30 inches deep. Why Yes you did spy a "Tank Room" behind the tank! Forgive the clutter, I am hoping that this will be up and running water within the next couple of weeks. I will post some more pics soon! Everyone I've had contact with on the site has been super warm and amazingly helpful, I couldn't have asked for a better community to be a part of! -
From the album: Some Pics
This room will house all the plumbing and supplies. -
Thank you Howard, I will look them up! I have called around to all the usual haunts but I have been unsuccessful! If I don't find one by Monday I'll just have to order! Hmmm...maybe a group buy and then have it over nighted or something!
-
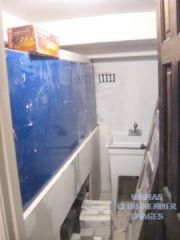
Hello WAMAS Family! If I had it all over to do again I would become a marine biologist and move to the KEYS or something but, here I am land locked in DC. SO, I am forced to bring a little bit of of God's most intoxicating creations home with me (oh the sea)! I have had several tanks from 44 gallons to 90 gallons but after about a year or so the high from the previous size would wear off and I would be looking to go BIGGER, which brings me to my latest fix (this will have to last me for a while) the 300! This is during the construction! This is post construction! Unfortunately when I was in the throws of construction I did not know about the wonderful community WAMAS, so I have made some mistakes but I am working with a few members to try and help me make some corrections! examples of Mistakes: -Since I have never worked with a tank this size (previously 90 was the largest), I did not realize that I should have factored in PVC vs hose as my plumbing plan! (thanks to Brian Ward for coming by and pointing out all of my short comings and being willing to help me correct them) (Thanks to Blaze98 for allowing me to call on him also for Plumbing Help) -Put tank in Place and my drywall guys finished the drywall and trim before I could actual cover the tank with plastic or something (Dust beyond your wildest dreams)! Thanks Hoover Vac family for helping me clean it out! - Forgot to cut the holes large enough in the 2x4 frame to get the nut to fit around the bulk heads! Got a Dremmel and got her done! Anyway this is going to be a reef tank! I was thinking of going with t5 lighting, I have seen a lot of really great tanks with just t5s! I am open for suggestions and any help!
-
Hey All, I am looking for a local kit myself! I live in NW, DC and I found one (Everclear Acrylic Buffing Kit) on Marine Depot but if I order now it will not be here until next weekend and I was looking to get my "Buff On" this weekend! Any suggestions? I am willing to travel 30 miles or so outside of the city to pick up one. Many thanks!
-
From the album: Some Pics
No water yet but hopefully soon. -

From the album: Some Pics
Me and the kids during Construction -

From the album: Some Pics
Wife took us to the GA Aquarium for my Birthday! I have a GREAT WIFE!!! -

From the album: Some Pics
Another picture of my love and wife with the reef in the background. -

From the album: Some Pics
Monti sitting at the Mac taking pictures! -
I used purple up for a while and it did give me results, the iodine in it was also really good for my inverts. The only problem with it is I feel like when you start using it you cannot stop. If you stop using the purple up and try to switch to kent products it is very difficult to get the same results. Just my .02
-
Pics of the Tangs
