


Origami
-
Posts
21,554 -
Joined
-
Last visited
Content Type
Profiles
Forums
Gallery
Events
Store
Posts posted by Origami
-
-
be a man...go with 1.25". it won't bow then.
Of course, you won't have any room in your sump but that's beside the point when it's a question of manhood.
-
Both HD and Lowe's should carry 1/4" acrylic in addition to the very thin (1/16"?) stuff. At least, mine do. That's how I built the baffles for my sump recently.
-
Ah, terrific NAGA! Maybe I don't need exactly a car full, though.
 I think I'd like to get a good quantity from you, if I could, and maybe mess around this winter with trying to fab and cure some rock. Where are you anyway?
 -
So you're saying that I should take my first trip to BRK then, eh? Sort of a pilgrimage?

-
Thanks, John. So, just how long would a 5 gallon bucket last? Understand that I'm new to this and the few kalk reactors that I've seen either in-person or in pictures look to be pretty modest in size. I've got to imagine that a 5 gallon bucket of the stuff is a lot.
Any thoughts on kalk reactors? DIY or buy? Know of a good DIY design? What about a simple kalk drip?
Thanks also for your experiences with the different brands. Looks like I'll research it a bit and see if I can find any significant difference that might account for the different observations you had.
-
Thanks. But a 5 gallon bucket? That sounds like it would last me FOREVER. LOL.
So, no big plastic fabricators in our area that would be a good source of shavings? I'll definitely see if I can't get some questions out to Almon.
-
Anybody out there know of a ready local source of food-grade pickling lime for making my own kalkwasser? I've not checked my local grocer's shelves but think I'd be in for an adventure as there aren't probably too many people involved in canning here in the big-city 'burbs.
Second, and eat your hearts out: My wife likes our first tank and is asking me to set up a second!
Anyways, I'm thinking (for this one) about making my own rock - that aragocrete stuff written about at GARF. The recipe calls for using plastic shavings as a lightweight filler. Anybody have a good local source of the stuff? -
Having no definitive response, I've put the CF's on a 1-year maintenance replacement cycle and the HQI's on a 6-month cycle.... for now, at least.
-
Dollars to donuts their hiding in the rockwork. I didn't see my Peppermint Shrimp for a week after putting them in my tank. I thought they had died, actually. But everyday, there I was, looking over the tank with a flashlight peering into this corner and that crevice... one day, I came across some long antennae deep into a hollow between a couple of rocks, low on the sandbed. And there they were, happy and healthy.
I have to guess that yours are doing the same. That's my guess at least (though I've not been doing this much longer than you).
-
LOL. I see what you mean now. I'm not really using a sock like you have there. Instead, it's more like a paint strainer and it also has a tie at the top, so I can tie the top off against the down tube, trapping debris inside the strainer. So far, it seems to work alright.
-
Eric Borneman doesn't think so. He claims it's one of those lasting myths. See http://reefkeeping.com/issues/2004-01/eb/index.php
I like the bubble trap because there's greater clarity to be gained. However, it doesn't appear that there's any major risk associated with microbubbles.
-
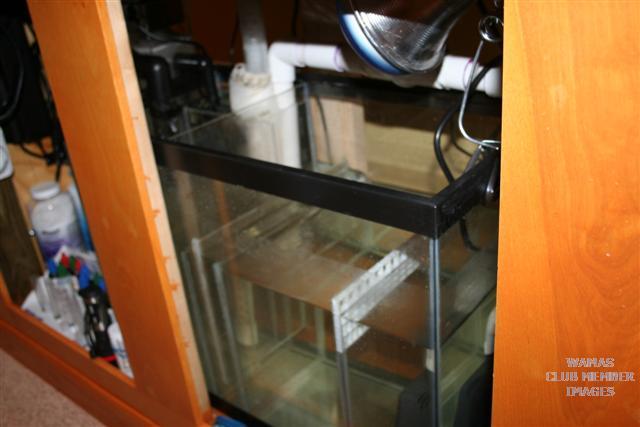
Second sump picture....
It's hard to see it, but I subdivided the first 8-1/2 inch section of the sump into a high-water area of about 3-inches or so (the first compartment). That left about 8-inches in that section for a small footprint skimmer in this, the second compartment. The high water area ensures that my heaters (2x 250W), which are fairly long, can fit submerged. Coincidentally, it also allows me to hang my HOB skimmer (a CPR BakPak 2R) over the side with the intake and pump in the first compartment, and the outlet emptying into the second compartment. Anyway, water cascades over the first wall, dropping about 3 inches into the second compartment. It exits the second compartment by going under another wall, into a bubble trap made up of 4 total walls. Under, over, under, and over... before coming to the refugium section (only about 7-1/2 inches or so long). That left about 6 inches or so for the last compartment, which is where the pump (a Rio 2100) sits to take the water back to the display tank. As you can see by the photos, I decided to try using egg crate to top off the last divider, instead of cutting notches in the plexiglas (I had some egg crate left over, so it seemed like something I could try).
Of the 20 gallon capacity, I have about 12 in the sump during normal operations, leaving about 8 gallons of room to protect from overflows, should power fail. The way things are set up, this provides more than enough protection right now (I tried it. Better safe than sorry.).
-
Design consideration...
If you're going to use a filter sock - make sure the water level isn't higher than the level of the top of the filter sock holder once it's full. (I won't tell you why I thought of this...)
bob
Bob, I'm not sure just what you mean. You mean don't fully submerge the filter sock? I'll tell you, initially I did just that, but air would get trapped a the top of the sock and would bubble out, making a lot of noise and creating some splashing. I raised the sock some so that the top is above the water line and it seems to allow the air to release in a more controlled fashion. By the way, this filter sock is more like a fine mesh strainer rather than a felt-like sock.
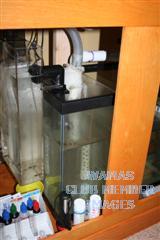
Jason, I'm going to attach some pics to this post. I'm sorry that I didn't get pics of the sump before I installed it. I've had to take two pictures to show you what I've done thus far with the setup. You can also see why I had to go with a 20H tank instead of a conventional 20: Because of the way I built the stand (with a center brace), there was no way of getting a conventional 36" 20 gallon into the space I'd built. Live and learn.
-
I drip acclimate in the sump, floating the bag there so that it reaches tank temp while taking the drip from the display tank up above. Periodically, I have to empty some of the water out of the bag, but it's pretty much on autopilot otherwise. Seems to work well that way.
-
Thanks for the reply. So how do you know when to change them?
My HID lamps are double ended HQI MH, 10,000K, 150W, on 8 hours per day, off 16 hours.
CF's are 96W actinics, on 12 hours per day (2 hours before and after the HID).
Does that help bracket the question of performance expectation?
-
It's never to early to plan, is it?
What is the generally accepted replacement time for Power Compact and MH lighting? I'm recalling 6 months and 1 year, respectively, but would like the input of others who've done this a time or two. Thanks.
Tom
-
I recently had the same problem when setting up for the first time. I'd hauled many 5-gal buckets of RO water home from work only to find that my TDS was up around 250 ppm. Snooping around, I found that the techs had installed sediment filters only ahead of the RO membrane, resulting in chlorine damage to the membrane. I bought my own RO/DI system from Air, Water and Ice and now I have 0 ppm TDS.
-
I built up the sump today. I really didn't like the feel of the polyethylene tubing at the end of the caulking gun. However, I did get another suggestion on RC that I tried.
If your first run a bead of sealant along the line where you intend to mount your baffle, you can press the baffle against this bead, driving it into position and seal the back edge. The sealant is thick enough that you can then just run beads on the forward edge finishing the job. It works pretty well actually. It helps to mark the outside of the tank with a dry-erase marker to help direct you where to put the beads of sealant and to align the baffle.
As for cutting 1/4" plexiglas (which I was worried about), a cheap plywood saw blade mounted on a table saw (or a circular saw) works pretty well, though you will get some melting of the plastic saw dust as you cut. I used a smaller circular saw blade mounted on my 10" table saw and it worked just fine. Also, a plain-old jigsaw with a wood-cutting blade works well for shorter cuts and for notches. I do offer this advice, however: Especially when using a table saw, wear safety glasses and a long-sleeved shirt as there are little bits of hot plastic thrown off the blade while cutting the plexiglas. When it comes to cleanup, cut some scrap wood to help clean out the plastic residue from the saw blade gullets and, after removing the blade, use a razor to knock any plastic buildup off of the blade edge.
-
I thought about doing that but decided the other way was just as effective and much easier (for me at least).
I agree with you, Bob. This is the direction I was headed as well but I may give this approach a try just for purity's sake. I bought a couple of feet of polyethylene tubing at Lowe's today just to see how it feels to try to caulk a decent bead in from 10 inches away into a 1-inch inter-baffle gap. If it doesn't feel like it'll be as clean as I'd like it, I'll probably just go with the blocking approach. At least, I know that, with the blocking approach, I can both maintain the baffle spacing easily enough.
Tom
-
cut the a 12" piece of ro tubing and put it over the tip of the caulk tube.
Thanks, Dandy. I may just give that a try! The extra rigidity of the ro tubing would certainly make it easier to guide. Maybe this weekend....
-
Bob, that's exactly what I was thinking of doing - "gluing" (using sealant) small acrylic blocking behind the individual baffles (after the first was installed, that is) and locking the baffle down from the accessible side with a bead of sealant around the perimeter.
Antiguan, thanks for the link. I looked at it and that approach makes some sense as well. Looks like he used the aluminum bar as a long putty knife to apply the sealant an inch or so at a time.
Either way will work, it seems. I just wanted to see if there was any magic method I was overlooking. Thanks for the input!
-
I'm putting together my first system and am building a sump from a new glass 20H tank (that's what'll fit in my stand). So anyway, I've got the sump designed and have incorporated a bubble trap into the design as well. I've even gone so far as to mock up the baffles in cardboard to see how it will all fit together. The baffles will be 1/4" acrylic. Here's my question:
I'm planning on putting the bubble trap baffles 1-inch apart. However, I've read that I'm supposed to put aquarium sealant on both sides of each baffle. This leaves me wondering exactly how I'm supposed to get the aquarium sealant down into this 1-inch space when there's another baffle next to the one I'm putting in.
I'm hopeful that any of you who've been through this before can enlighten me on the technique you used.
Right now, I'm thinking about only sealing one side of each baffle and maybe putting an acrylic block on the back side of the baffle to "pin" it in place. It may, however, be sufficient to only caulk one side of the baffle. I don't know. What's your opinion?
New guy!
in General Discussion
Hey there! Hope your move goes smoothly and welcome!