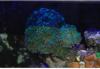
Glenn April 25, 2011 Share April 25, 2011 (Hope this is appropriate forum for this) First, thanks to Rob G. (TheFishman65) for the Group Buy on the LEDs and drivers, and some technical assistance. And thanks to Iangibby for the two heatsinks. Commentary: I plan to build TWO 24-LED units but am having issues with the 2nd build so these pics are one build with twelve 3-watt CREE Cool Whites (CW) and twelve 3-watt CREE Royal Blues (RB). Both strings are connected to my Apex for dimming ability. Pic 1 - 1800hrs - 100% CW, 100% RB Pic 2 - 1830hrs - 75% CW, 100% RB Pic 3 - 1900hrs - 50% CW, 100% RB Pic 4 - 1930hrs - 25% CW, 75% RB Pic 5 - 2000hrs - 0% CW, 50% RB Pic 6 - 2030hrs - 0% CW, 25% RB (ps - sorry about the reflections - I'll actually try to take some better pics next weekend (when I have the 2nd build in-place (fingers crossed :-) )) Link to comment Share on other sites More sharing options...
DaveS April 25, 2011 Share April 25, 2011 Very interesting pictures! Can you provide some info on tank size, heat sink size, led placement and optics used? I'm trying to figure out how to arrange mine so that info would help. Thanks. Link to comment Share on other sites More sharing options...
Glenn April 25, 2011 Author Share April 25, 2011 The tank is a 50g acrylic - approx 36x15x20tall. As you can see, it's pretty sparse for now - everything was moved from the 60cube and we're not working to enhance it much since we're moving in the Fall and want to limit livestock. I am going to add ONE piece of SPS for an LED test :-) The heatsinks are standard heatsinkusa.com type heatsinks - two 4.5x 12's, welded together to make a 9.12 heatsink. (The welding was done by iangibby before he sold them to me.) The LEDs are placed 6x4 across the heatsink - 3 CW's and 3 RB's, approx 2" apart, running down the 12" length of heatsink, the 2nd row is again 3 CW's and 3 RB's, alternating the pattern of the first row, and continuing the same pattern for the 3rd and 4th rows. For now, no optics. I may change that once I get the 2nd LED build completed. The heatsink is sitting 3/4" off the top of the aquarium - in the 6pm picture (pic #1) you can see the shadows that this creates in the upper corners of the tank. Since everything in this tank is 'front and center' of the tank, the shadows are not an issue. When I move all of this (and maybe additional LED builds) to the 180 (6x2x2), and have more liverock and livestock, I won't want the shadows. Link to comment Share on other sites More sharing options...
RicSG April 25, 2011 Share April 25, 2011 Can you post the picture of the LED unit? If possible. Also how much did you spend. I have 90 Gal tall and am trying to go LED route. Link to comment Share on other sites More sharing options...
Guest thefishman65 April 25, 2011 Share April 25, 2011 Nice pictures! We got the ELN driver fro $25.50, the CW for about $4.75 and the RB for about $3. I will probably start a buy in a month or so - no guarantee on prices as it is affected by volume and price of the dollar. Link to comment Share on other sites More sharing options...
Glenn April 25, 2011 Author Share April 25, 2011 To add to the costs that Rob gave for the drivers and LEDs, I think I paid about $65 for the two heatsinks. Incidentals (wire, solder, etc) were probably another $20. I'll try to get some more pics after the next build. Link to comment Share on other sites More sharing options...
Guest thefishman65 April 25, 2011 Share April 25, 2011 Sorry I get scrap heat sink material. It is not as easy to work with, but the price is right. Link to comment Share on other sites More sharing options...


Recommended Posts
Create an account or sign in to comment
You need to be a member in order to leave a comment
Create an account
Sign up for a new account in our community. It's easy!
Register a new accountSign in
Already have an account? Sign in here.
Sign In Now