


waboss
-
Posts
402 -
Joined
-
Last visited
Content Type
Profiles
Forums
Gallery
Events
Store
Posts posted by waboss
-
-
What @DaJMasta said is very good information.
One of the main "keys" I'd reiterate is to watch a lot of videos and if you use Facebook, join a few groups so you can see some of the successes, and failures, that others have had. Plus it'll expose you to how versatile the printers can be.
Many folks get a 3D printer and "go nuts" upgrading everything because they saw someone else do it and they were successful. My advice would be to get a good solid printer that has decent support and a good following (so you can ask for help if needed) to start with. And don't start upgrading things until you have a good handle on the basics (which would be the exact opposite of what I did..............so I know what I'm talking about! haha).
Personally I've used Creality, Tevo (now Homer), and Prusa printers. The Prusa was probably the "easiest" to use, and probably the nicest, but I needed larger print areas, so now I use a Creality CR10s-Pro. I'll likely soon be getting a CR6-Max (if it's ever in stock) so I can have an even larger print area (I want to print a set of larger sump baffles and a larger ATS!).
With all that being said, if you have any specific questions, feel free to PM me.
-
1 hour ago, Whitewillsmiff said:
That's awesome! I just started looking at ways to fab up an ATS, looks like everyone is sold out of the pre-fab units.
Thanks! Yeah, I really just wanted one that fit where I needed to put it. Now I keep refining it (one day I might actually swap in one of the new ones! hahaha).
If I can help ya out, just let me know. Heck, I might even have an extra complete "body" somewhere.
-
Wow, I just happened to check and saw some folks had posted to this thread. My apologies for the delay in responding.
First, yes, I'm printing with PETG. I was using ABS, but the smell eventually annoyed me enough to switch to PETG.
Secondly, yes, there's been several new iterations of it. Some of the changes are:
- Slimmed down the "viewing window" to help minimize light bleeding out (I still need to make a cover for so you can just close it unless you want to se it)
- Added some tabs to the windows for the lights to also minimize light bleeding out
- Increased the height of the "walls" on the base
- Added a single vent to the top which helps with pressure causing an overflow if you try and put the top on with the pump running (I tried it with 4 small vents in each corner too, but I like the single better).
Recently I've modified it to "make" 2 newer versions
- One is a much slimmer ATS (about 43mm narrower) which I think will be fine, but I'd need to print one to test it out (based on everything else I've done, it should work fine though)
- The second has no "light windows" in case you want to use submersible LED's like the GEM lights from Santa Monica (I'm thinking of ordering a set of the lights to test this one out
The reality though is that I'm still running the first prototype though (with a warped top and all from some bed adhesion issues when printing). It works fine. I'm pulling massive amounts of algae off the screen weekly, and my nutrients are much more under control. So I haven't had a reason to pull it and replace it. I have 2 other ones printed that I thought I might swap it out with, but my motivation is pretty low with this one working so well.
-
I've had several different turf scrubbers over the years and they all had good and not so good points (for me anyway). Plus I always had to figure out how to mount them by making shelves or supports over the tank and stuff like that. Recently I've gotten into 3D printing, and I decided "why don't I make one that fits exactly like I want it to"?. So that's what I did.
This one fits almost perfectly over my 20L sump (I say almost because I really should make it about 3mm longer, so there's less wiggle room).
Some thoughts I had as I built it:
- I want it to fit my sump, with no extra supports
- Needs to be easy to open and maintain
- Would prefer to be able to use "off the shelf" parts to fix or upgrade it
- Need to be able to see in the ATS to monitor growth and determine when to clean it
- Would be nice if it was designed so I could easily adjust the dimensions if I needed to
I've already made a few changes from my original design out of necessity or finding things I didn't think of at first. I'll even share a couple of them here. Things I really should have thought about, but didn't:
- If the drain tube is in, and the lid seals to the base too well, there's going to be a pressure imbalance that will force water over the edges of the base and cause an overflow
- Might want to find lights that have longer cables, these are a little short and can get in the way if not routed properly
-
The walls on the base need to be a bit taller than I expected as I didn't account for the height of the drain bulkhead with the seal on it
- I need to tweak the design again and reprint. I want to bring the "walls" up on the base a little more and also create light "shades" built into the base around the lights, so there's not so much light bleed. Also, I had planned to make a "door" or panel or something like that for the front window to also block light. But overall, I'm pretty happy so far.
Anyway, this is what I came up with (if the video works, if not, maybe it'll show you the link):
-
On 9/14/2020 at 12:03 PM, molcott said:
are there any good fish safe filaments that are easier to print with than PETG?
I know this is a little older of a post, but I just saw it and have recently been printing a fair for my tank, so I thought I'd chime in just in case it's useful.
PETG is what I settled on after getting really tired of the fumes from ABS and not having a good way to vent them out of my office at home. Not all PETG's are created equal though, I've found a couple that print really well for me after trying several.
If this topic is still of interest to you, feel free to respond or PM me with what issues you're having with it (I'm guessing bed adhesion/warping, possibly some stringing, and maybe even layer adhesion)
-
21 minutes ago, Ben A said:
Send me a pm. I'm finishing one and working on a second so it will depend on how much of a rush your in, but I've built a lot of WAMAS members.
Thanks, PM sent
-
So I was getting ready to build a stand, and after doing some math, realized that by the time I buy the materials, and then the equipment, like saws and such, it would probably be the same cost to me as just buying a stand already built. So before I jump in and just build one, I thought I'd see if anyone on here wants to make a little dough and build a stand for me. It'll be nothing fancy, and is pretty small, something like 48x24x36 with reinforcement/braces for a slightly smaller tank.
Anyway, hit me up with a PM if you're interested and we can chat.
-
Well, dug up an old killawatt meter I had (and forgot about), plugged in the transformer with the bulb attached...nothing, not even an attempt. So I'm going to guess the transformer is toast.......sigh.
-
Ok, so I've been running an Aqua UV 15w HOB filter on my tank for about a year. I decided I did't like the HOB look (or how it causing a little salt creep on the rim of tank), so I picked up a used Aqua UV 25w in line. It didn't come with a bulb, so I picked up a new one but it won't fire/light when connected.
Sooo, I'd like to test the ballast and/or bulb. I need to borrow a transformer though to test the bulb, unless I can hook it up to my 15w transformer (I'm just not sure if it'll even fire......even if it's just dimmer, at least I'd know the new bulb was good, and in that case, it's probably the ballast/transformer)
That probably makes the most since, unless I can find another 25w ballast to test with.
Any ideas out there?
-
Ok, so added 2 T5's to the sides of the Photon V2. Not that I needed the PAR, but I wanted something that looked a little better and would help with shading.
Right now, everything is still very blue until I get the GHA fully under control, then I'll start getting a bit more balance to the color (I'll always keep it on the blue side, I like it, and when I'm diving, that's usually closer to the colors I see under water).
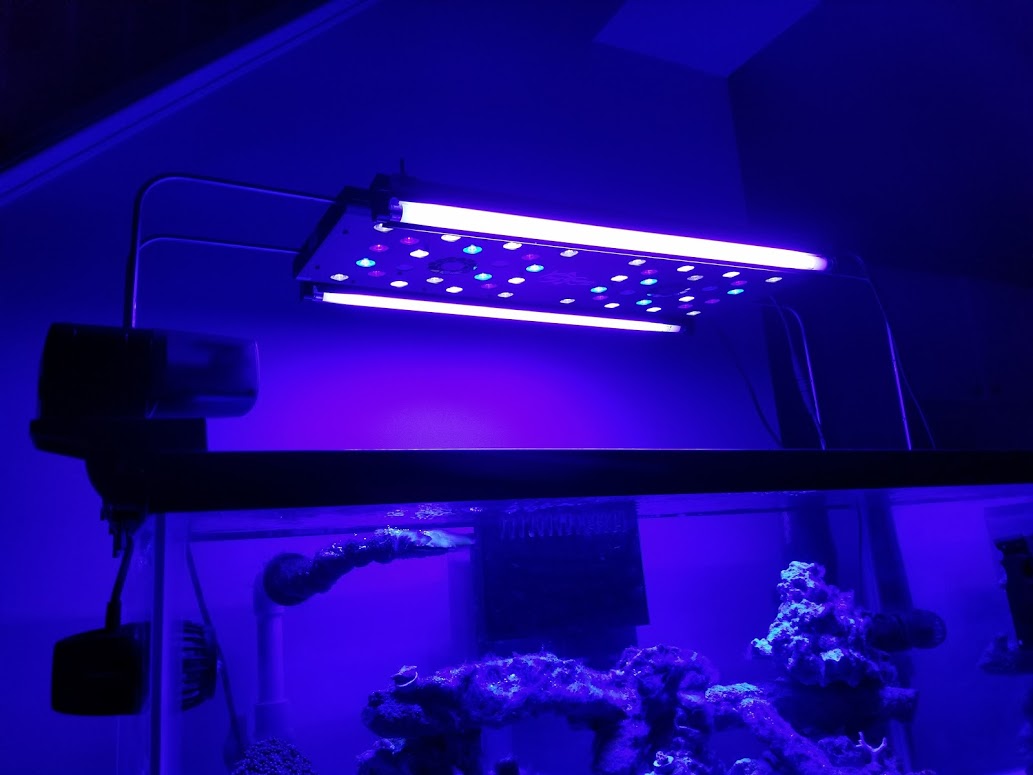
So there was a good amount of light bleed in the room before the T5's, now there was waaaayyyy too much, so I built a "canopy" for it (open top).
I was going to switch it around and hand the lights from some shelf brackets I would mount to the wall, but after looking at it, and feeling a little lazy, I decided to just notch out the canopy on the side to accommodate the "feet/arms" of the stand for the light. It looks ok from 5 feet away, it's a little rough up close though. If I decide to hang the lights later on, I can just wrap the canopy with a nice vinyl wrap and it'll cover the notches anyway.
I need to take the notches up a little higher to fully "block" the T5 light bulbs from being seen when laying on the couch watching TV, but I'm going to add another brace across the side (on the inside) first. Just to be safe.
-
I'm liking the new sump area. What are you running in the mini media reactor?
I'm running carbon and GFO.......I pulled the biopellet reactor I had on the system as I got a huge GHA and cyano outbreak that I couldn't get rid of while running it.
Since I've removed it, cyano is gone and GHA is slowing disappearing (of course adding 20 snails and a lawnmower blenny helps too!)
-
Looking good. Looking forward to following your build

Thanks! I need to update this thread, probably tonight.
-
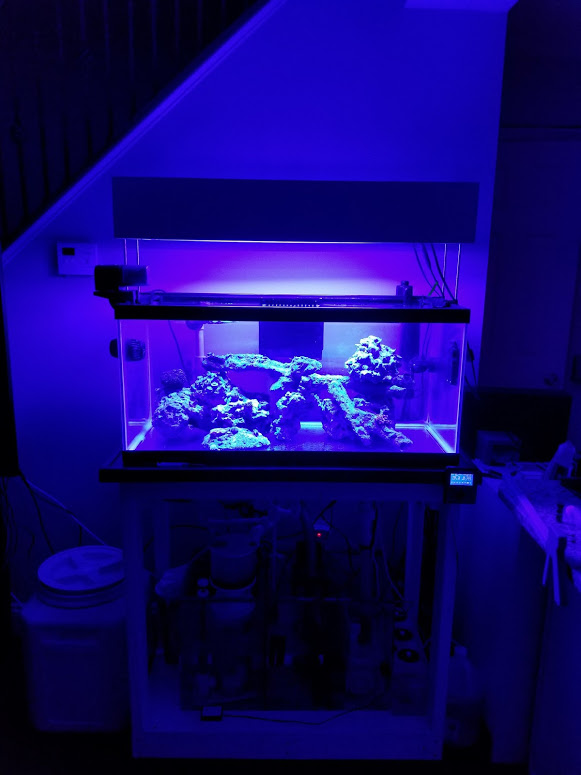
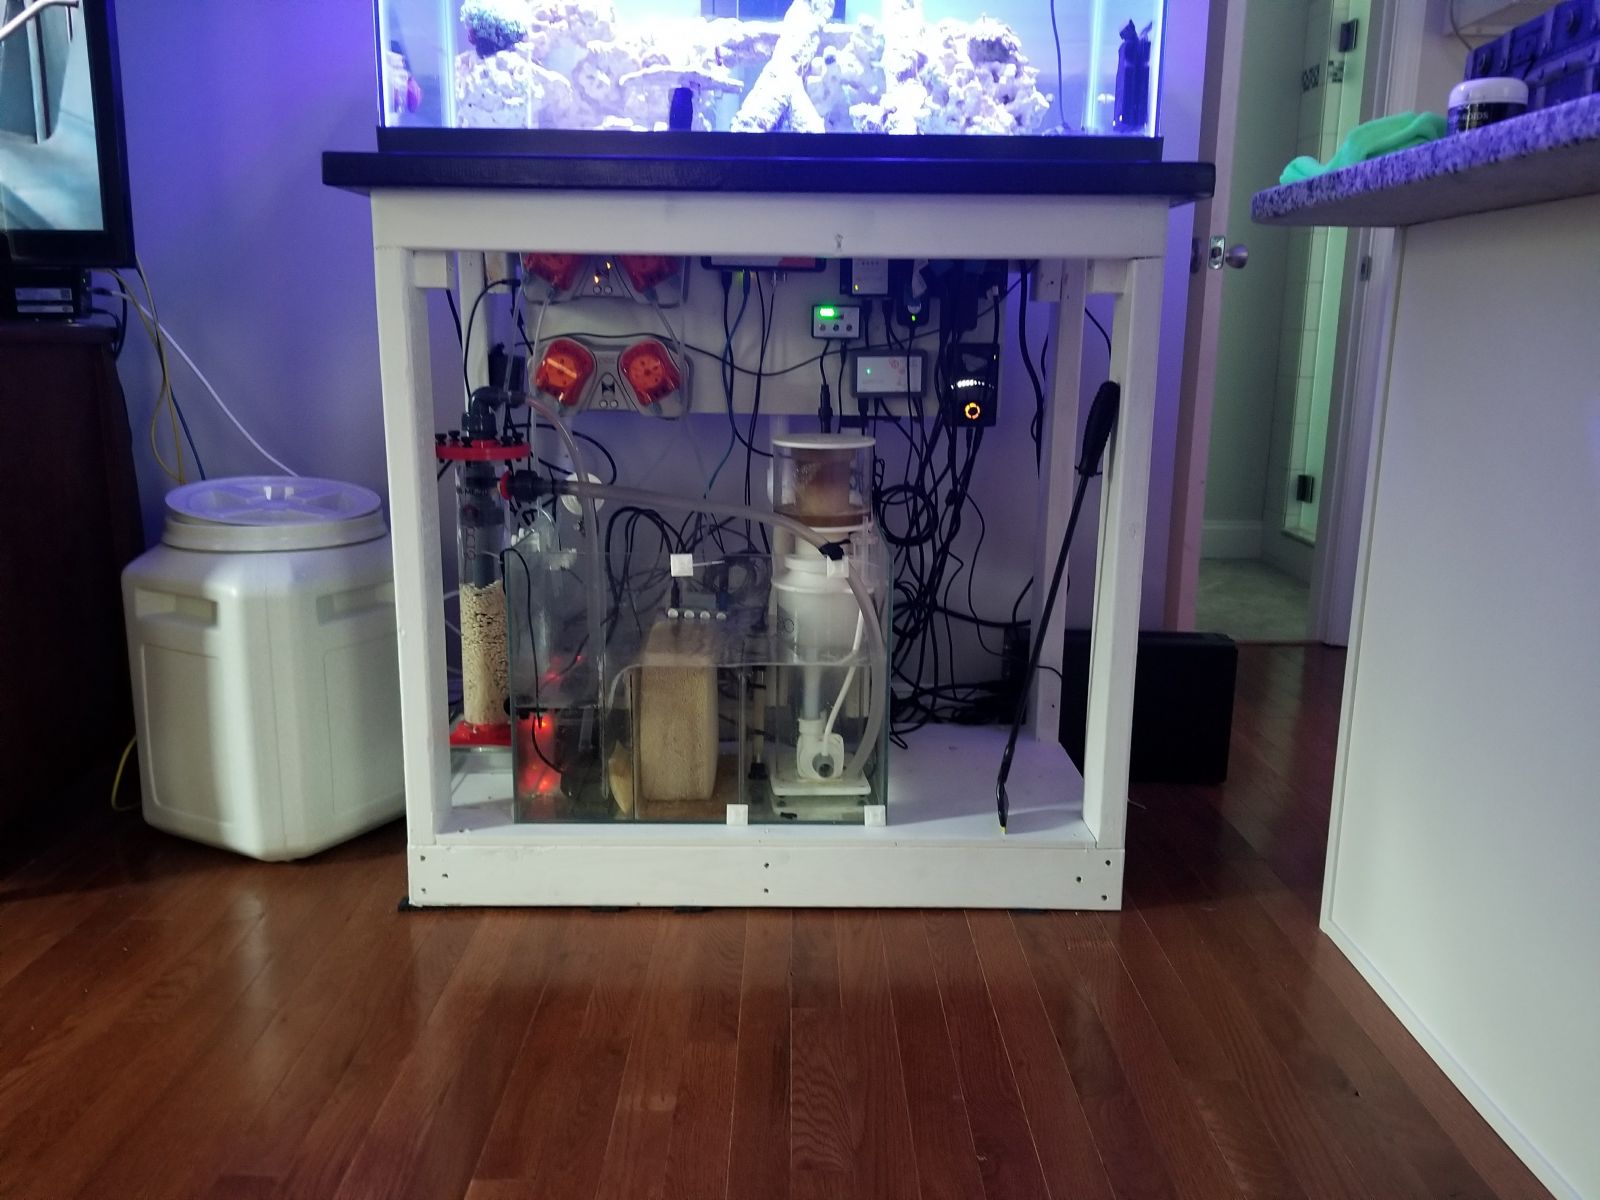
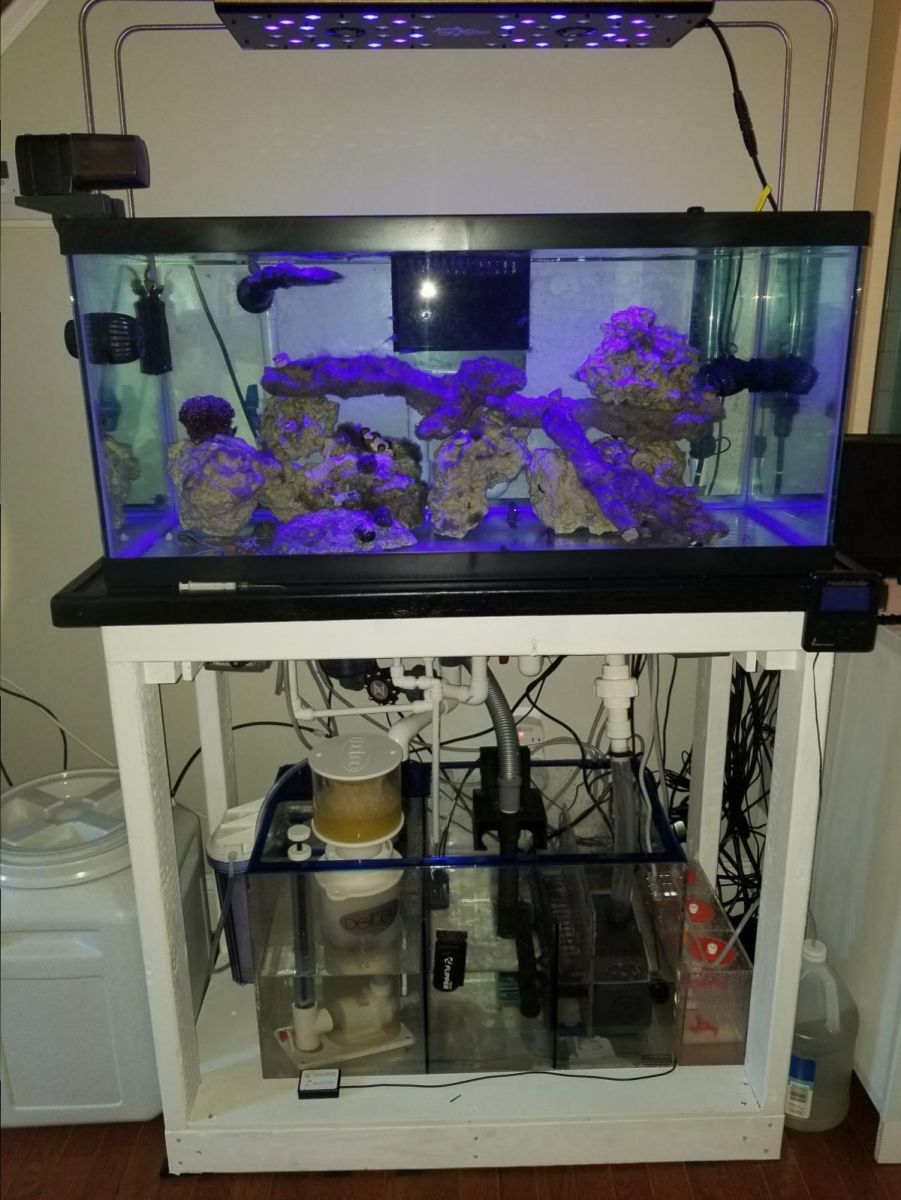
I recently moved and decided I wanted more horizontal space in the tank and wasn't really diggin' the cube design of my Reefer 170. So, since cash was a little tight during the move and I didn't really want to drop a bunch on a newer Reefer, like a 250 0r 350, I decided to go "old school" and just build a stand and drill a 40 breeder.
Now, to be fair, I did check with a couple of local builders to have a custom tank and metal stand built, but in both cases, it didn't work out. One had too long of a wait list for my needs and the other became unreachable after getting the quote. So that also helped "push" me into this decision (time will tell if it was a good idea or not......haha!)
So here's some details of the tank right now:
-Aqueon 40 Gallon breeder drilled for an eShopps Eclipse overflow and a 3/4" return
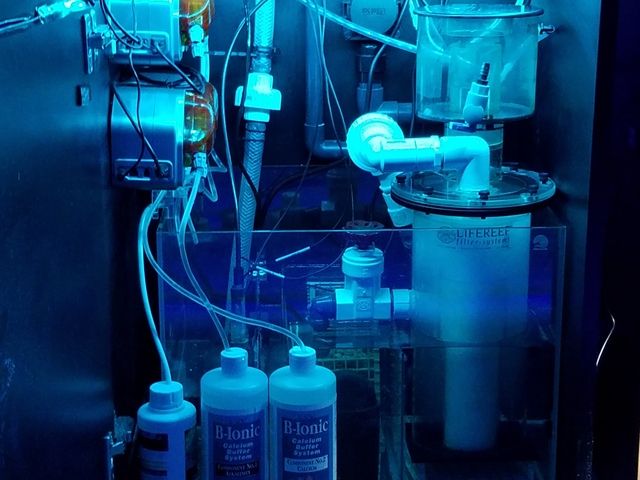
-Quiet One 5000 Return feeding a manifold for the other filters/reactors
-Deltec SC1351 skimmer
-Neptune Apex Classic
-2x DoS-FMM module with sensors on return and UV filter
-BRS mini media reactor
-MP10 QDW
-Jebao PP-4
-Reefbreeders Photon 24 V2-Aqua UV HOB 15 watt UV filter
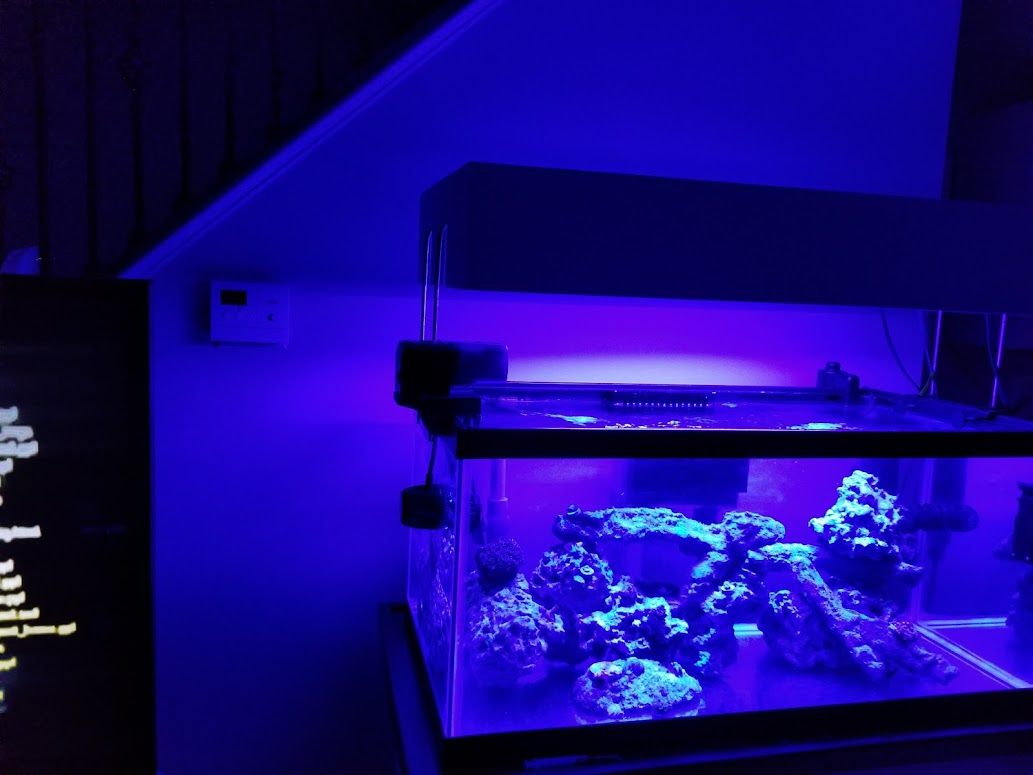
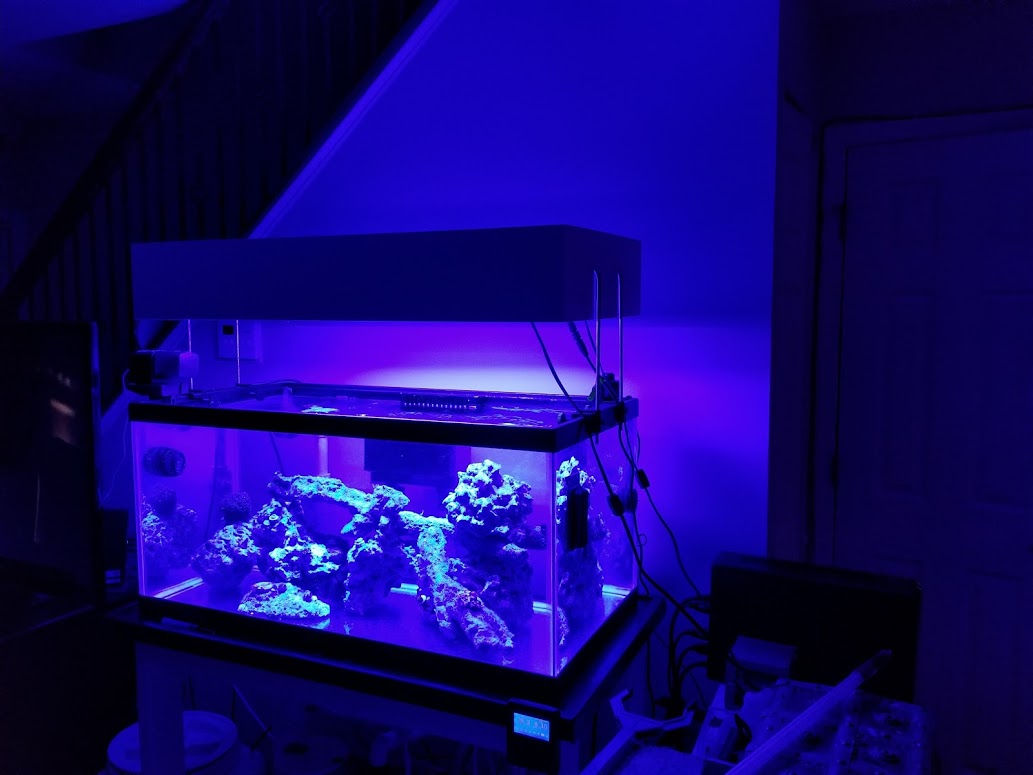
So when I moved, I moved the LR (kept it wet) and just did basically a full water change. I did scrub the LR, in tank water, before putting it in the new tank since I had some hair algae issues in the old tank (looking back, I should have just started over......but I was trying to keep my coral and critters alive and happy...this partially worked).I still need to build the panels to enclose the cabinet. I have all the hardware, but need to go get some nice panels, cut them down, and stain them.
Here it is after "initial" setup(Initial is in quotes as I made several little changes during the very beginning of setup)

I was really tired of having so many pumps and cables in my sump, and I wanted to free up the refugium area to use it for some macro algae,so I beefed up the return pump and added a manifold.
Here's where we are now:
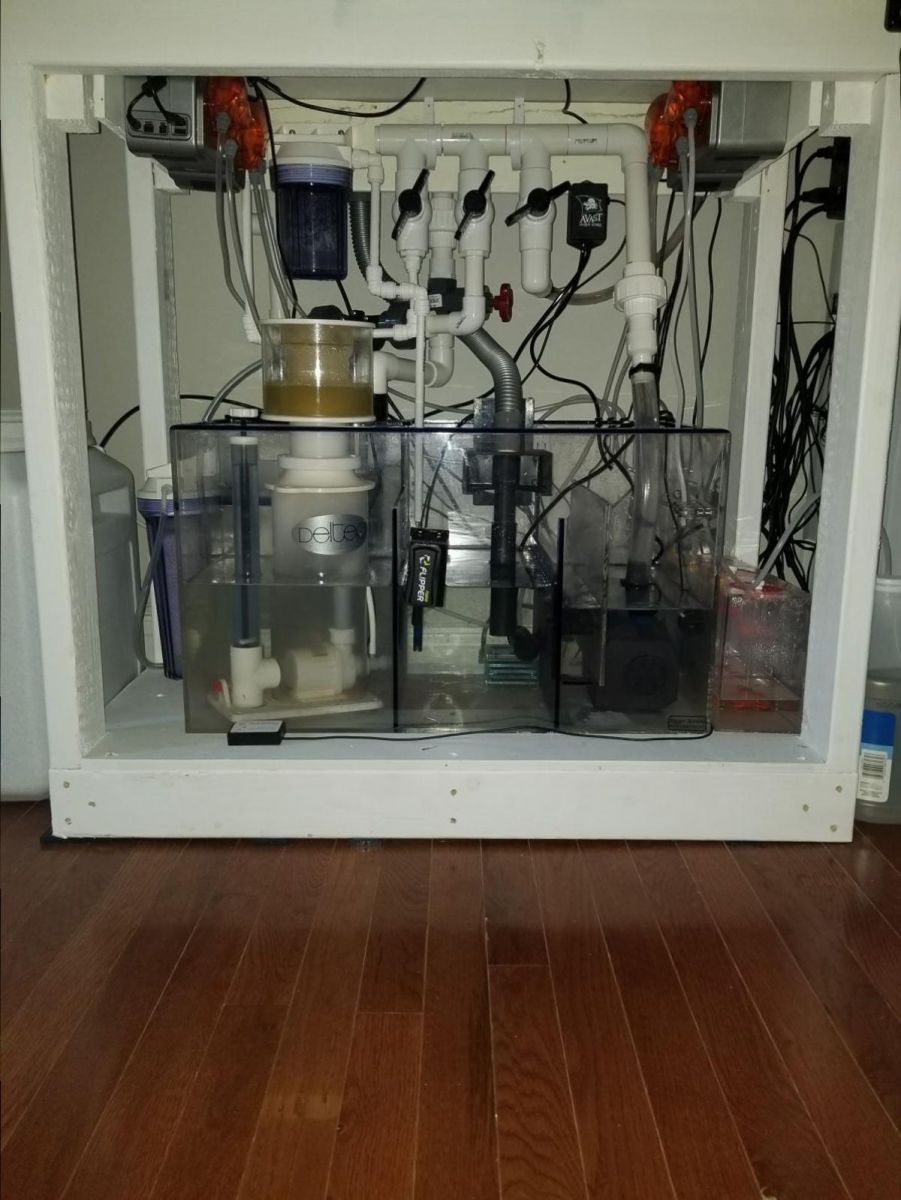
During this whole build out, I was dealing with some cyano issues and hair algae (probably from the move and then all the tinkering I was doing). The cyano is prett much gone now and the hair algae is getting under control. So I'm hoping to have it all healthy and "smooth" soon. Well, until I decide I hate the 40 breeder and go with something like a CAD lights shallow or have something else built.
-
it's been a while, so I figured I'd post an update.
Tank's been through a few changes and I've been hemming and hawing on either just shutting it down and getting out until I buy another house, or changing it around to make it more "attractive" to me. Currently I'm on a lagoon style kick but haven't made any decisions yet and I keep tinkering, so it's staying interesting. I'm getting to the point where I really want to leave it alone and watch things grow, but that never seems to happen.
Since my last update on the tank, I've done the following:
-Changed the lighting again, first to a Nanobox LED (was not happy with it) and then to an AI Hydra 26HD. I ended up adding a second one purely for coverage to minimize shadowing but I'm leaning towards taking both of them down and just using a single Hydra 52HD or 2x AI Prime HDs. To be honest, I was getting fed up with trying to tweak the individual colors and was thinking of going back to the Kessils until I found the Kelvin settings on the AI software, now I'm very happy with the Hydras.
-Pulled my BRS dosers and installed 2x Netpune DOS's . They're pricey but they made my life easier and the tank is more stable. So that was definitely a good thing. The "bad" thing is that I may end up dosing more additives (KZ or red sea) and I'll need more heads. So I may end up pulling 1 of the DOS's and adding a 5th Kore or Profilux.
-Picked up an Aquamaxx rimless cuboid tank and turned it into a sump. Swapped it out with the stock one that comes with the Reefer and now I have much more room to see and work on things. It was all about layout....had nothing to do with quality. The sump Red Sea supplies is top notch, I just got tired of dealing with the layout.
-Went through a bit of a "flow changing" craze. Had a Gyre xf-130, switched to 2x Tunze 6055's, then back to the Gyre, and finally landed on 2x RW-4's connected to my Apex. They may be cheap, but they seem to be working better for me than my other options (similar to the Tunze 6055's, but they were just too big).
-And most recently, this past weekend actually, I pulled out all the rock that had aptasia on it (there's was a fair amount) and redid my rock work with reefcleaners dry rock.
-
Thanks for all the input so far! I like the idea of a longer tank, and while I know it'll be safe as long as I run it across the joists, convincing my landlord is another thing. My last tank, before I moved here, was 96x24x24.......the length was great! On that tank, I made my own sump from a 75Gal and a refugium from a 40Gal, which all worked out well.
I have considered, for about a NY minute, a cadlight tank and stand but I've seen, and heard, from folks, including people I know personally that their quality has dropped considerably.
I've even priced out a custom tank/stand from Reef Frenzy, Reefomania, and a couple of acrylic custom builders. I'm not crazy about acrylic tanks but thought I'd check them out.
I guess I'm kind of in a spot where I don't want to invest a ton in a custom tank as I plan to move within the next year or two, when I buy a house, and then I'll be going back to larger setup.
Decisions, decisions......
-
You know, I really do like that tank, but it's an AIO and I want to stay with a sump and such. So if I were to go that route, I'd need to remove the rear sections and either drill the tank (not a big deal) or use an overflow box.
I mean if I found a great deal on one, I might go that route.....just because it is a cool tank. Thanks for the input!
-
OK, so here's the deal.
I have a Red Sea Reefer 170, which I do like a lot and it's a H-E-double hockey sticks of a tank/stand/sump combo. What I don't like, and didn't realize until after I had it up for months, is that I'd really prefer a shallower tank with a little more length to it. It will have to stay at about the same volume as weight is an issue in my second story apartment.
So here's what I'm thinking at this point. Pick up a Deepblue 36x18x16 rimless, RR, tank and a R&J Oak Extreme stand.
Pro's
-36" in length vs. the 24 I have now. Allows a little more "room" for fish to swim and coral placement is easier (for me)
-Takes about 4" off the height of the tank
-Stand has a reputation for being built like a tank (which is one of the things I really like about the Reefer170 stand)
-Stand is a little taller (36") so plenty of room and better viewing for a shallower tank
-It's not a cube! Or cube-ish. I'm becoming less and less of a fan of cube tanks
Cons
-Money man....spending more bloody money!

-In relation to the first con, need to buy a good sump as well (probably a ruby trigger)
-All the mods I've done to my setup will be "lost" many won't tranferr over to the new system
-Have to get rid of my Reefer 170 once I've moved everything over
-Work involved in moving tanks....not a big deal, but is something to consider
So after taking the time to write this post, it's pretty evident that all the cons will there no matter what I do, if I switch tanks......so there's that!
Anyone have any helpful thoughts, comments, ideas?
-
Ok, made a quick video today during maintenance of the reactor running.....if you can hear it, you're better than I am!
-
Well, I need to do a water change tomorrow anyway, so I'll have everything shut down. Maybe I'll make a quick video of the reactor running solo so you can check out the noise level.
-
Cool! I work well with lists
1- First couple of days, no, but it's not loud either. After a few days, it's pretty quiet, I can't hear it at all with everything else running.
2- I think so. Well, so far anyway. I'm still not sure about this whole "fluidizing" carbon thing....but it seems to be working well so far.
3- It seemed very effective. I didn't end up with carbon "dust" floating around my tank or even on the while acrylic pieces of the reactor....but to be honest, see the second part above.
4- I can't really speak to that, you can email them though or ask in their dedicated part of this or other forums. From my experience, they get back to you pretty quickly (email is probably best).
Hope this helps!
-
I have their smallest spyglass in the sump of my Reefer 170. It seems to work well and stays pretty silent after the first couple of days.
I had issues with media falling down below the ball they use to separate the output of the pump from the media, but just installed the small mesh "plate" and it working much better now. What all do you want to know?
-
I haven't picked them up yet, but I've been thinking about it. My tank's pretty small though (34 Gal display) so I could probably only use 1 as 2 would probably make it like a tsunami in my tank. I like the idea of controlling it from my Apex but I'm afraid that with only being able to use 1, I'd have too many dead spots.
-
Yeah, they work out well, and they make a nice place for pods to spawn.
-
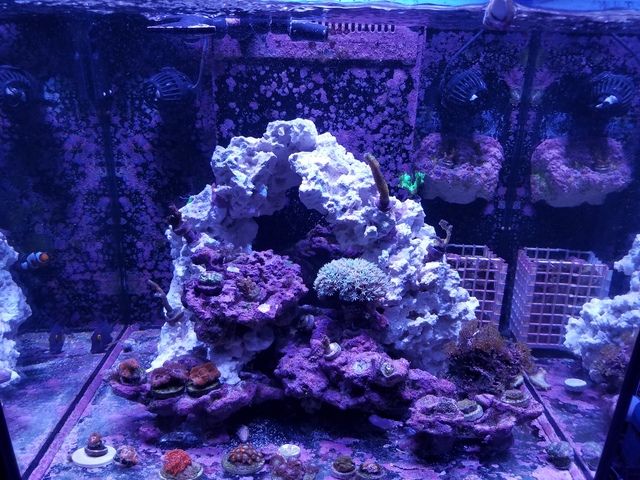
I just realized that I never created a build thread over here for my new (well, new-er at this point) Red Sea Reefer 170. I had a BC29 that I had started a thread on but that kind of grew into what I have now.
A little history first I suppose. I just got back into reef keeping about a year ago and started back in with a Biocube 29. Within about 6 months, I converted/tweaked/hammered/cut everything on it so that it wasn't really an AIO anymore (go figure) and I really wanted a little more real estate for rock work and such.
So.......I started looking around at all the reef ready tanks that were easy to get and decided that if I went that way, I'd go with a Deep Blue 20x20x16 or a 24x24x12. So I kept looking around and checked on the Red Sea Reefer tanks but they were still too hard to find at the time (or so I thought). As things sometimes go, I got busy and didn't really push it along for a month or so. Which is a good thing since the more I kept checking out the reefers, the more I liked them.
On a whim, I decided to check with around locally again to see if any were available. Well, as luck would have it, Quantum Reefs did have one in stock. So there we go! It must be fate right? Well I picked up the 170 brought it home and set it up (let me tell you....that bloody thing is pretty darn heavy.....lugging it up my steps was I'm sure a comedic scene).
After getting it setup, the rest of the night (and on into the morning) was devoted moving it into the right place (after moving the BC29 out of it), getting familiar with the overflow adjustments, and migrating all my crittters that were in the BC29 to the 170. It all went pretty smoothly though, just some of the "normal" issues one has when doing this stuff. Like not premixing enough seawater, misplacing one of the clamps for the return, you know, stuff like that.
So now it's been up and running for 2 months and doing pretty well. Of course I haven't stopped tweaking it a little here and there, but I think I need to just let it "grow" for a while before making any more large changes. To be honest, now that I have had it up and running for a couple of months, I do really like it, I just wish it wasn't quite as tall as it is. I love how tall the stand is, but I kinda wish the tank was about 4-6 inches shorter (no, I'm not going to cut it!).
And now for some pics.
Here it is right after I set it up:
(yes, there's a little cyano on the side of the frag rocks......annoying)

Inside the stand:

After I swapped out the MP10 for a Gyre 130:

Some shots of my "tenants":


When my Skimz SN123 skimmer froze up and I had to run a SCA-302 for a couple of weeks:
(also moved the marinepure spheres to the sump)

New look under an ATI 6x24w instead of the Kessil:


Only thing different now is that it's back under the Kessil instead of the ATI due to some relay issues on the ATI (I think). I haven't decided yet which light I'm going to keep in the long run.
I'll try to keep this thread updated.
NooPsyche K7 PRO III
in General Discussion
I had the II's, they worked just fine. But yes, the controller can be very annoying when programming.
From what I've seen the III's are even better. I have a friend who's growing insanely colorful SPS and LPS under them that look amazing.
If I were looking for a light now, I'd be looking at getting them.