waboss
-
Posts
400 -
Joined
-
Last visited
3 Followers


waboss's Achievements
Master Reefer (8/13)
-
I had the II's, they worked just fine. But yes, the controller can be very annoying when programming. From what I've seen the III's are even better. I have a friend who's growing insanely colorful SPS and LPS under them that look amazing. If I were looking for a light now, I'd be looking at getting them.
-
What @DaJMasta said is very good information. One of the main "keys" I'd reiterate is to watch a lot of videos and if you use Facebook, join a few groups so you can see some of the successes, and failures, that others have had. Plus it'll expose you to how versatile the printers can be. Many folks get a 3D printer and "go nuts" upgrading everything because they saw someone else do it and they were successful. My advice would be to get a good solid printer that has decent support and a good following (so you can ask for help if needed) to start with. And don't start upgrading things until you have a good handle on the basics (which would be the exact opposite of what I did..............so I know what I'm talking about! haha). Personally I've used Creality, Tevo (now Homer), and Prusa printers. The Prusa was probably the "easiest" to use, and probably the nicest, but I needed larger print areas, so now I use a Creality CR10s-Pro. I'll likely soon be getting a CR6-Max (if it's ever in stock) so I can have an even larger print area (I want to print a set of larger sump baffles and a larger ATS!). With all that being said, if you have any specific questions, feel free to PM me.
-
Thanks! Yeah, I really just wanted one that fit where I needed to put it. Now I keep refining it (one day I might actually swap in one of the new ones! hahaha). If I can help ya out, just let me know. Heck, I might even have an extra complete "body" somewhere.
-
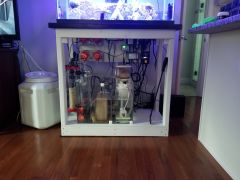
@thewire @Aquastudent Wow, I just happened to check and saw some folks had posted to this thread. My apologies for the delay in responding. First, yes, I'm printing with PETG. I was using ABS, but the smell eventually annoyed me enough to switch to PETG. Secondly, yes, there's been several new iterations of it. Some of the changes are: Slimmed down the "viewing window" to help minimize light bleeding out (I still need to make a cover for so you can just close it unless you want to se it) Added some tabs to the windows for the lights to also minimize light bleeding out Increased the height of the "walls" on the base Added a single vent to the top which helps with pressure causing an overflow if you try and put the top on with the pump running (I tried it with 4 small vents in each corner too, but I like the single better). Recently I've modified it to "make" 2 newer versions One is a much slimmer ATS (about 43mm narrower) which I think will be fine, but I'd need to print one to test it out (based on everything else I've done, it should work fine though) The second has no "light windows" in case you want to use submersible LED's like the GEM lights from Santa Monica (I'm thinking of ordering a set of the lights to test this one out The reality though is that I'm still running the first prototype though (with a warped top and all from some bed adhesion issues when printing). It works fine. I'm pulling massive amounts of algae off the screen weekly, and my nutrients are much more under control. So I haven't had a reason to pull it and replace it. I have 2 other ones printed that I thought I might swap it out with, but my motivation is pretty low with this one working so well.
-
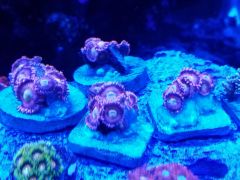
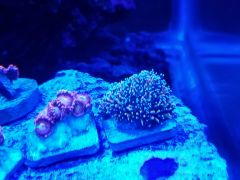
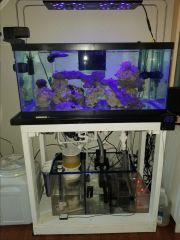
I've had several different turf scrubbers over the years and they all had good and not so good points (for me anyway). Plus I always had to figure out how to mount them by making shelves or supports over the tank and stuff like that. Recently I've gotten into 3D printing, and I decided "why don't I make one that fits exactly like I want it to"?. So that's what I did. This one fits almost perfectly over my 20L sump (I say almost because I really should make it about 3mm longer, so there's less wiggle room). Some thoughts I had as I built it: I want it to fit my sump, with no extra supports Needs to be easy to open and maintain Would prefer to be able to use "off the shelf" parts to fix or upgrade it Need to be able to see in the ATS to monitor growth and determine when to clean it Would be nice if it was designed so I could easily adjust the dimensions if I needed to I've already made a few changes from my original design out of necessity or finding things I didn't think of at first. I'll even share a couple of them here. Things I really should have thought about, but didn't: If the drain tube is in, and the lid seals to the base too well, there's going to be a pressure imbalance that will force water over the edges of the base and cause an overflow Might want to find lights that have longer cables, these are a little short and can get in the way if not routed properly The walls on the base need to be a bit taller than I expected as I didn't account for the height of the drain bulkhead with the seal on it I need to tweak the design again and reprint. I want to bring the "walls" up on the base a little more and also create light "shades" built into the base around the lights, so there's not so much light bleed. Also, I had planned to make a "door" or panel or something like that for the front window to also block light. But overall, I'm pretty happy so far. Anyway, this is what I came up with (if the video works, if not, maybe it'll show you the link):
-
I know this is a little older of a post, but I just saw it and have recently been printing a fair for my tank, so I thought I'd chime in just in case it's useful. PETG is what I settled on after getting really tired of the fumes from ABS and not having a good way to vent them out of my office at home. Not all PETG's are created equal though, I've found a couple that print really well for me after trying several. If this topic is still of interest to you, feel free to respond or PM me with what issues you're having with it (I'm guessing bed adhesion/warping, possibly some stringing, and maybe even layer adhesion)
-
Thanks, PM sent
-
So I was getting ready to build a stand, and after doing some math, realized that by the time I buy the materials, and then the equipment, like saws and such, it would probably be the same cost to me as just buying a stand already built. So before I jump in and just build one, I thought I'd see if anyone on here wants to make a little dough and build a stand for me. It'll be nothing fancy, and is pretty small, something like 48x24x36 with reinforcement/braces for a slightly smaller tank. Anyway, hit me up with a PM if you're interested and we can chat.
-
Well, dug up an old killawatt meter I had (and forgot about), plugged in the transformer with the bulb attached...nothing, not even an attempt. So I'm going to guess the transformer is toast.......sigh.
-
Ok, so I've been running an Aqua UV 15w HOB filter on my tank for about a year. I decided I did't like the HOB look (or how it causing a little salt creep on the rim of tank), so I picked up a used Aqua UV 25w in line. It didn't come with a bulb, so I picked up a new one but it won't fire/light when connected. Sooo, I'd like to test the ballast and/or bulb. I need to borrow a transformer though to test the bulb, unless I can hook it up to my 15w transformer (I'm just not sure if it'll even fire......even if it's just dimmer, at least I'd know the new bulb was good, and in that case, it's probably the ballast/transformer) That probably makes the most since, unless I can find another 25w ballast to test with. Any ideas out there?
-
-
-
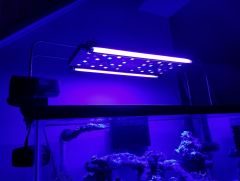
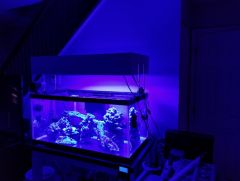
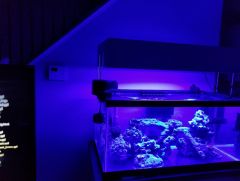
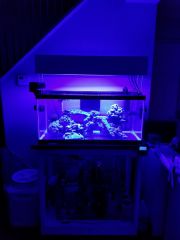
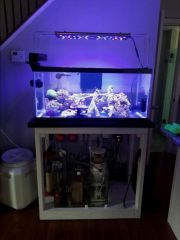
Ok, so added 2 T5's to the sides of the Photon V2. Not that I needed the PAR, but I wanted something that looked a little better and would help with shading. Right now, everything is still very blue until I get the GHA fully under control, then I'll start getting a bit more balance to the color (I'll always keep it on the blue side, I like it, and when I'm diving, that's usually closer to the colors I see under water). So there was a good amount of light bleed in the room before the T5's, now there was waaaayyyy too much, so I built a "canopy" for it (open top). I was going to switch it around and hand the lights from some shelf brackets I would mount to the wall, but after looking at it, and feeling a little lazy, I decided to just notch out the canopy on the side to accommodate the "feet/arms" of the stand for the light. It looks ok from 5 feet away, it's a little rough up close though. If I decide to hang the lights later on, I can just wrap the canopy with a nice vinyl wrap and it'll cover the notches anyway. I need to take the notches up a little higher to fully "block" the T5 light bulbs from being seen when laying on the couch watching TV, but I'm going to add another brace across the side (on the inside) first. Just to be safe.
-
Moved from Red Sea Reefer 170 to a 40 Breeder.
-
-
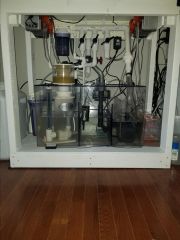
I'm running carbon and GFO.......I pulled the biopellet reactor I had on the system as I got a huge GHA and cyano outbreak that I couldn't get rid of while running it. Since I've removed it, cyano is gone and GHA is slowing disappearing (of course adding 20 snails and a lawnmower blenny helps too!)
-
Thanks! I need to update this thread, probably tonight.