stankyd
-
Posts
136 -
Joined
-
Last visited
Content Type
Profiles
Forums
Gallery
Events
Store
Everything posted by stankyd
-
Is a siphon returning water to the sump inherently bad?
stankyd replied to stankyd's topic in Do It Yourself
No, don't have a second drain. Regarding the risk of overflow, wouldn't that scenario be true of a vented Durso as well? -
I see posts all over the place saying that a siphon is very dangerous. My situation is that with a Durso pipe so much air is being sent into the sump I have uncontrollable micro-bubbles. After much tinkering I replaced the cap on Durso with one with no hole and it now siphons on purpose. The water drains very quickly and quietly and with zero air entering the sump. When I turn off the pump the water level drains and as long as it doesn't overflow the sump (not even close) before the siphon breaks. Upon turning the pump back on, the tank level rises and the siphon is automatically reestablished. Is there anything in apparently dangerous about this set up?
-
this sounds like a really creative project, cant wait to see more!
-
Really well done, i like the rockwork and the stand is really nice. Is all the plumbing (if any) above the stand?
-
here are the build out photos https://www.flickr.com/photos/davester1/albums/72157686968544316/with/36323171375/
-
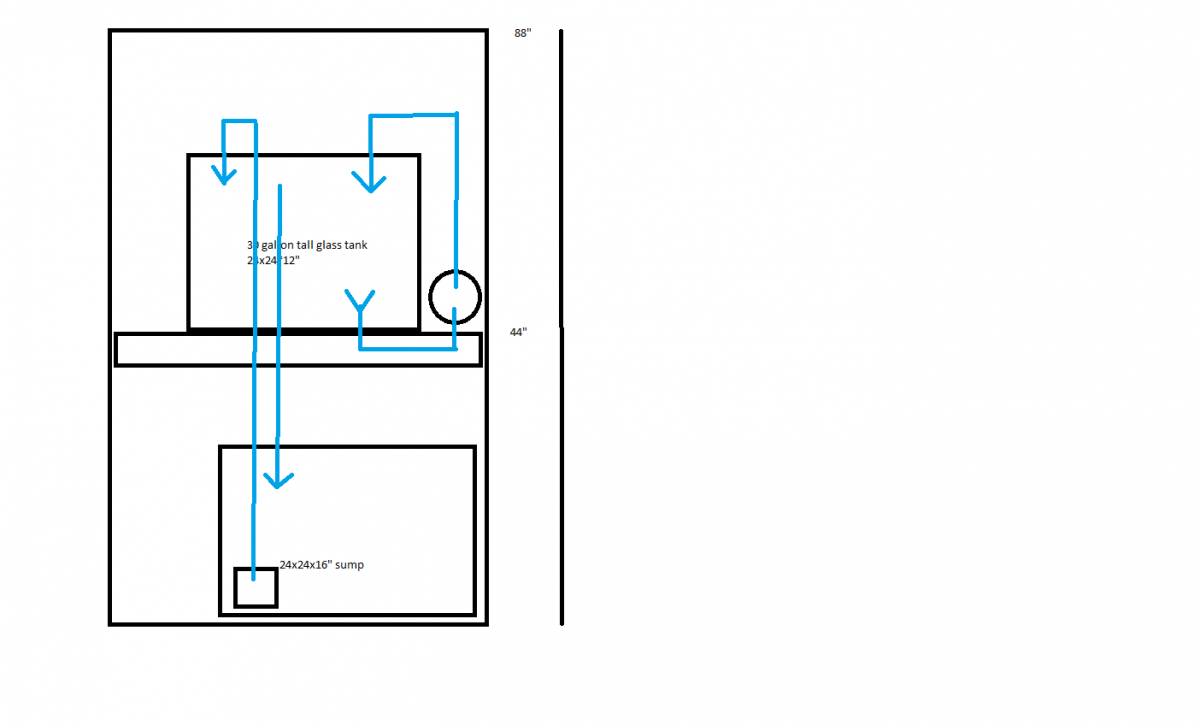
After recently selling my 300g acrylic and selling off my livestock, I am in the process of setting up my 30 tall. The wet bar had a sink and counter and i want to setup I guess whats call a mixed reef. Having large tanks in the past, i never realized how difficult "small" is! I have 2 water flow designs i would like to pass by you as i am about to start cutting PVC and am still unsure. This uses my main iwakii md70 as a closed loop and a smaller pump in a sump to circulate water through skimmer and refugium. My fear in this design is the water will get HOT and that the usefulness of fans / evaporation cooling would be diminished due to the relatively slow water flow through the sump. Advantages, 1. 2 pumps ensure flow in case a breaker kicks, 2. I dont have to cut into the plastic sump so its easier to change my configuration. 3. the closed loop let me put the pump intake down low for better circulation design 2 is simpler. Just a standard pump and sump but with more water flow into the sump, the cooling fans will have more benefit. I would love to hear your thoughts! Will post some pictures later today of the location. Corrected photo link https://www.flickr.com/photos/davester1/albums/72157687322124715
-
I like the "light" build and look of the stand design!
-
Not really sure of the cause and i have never had one of these workhorses die on me. iwaki repairmen are probably like the maytag guy.
-
I have an iwaki md70RLT just like this one and it was in storage for a couple of years. When i started it up it makes a high pitched whirling sound. it appears to pump very well when connected to my 30 tall in a closed loop configuration. Does anyone know of a good repair shop local or on the web?
-
My 8 foot acrylic tank has a ton of scratches from cleaning the algae. Wondering if anyone is good at removal of the scratches from a live fully stocked tank? Looking to hire in the Springfield, VA area. d.
-
Looking for someone with experience removing scratches from inside an acrylic tank while the tank has water/livestock. i just don't feel comfortable doing it.
-
thanks, that was very helpful!
-
Have had tanks for years but never seen them breed, any opinions? closer
-
in the past, fry have always just landed in the sump. i have had decent luck just leaving them there until well grown. D.
-
This is the nickname i gave for my previous tank back in Florida, had everything from anemone and riccordia to clowns and cardinals and angelfish breeding and splitting and dividing. Anyways, my wife noticed this white/clear egg sack the other day with definite embryos growing inside. There had been several prior that disappeared overnight, i assume crabs got to them or something. lets see if these hatch out. And dad i presume watching over and circulating the water around them with his tail and body The only other thing to breed in here so far were mollies. will keep you posted. D.
-
Well at end of 2 days, its really cleared up. No noticeable change in skimmate. Regarding bioload, here are about a dozen small fish clowns, a tang, damsels etc.. Taking it slow and easy. Have had no fish deaths to speak of since setting up. Very light coral load too and they surprisingly look pretty happy, showing nice growth and color. About to install led's over the tank soon. Will post my water params. My major annoynance is the hair algae and I cant seem to find anything to eat it. Dave
-
Here are some clues. Using a 5 stage R/O with 0TDS, The only other phospate source I can think of would be food. I feed Tuesday/Thursday/Saturday only on this 300g tank its quite a small bioload. I grow chaeto in the sum lit 24hours and i pull about half of it out every 2 weeks. Great growth. Even with the chaeto, I get subborn hair algeae in spots. Skimmer - TUNZE DOC PROTEIN SKIMMER 9011 rated for 264 gallons I am dosing 2 part calcium a capful once a day The only other phospate source i can think of would be food or perhaps the rocks themselves these rocks had no problem in my last tank but i had a much larger skimmer. Arragonite sand bed. I suspect I need more water changes - doing 1 40g per month - does everyone do their changes with R/O?
-
Good effects after 12 hours later, even the zooos are beginning to open up
-
What used to look like this In about a week it turned to this when my UV sterilizer went very bad. The only thing that seems to really have a problem are the zoos. i just installed the TMC Vecton V2 600 25 watt UV Sterilizer. Care to guess how long it will take to clear up?? D.
-
ultimately the cause of the microbubbles was the speed the water was flowing down the overflows. it was so fast, it was sucking air down along with the water. With all 3 overflows feeding the refugium, the flow over the baffles was too much and with 4 baffles I was still getting bubles at the pump. i resolved it by taking the flow from 1 of the 3 overflows into the section with the pump, slowing down the flow from the refugium. I restriced the flow with a valve from the 1 overflow into the pump section which eliminated those bubbles. What a project! Dave
-
Thanks, the reduced lighting is a huge change for me, going from sps dominated with MH's to this combo of PC and low end LED's is a learning experience.
-
Well things have settled down quite a bit. micro bubbles are gone cycle complete, and then complete again water clarity is greatly improved despite my crappy lighting seeing alot of green algae boosted my cleanup crew with more snails, the astrea's are the only ones who seem to be interested in the green hair algae. as you can see, I started to put some finishing touches on the tank stand, will sand and paint soon.
-
It really didnt. Raising the level eliminated the waterfall which probably helped but the flow was so fast from the skimmer section that bubbles were zipping through the 3 baffles. I added a raised baffle on the skimmer side of the trap and that really did the trick. Dave
-
Actually, its all cured now but what i did do was place egg crate in between which keeps the calerpa at bay and has the same affect. Great tip, Dave
-
Thanks to EZTIMES generous offer of calerpa, my micro bubbles are completely gone! Will be adding the egg crate because some of the algae is making it's way through the baffles. Thanks everyone! Dave