


Integral9
-
Posts
1,182 -
Joined
-
Last visited
Content Type
Profiles
Forums
Gallery
Events
Store
Posts posted by Integral9
-
-
Out of the frying pan, into the fire.....
Now we have black clouds of death floating under the ocean towards the coral reefs.

http://www.google.com/hostednews/ap/article/ALeqM5hkizwl1juq5nw6XDJ9UTfq9bY0dwD9FOKING0
-
I also started with a 55 but I am upgrading to a 135. I always wished I had a 75 or 90 when I started, so I am going bigger, hoping to not want to upgrade again. I would definately go with a insump skimmer, if you can. IMO, the HOBs are just messy in comparison. I've been very happy with my ASM Mini-G skimmer, but it's not enough for my 135, so I got an SWC Xtreme. A 30g sump is fine, but more is always better. Why not use your 55g tank?
-
It's not a traditional reflector (parabolic mirror) but the plastic they are built in is a lense that reflects the light outwards to a predetermined viewing angle. So one could argue that as a reflector, but I see your point about dispersing the light evenly. The secondary lenses make more sense now. But I think it's a shame that you have to loose a small percentage of your light (absorbed by the material the lens is made of) to redistribute it evenly, even for a net gain. I guess LEDs just aren't made to produce evenly distributed light.
I suppose it depends on the kind of dimmer you use, but all the DC dimmer switches I've seen (except for the digital ones) are basically potentiometers with fancy knobs on them. Potentiometers won't interrupt current, unless they have an off position. They are also relatively cheap. Their only downside is that they can get hot as the current you run through them goes up.
-
LEDs are great. But something that I've noticed more of recently is people putting lenses on top of them. I find it curious as most LEDs come with reflectors built into them to focus their light in one direction. I've seen anywhere from 10-160 deg. So one should be able to achieve the desired light dispersion angles with out putting a lense on the LED. Aside from protecting the LED from the salt air environment do the lenses have any real purpose?
btw. A dimmer switch for a 12V circuit should be all that's necessary to add a dimmer to the circuit. Boat/US might have something useful...
-
Dude, awesome vid. So just out of curiosity, where you trying to "see" how hard he hit or something? Also, did he break skin or did it just hurt like H-E-double hockey sticks?
-
Wouldn't be the first time the Fox News distorted the truth.... Maybe they "forgot" to convert from rubles to dollars; 1 dollar is about 30 rubles.
-
Could also be algae build up in the U-pipe, if yours is like mine and clear. I use a baby bottle scrubber on a flexible handle to clean it out.
-
When I called Current about getting my Outer Orbit Pro's T5 Ballast replaced, they sent me to marineandreef.com. They don't have the end-caps listed, but you might try to call them and see if they can get them. It seemed they were the preferred parts dealer for Current.
I like the DIY repair Jon offered. It should be safe from salt and moisture as long as you keep the acryllic cover over the bulbs. If you decide to put anything over the end to protect it, be careful as it could melt.
-
Why isn't my pic listed here?
-
A sawzall or some sort of reciprocating saw with a neat or smooth metal type blade worked well for me. I just drew the lines and help my breath. I found the metal cutting blade worked best because it was smooth, it didn't chip or crack the acrylic, and it didn't melt the acrylic when cut so the shaving just fell off rather than heat up and stick. I found this to be 100% better than scoring and breaking. Just my .02
That works well. I might add to use some clamps and a block of wood to help guide the saw. Clamp the wood to the plastic along the edge of the saw so that the blade follows the line. Then you just have to hold the saw against the wood to keep a straight line. A piece of hardwood flooring works great.
IME, you just about have to use metal blades to cut acrylic. Blades meant for wood will crack or chip your acrylic almost every time.
-
In either case, Elian the Mantis would be happy to have him for dinner. I'm all out of hitch-hikers, err dinner dates.

-
I lived in Post Forest Apartments in Fairfax for 3 years. It was probably the best apartment living experience I've ever had in N. VA. I encourage you to take a look at them. While they didn't have stone counter tops and faux rock walls on the buildings, the apartments were clean w/ modern appliances. I also found the office staff great people to deal with. Also, parking was never an issue and I could have as many guests as I wanted. They are pet friendly, and offer garages for a little extra per month. Pool, workout facilities, tennis courts and a gated community. The walls are completely sound proof as I never heard my neighbors and they never heard me.
-
Thanks guys.
Lighting over my 30g is an 24" Outer Orbit Pro Series: 150W 14K from XM and 4x24" T5s from UV
Lighting over my 55g/60g is 4x48" T5s w/ 3 from UV and 1 from ATI.
-
http://picasaweb.google.com/forrestd991/
Pics were taken w/ a Canon S7 by a friend of mine. Some were done w/ macro settings.
-
I have the 24" 150W Outer Orbit Pro Series(w/ 4x24" T5s) over my 30g and it's a very good light. I don't know if this is just the case when you have a single MH, but my corals grow directly towards the halide which prevents them from getting that "natural colony" look that I am able to get in my 55g with only 4x48" T5s. I'd say the color of my light is better under the T5s.
GBN under Outer Orbit:
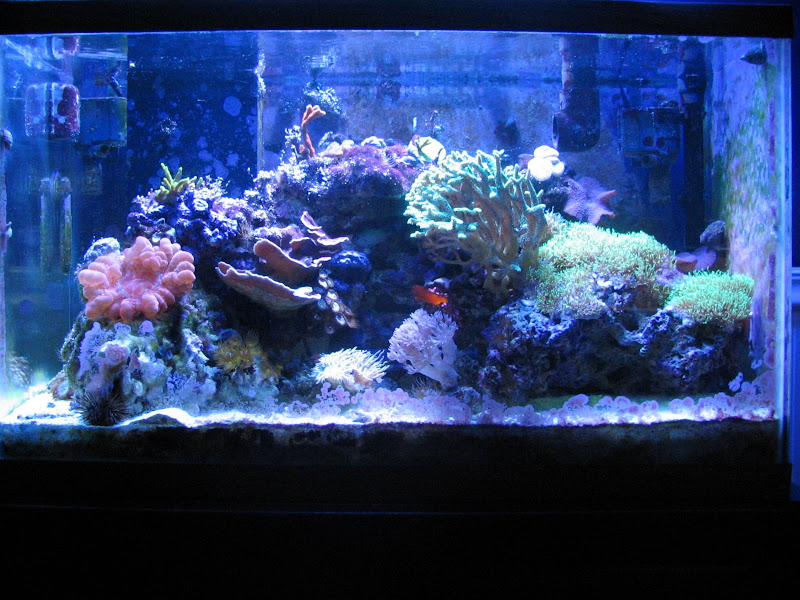
notice how lopsided the colony is and how the right side is "reaching" towards the light?
Cons would be: (1) The cooling fan only spins when the halide is on (however their manual suggests differently)
(2) The T5s don't receive much cooling as most of the air moves across the MH and ballasts.
(3) Reliability: One of the banks of T5s has gone out and I have replaced the bulbs and the ballasts and still can't figure out what the problem is. The bulbs all work in the other bank and the end caps appear (very difficult to see) to be making solid connections.
FWIW: The 135 I'm setting up will be all T5s (12x36")
-
Any luck bringing the hippo back?
-
Yeah, posting images here is like trying to fit an SUV into a mailbox. It's just not a good idea even if you get it to work. The best bet, and what most people do, is to post them to another site like imageshack or photobucket or picasa and link them from there. I use picasa, but the linking requires some reformatting of the link. I think imageshack and photobucket provide links to your images in a plug-n-play fashion.
I've got some new pics of my tanks I'm going to try and get to uploading tonight. I'll snap a pic of my overflow box and sump for you so you can see what I've done. Sounds like you are trying to imitate my setup.
-
Funny you mentioned about flatworms. I've had a problem with that and still do. I manually sucked up many as I could everyday for 5 days and than used flatworm exit and than repeated after one week. There's significant improvement but I still see some. Should I do the flatworm exit again? The only quarantine tank is a 10 gallon. Boo. What should I do?
You can use a 20-30g rubbermaid-TM storage bin for a QT if you don't think he'll fit in the 10g. Rubbermaid plastics are food safe, so they are safe for salt water. He's not going to be in the tank forever and will be fine when you put him back in the DT after he gets better. Don't forget about doing the water changes to keep the nitrates and amonia down. If you can, I would dip the hippo in the flatworm exit before putting him into QT. It'll reduce the number of parasites that travel with him into QT.
You also need to remove the source of the problem in the DT before the hippo goes back in. Fortunately you can do that while the hippo is in QT. Sounds like you've got quite a source of food for a hungry flatworm predator. Otherwise I would keep doing the flatworm exit treatment until absolutely every last one is dead or until you don't see any for a week or so. Also check out this link: http://www.melevsreef.com/flatworms.html Looks like he's got a pretty good method for dealing with the parasites in a DT. Your hippo just needs a little more to recover.
Let us know how it goes.
-
I've seen ich before and this looks different. Can it appear like this? I do not have a grounding probe. Whether it's ich, parasites, fungal, can it affect only one fish?
That's how it starts. The other fish are probably more healthy so they're immune systems are helping to fight it off. Once this guy goes, the parasite's host is lost and they will seek out another. Almost always, with concentrations high enough to kill one figh, no fish's immune system will be able to handle the outbreak.
-
Whoa. That's one sick fishy. wow.
OK. HLLE is much more obvious than that looks. And ich is usually white specs, that look like little mini rice grains stuck on the the fish. Sometimes they can be black, but I've only read about that. I've lost a hippo to ich before and it didn't look anything like that. I also don't think you have fin rot as the fins I think would look more loose and there would be pieces (rotting pieces) of them hanging off / floating in the water column.
IMO. I think you've got a serious case of flat worms there. It looks like their bite marks at least. If you have a UV light (like a black light) you might be better able to see them. I think a stronger than normal iodine solution like "Pro-Coral Cure" from Tropic Marin might help. I'd do a dip at twice the recommended concentration. If he doesn't look better after a day, then up the concentration one squirt. I wouldn't go higher than 4 squirts (depending on size of dipping container). There's also the flatworm exit product that seems to work. I'd do a dip or put the fish in a QT before applying as the dead flat worms are better left outside the DT. A natural soluton (but might be too late for that) is a coral banded shrimp. But at the stage your hippo looks, I doubt he'd /she'd let anyone /anything else near it.
Good luck. Let us know what you do and if it's helping or not.
-
Aside from installing a "durso" stand pipe in my over-flow box, I also extended the drain pipe into my sumps about 4" from the bottom. Then drilled several 1/4" holes through the pipe above and below the water line. Just like some paintball gun barrels. The durso stops the constant sucking sound and the holes at the bottom of the drain line get rid of the "blub-blub BLUB" from the water crashing into the sump w/ air pockets. Now the tank just makes a slight "squeege" (kinda like what a sponge makes when you wringe it out) when water shoots out the holes a little bit; but that is not bothersom at all. When I close my sump cover (a double thick denim sheet sewn to wrap around the metal stand) I can barely here it. I sit about 2 feet away from it and watch my TV across the room all the time. The noisiest thing now are the 2 5" ice-cap fans in my canopy.
-
Submitter: Forrest, Integral9
Camera: Canon S1IS
Location: My 30gallon
Subject: The Red Beard
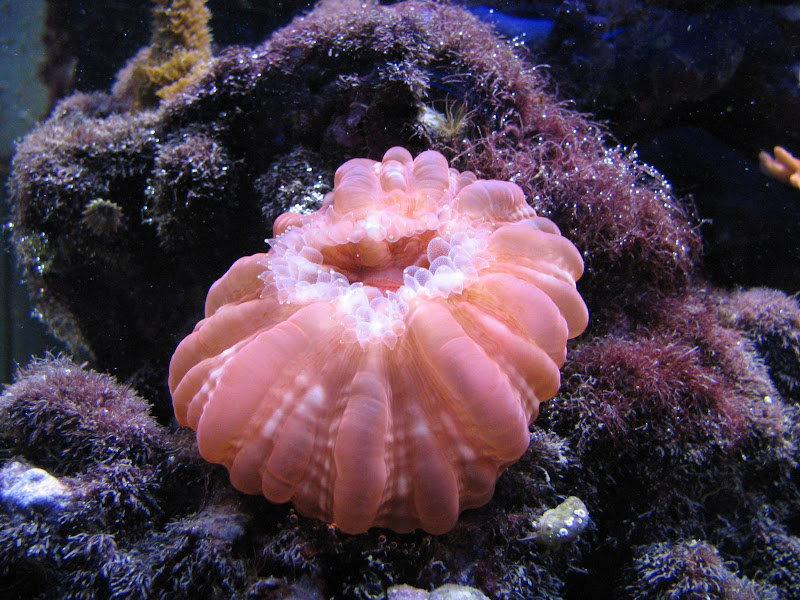
From 10/2007
Full sized image available here: http://picasaweb.google.com/lh/photo/PbRD2...feat=directlink
-
please post a pic.
tia.
-
I was able to move my RBTA by blocking all the direct light it got by placing a board over the tank where it was. It moved back to the front of the tank (where there still was light) w/in a week.
Good Luck.
Upgrading Questions!
in General Discussion
Um, yeah, what zygote2k said works if you want to get rid of the pipes. But, post a pic of your tank. Lets see what you're working with.