


SteveM
-
Posts
781 -
Joined
-
Last visited
Content Type
Profiles
Forums
Gallery
Events
Store
Posts posted by SteveM
-
-
 Everything looks good. Love the bubbles on the RBTA. I noticed this acro might have a pocillopora hitchhiker on it. You might want to transplant that away from the acro before they grow into each other.
I noticed it but wasn't sure exactly what it was. When it grows out a little I will cut it off, thanks.
-
A few more.


-
Here is an update of how some of the corals are doing and some new additions. Lost a few of the original colonies but everything else is doing great. Have gotten some pretty good growth going on several of the corals. I have been messing with my Radions trying to get the right combination of color and growth but it is still a work in progress.


-
How are the acro's liking the radions?
I think it's still to soon to tell. I have been messing with the light schedule and think I finally have it dialed in. A few of the acros seem to be starting to really color up and hopefully they will continue to get better. I have also started to see some pretty good growth from the first couple I put in.
-
Wow, looks awesome. What's the SPS in the 5th pic?
I think it is a sarmentosa acro. It is supposed to be green with pink tips.
-
Here is the tank with the new corals in it. So far so good....


-
Thanks everyone!!!
Here are the corals that arrived today. All SPS except two chalices. Just a quick pic with my cell phone.

-
Amazing Steve! Congrats!
are those radions?
Yes, those are Radions. So far they are running great. I have them set to 60% right now and I have a ability to raise and lower them as needed for acclimation. And Thanks!
Looks awesome! So are you going to have 8 lights in pairs or just the 7 shown?
There are 8 Radions as pictured earlier. I had taken one off in the picture due to a minor issue.
-
All the corals I have ordered so far are acros. Here are a few of the "test" ones I added a few weeks ago to make sure the system was stable. I also added a small RBT anemone.


-
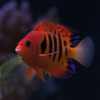
Here are some of the fish.


-
HI guys, I'm back for an update. Sorry it's been a while. The tank is up and running and so far so good. Lots of new additions. I have a large coral shipment coming today so more pics to come.


-
Hey Steve! New tank looks killer, doing it right for sure!
Hey Dan! Great to hear from you. It's coming along. Hope to have fish in it soon. Hope you're doing well.
-
Finished the light rack for the tank. This will attach to the actuators mounted to the walls. This will give me the ability to raise and lower the lights when hen I need to work on the tanks. There is a slight offset to the lights due to the way the tank will be aquascaped.


-
Is it the picture or does your overflow run slightly uphill? Seems like that could cause some problems in the future if it is in fact graded uphill with clogging down the line and slow draining.
Other than that, very nice!
It is just the angle of the pic with the wide angle lens. The drain lines run slightly down hill.
-
Worked all day today on the tank. Got a minor leak fixed in the plumbing near the UV. Then spent the day building the mounting structure for the actuators that will raise and lower my light rack. They work off a remote control and will allow me to raise the lights up when I need to work inside of the tank. Here are a few pics from what was done.


-
Disregard the above post. I actually had to add a little water to the return section and things evened out.
-
Here is a link to a video of the sump. If anyone has a suggestion as to how to get the water level in the main section a little lower please let me know. I tried taking some water out and also cutting back on the flow from the drains but the water level seems to only go down in the return area of the sump, not the main section.
-
Does your overflow have a box on the inside of the tank? I see a bunch of holes in the picture as well as a tooth surface skimmer.
There is no overflow box on the inside of the tank. Only on the outside. The holes are drilled thru the glass and the "teeth" are actually cut out of a thin sheet plexiglass that is affixed to the inside surface of the glass where the holes are drilled. Not sure why it is done that way.
-
Plumbing all done.... just need to test it!


-
Plumbing completed today. Still have to run a test on everything. Wish me luck that there are no leaks!

Beginning of the plumbing. Parts everywhere.

More parts.

and more parts.

and more parts....

yup.. more parts.

Plumbing in progress...


Plumbing just about done.

-
Finally have an update to the build. Here are a few pics of the completed trim out and location of the tank.


-
Thanks everyone. I appreciate the comments. I will keep updating as things progress. If any of you every get down to the Tampa/Sarastota area give me a shout.
-
Onto the floor lifts.

Rolling it into place.

Nope, won't go in from this angle....

Had to move one of the floor jacks to the opposite side and line it up to slide it in from the end.

Sliding into place... easy.

Almost there.

Ahhhh... made it. This is from the back side of the tank.

The finished product!!!!


A BIG thanks to Phil from ReefeScape for all the help and encouragement!!!
-
Tank was delivered today. Thank goodness everything went fairly smoothly. Here are the pics....
Floor lifts in place.

Truck arrives... (BIG truck)

Tank in the rear of the truck.

Tank was to long to just lift. Had to pull it out and leave it hanging out of the back to get to it from the side.

con't........
Yup... that's the tank teetering on a pallet set on it's edge to hold the tank up until the forklift could get it from the side. I almost has a heart attack!

Whew... got it in time.

Around to the rear of the house.

In thru the sliders.

New Large Tank Build (in Florida)
in General Discussion
I ordered them from this place http://www.tank-depot.com/