Reefoholic August 5, 2016 Author Share August 5, 2016 (edited) Considering the marinepur blocks, I would just try to accomplish that with live rock. Essentially all it is is an ultra porous material that provides more surface area for your beneficial bacteria, unless you're going to go ultra minimalist with your aquascaping, it's probably not necessary. I am a huge fan for keeping this as simple as possible (KIS) The hardest part about setting up your tank is going to be waiting for as long as possible, even after your tank has cycled, to let everything develop. I honestly believe the longer you can keep a tank setup without adding livestock, the more success you'll have. Then when you do start adding things, do it slowly, so the tank adapts. If you have the patience to let your tank run for 90 days without adding livestock, you should do it. Dude, you read my mind! I am really trying to take this new setup slow and digest every step (unlike all my other builds which the tanks were up and running around 4am the next day. PLS DONT JUDGE, we have all been there, done that!) Here is my plan for the next months: 1) Build the stand - Almost done 2) Build the SUMP - I am planning on using a 20 gal. I will need to compartmentalize it with the acrylic sheets I got. 3) Setup the SUMP - So far I cleaned the pumps. I am planning on soaking my PS in vinegar overnight and giving it a good clean. 4) Setup plumbing - materials purchased, need the overflow box in place to start the build. 5) Build the canopy - This will be a very simple canopy since I am using 2 AI Primes (Prime and HD) and I love the way they look. 6) Design the LR and fasten together for stability 7) Make saltwater - LOTS AND LOTS 8) Setup the equipment, fill in the tank, etc. All above should be accomplished by September. ----- at this point, I would like to cycle the tank for at least 6 weeks ----- Somewhere around the 2nd week of October 9) Start adding Live Stock (fish first) 7) Start adding Soft Corals 8) Cycle for at least 8 weeks 9) Start adding SPS Ideas? Too long for a new setup? Edited August 5, 2016 by Reefoholic Link to comment Share on other sites More sharing options...
molcott August 6, 2016 Share August 6, 2016 if you do decide to go the marinepur route along with your liverock all you would need is the 8x8x1 plate Link to comment Share on other sites More sharing options...
Reefoholic August 8, 2016 Author Share August 8, 2016 Here is an update after this weekend. I enjoyed working outside on my porch (getting eaten by mosquitos most of the time) and finished most all the build. 1) Build the stand - DONE 2) Build the SUMP - I am planning on using a 20 gal. I will need to compartmentalize it with the acrylic sheets I got. DONE 3) Setup the SUMP - So far I cleaned the pumps. I am planning on soaking my PS in vinegar overnight and giving it a good clean. DONE 4) Setup plumbing - materials purchased, need the overflow box in place to start the build. 5) Build the canopy - This will be a very simple canopy since I am using 2 AI Primes (Prime and HD) and I love the way they look. DONE I am looking to tackle the plumbing and electrical wiring tonight. I am going to build a return with back syphon safety by turning it into a U in the Display tank.Should I paint the PVC pipes black? Anyone knows if coralline algae will grow on the PVC pipes? Will post pictures. Link to comment Share on other sites More sharing options...
Reefoholic August 9, 2016 Author Share August 9, 2016 Looking for advice on the below. BRS Dry Rock - Pukani or Reef Saver? Red Sea Reef Mature Pro Kit - Thinking of this to kick start the tank cycling, anyone has experience with this product? Thanks in advance. Link to comment Share on other sites More sharing options...
Reefoholic August 10, 2016 Author Share August 10, 2016 BUMP Link to comment Share on other sites More sharing options...
Reefoholic August 11, 2016 Author Share August 11, 2016 Last night was very productive BIRTHDAY night. What better way to spend one's birthday than setting up a fish tank? (hehe) I changed the filters on my RODI unit (a huge shout-out to Air Water and Ice - they are awesome!) The RKL is now setup and affixed to the stand. I will still need to upgrade the version and rename the channels. BTW, I cannot find my temp or salinity probe. I strongly think that they got lost during the move. I will need to buy those. If anyone is looking to get rid of theirs, pls let me know ATO setup - Complete Protein Skimmer - Complete. New pinwheel arrived yesterday (a huge shout-out to AVAST). The skimmer is setup and peacefully sitting in the sump. I ran a tube from the air intake and affixed that to the stand too. In the past, the air tube has gotten water in it which results in a high pitched weird noise. Hopefully, the new setup will prevent that from happening. Return Pump - 80% Complete - I still need to put together the pipes. Pics to come... Link to comment Share on other sites More sharing options...
Reefoholic August 19, 2016 Author Share August 19, 2016 UPDATE Pluming is done. Received my BRS order and setup the rocks in the tank. Have been making water; so far only 10 gal in total produced Any ideas how I should cycle the tank? Blue lights or no lights? Sent from my iPhone using Tapatalk Link to comment Share on other sites More sharing options...
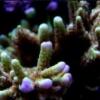
Bruleyii August 19, 2016 Share August 19, 2016 I like your aquascape. Lots of hiding places and options for coral placement. Link to comment Share on other sites More sharing options...
Reefoholic August 19, 2016 Author Share August 19, 2016 I like your aquascape. Lots of hiding places and options for coral placement. Thanks bud! I am all for water flow and hiding places. I think this setup is going to be fish lite and coral rich. I moved the powerhead halfway down the side of the tank, and it is kind of pushed to the back for better flow. Since this is a bare-bottom tank, I can easily achieve a good water flow under the rocks. Still gotta make a boat load of water... ugh Link to comment Share on other sites More sharing options...
Reefoholic August 22, 2016 Author Share August 22, 2016 (edited) UPDATEFinally I could hook everything up and start the water flowing. I had to tweak the plumbing some and still fixing some things with the skimmer - I found out the muffler was leaking in air since the silicone on the seals got warped over time. I took that apart and glued it back together.Questions:1) Since I am curing the BRS DRY rock, I expect the cycle to be longer. Having said that this morning the water is still very cloudy. I have carbon in the sump and a filter sock. It has been around 7 hours since those were placed in the Sump. Anything else I need to do?2) Should I have the lights on or off when cycling. I read many conflicting things online regarding cycling the tank with or without the lights on. Some people say that having them on will early start he algae bloom cycle so that you can get rid of the algae early in the game. Some people think that algae due to the lights being on will compete with the bacteria for nutrients and it could prolong the cycle time overall.3) Do I need to do water changes while cycling since I am also curing live rocks? 4) There are way too many micro bubbles in the return dump of water. I am not sure if the skimmer is sitting too deep in water or I need to give it time to break in.Any ideas, comments, stories from past experiences are greatly appreciated!Thanks!Sent from my iPhone using Tapatalk Edited August 22, 2016 by Reefoholic Link to comment Share on other sites More sharing options...
Reefoholic August 22, 2016 Author Share August 22, 2016 Setup the skimmer with a longer pvc. Muffled the sound pretty well. I also put the skimmer return in a filter sock. That seemed to have taken care of the bubbles. However the skimmer now is going a little bit crazy. Maybe it will die off??? Only time will tell. https://vimeo.com/179828417 Any suggestions? Sent from my iPhone using Tapatalk Link to comment Share on other sites More sharing options...
Reefoholic August 23, 2016 Author Share August 23, 2016 Just a quick update, the skimmer seems to have calmed down a lot. I am remembering slowly that it usually takes time for the skimmer to break in and find it mojo. Any experience with the AI Prime schedule setup? I don't want to fry my corals, fish, etc. once they are in the tank. Cheers! Link to comment Share on other sites More sharing options...
jwalsh August 23, 2016 Share August 23, 2016 Really like the reclaimed wood look of the stand and the rockwork looks great. Excited to see how this comes along. Re: cycling, I've always kept the lights on their normal schedule for my nanos but that's just anecdotal. Link to comment Share on other sites More sharing options...
Reefoholic August 23, 2016 Author Share August 23, 2016 Really like the reclaimed wood look of the stand and the rockwork looks great. Excited to see how this comes along. Re: cycling, I've always kept the lights on their normal schedule for my nanos but that's just anecdotal. Thanks jwalsh! I think the stand turned out great, to my surprise too. I like the wood stain I chose, also who knew burlap could be so useful??? I am planning on replicating the Great Barrier reef Sunrise-Sunset schedule in December Dec 25, to be exact, one of my fav days) for my AI lights. It seems like a lot of tweaking, but I think in the end, it will be worth it. Here is a quick look at what I am trying to do: Rise: 5:42am Meridian: 12:17pm Set: 6:51pm This will give me a total of around 13 hrs of light. I will also factor in the ramp up and ramp down times (twilight zones), I am replicating the civil twilight times; please see below. Twilight - 5:18am / 7:15pm During this period, I will use more blues, reds and UV then white. Comments are appreciated and encouraged. Link to comment Share on other sites More sharing options...
Reefoholic August 25, 2016 Author Share August 25, 2016 (edited) Some modifications and the skimmer now only has a hum I bought some hot pads from Amazon and made a bottom shelf from Egg Crate and some old tubing. I layered the silicone hot pads on top of that (covering the sides too as much as I can) then put another egg crate square on top of that. Skimmer goes on top of all those. And BAMM! POW! Near silent skimmer.One thing I realized is that my water evaporates so quickly. It was filled to the line in the pic last last and this morning see where the water line is.Is this much evaporation EXPECTED??? What are your experiences? There seems to be no leaks anywhere.Sent from my iPhone using Tapatalk Edited August 25, 2016 by Reefoholic Link to comment Share on other sites More sharing options...
Origami August 25, 2016 Share August 25, 2016 I used to evaporate about a gallon a day from my old 90 gallon tank. That's 231 cubic inches of water per day. I'm just guessing at dimensions, but it looks like you may have dropped about an inch in a compartment that's about 5 inches by, what?, 15 inches? If that's the case, then that's 75 cubic inches or about 1/3 of a gallon. So your evaporation out of your 29 gallon tank is on par with what I used to get out of my old 90. Is that where you always run your ATO water level sensor? It seems low. As for the silicone hot pads, I've also successfully repurposed old neoprene mouse pads to provide isolation to reduce pump noise. They work great. Link to comment Share on other sites More sharing options...
Reefoholic August 25, 2016 Author Share August 25, 2016 I used to evaporate about a gallon a day from my old 90 gallon tank. That's 231 cubic inches of water per day. I'm just guessing at dimensions, but it looks like you may have dropped about an inch in a compartment that's about 5 inches by, what?, 15 inches? If that's the case, then that's 75 cubic inches or about 1/3 of a gallon. So your evaporation out of your 29 gallon tank is on par with what I used to get out of my old 90. Is that where you always run your ATO water level sensor? It seems low. As for the silicone hot pads, I've also successfully repurposed old neoprene mouse pads to provide isolation to reduce pump noise. They work great. That's good to know, thanks Tom! Should I go up more for the ATO water? My current level is about 5' below the acrylic chamber divide. Maybe I could bring it up to much closer? Link to comment Share on other sites More sharing options...
Origami August 25, 2016 Share August 25, 2016 No. That's not necessary. It just seemed like the tube was under a lot of water before it triggered the ATO to stop. Is that typical of your Avast ATO? I don't think that mine (also an Avast ATO) has to get that deep before it triggers the ATO pump to stop. Link to comment Share on other sites More sharing options...
Reefoholic August 25, 2016 Author Share August 25, 2016 O No. That's not necessary. It just seemed like the tube was under a lot of water before it triggered the ATO to stop. Is that typical of your Avast ATO? I don't think that mine (also an Avast ATO) has to get that deep before it triggers the ATO pump to stop. Oh gotcha! I have not adjusted my ATO sensor yet since my old Tom's pump died on me and I am waiting on a replacement diaphragm pack, which should arrive today. Link to comment Share on other sites More sharing options...
Reefoholic August 26, 2016 Author Share August 26, 2016 (edited) Never a dull moment. Last night we came home to find a leak in the ceiling coming from the second bathroom upstairs. What a joy!I immediately put a bucket down and drained it. There was maybe 2.5gal of yellow/brown water. Below picture is towards to the tail end of it.This morning there is a huge stain spot to the left of it and the plaster is coming off from where the leak was and it is much bigger. Not really looking forward to the dust and construction that's coming our way this weekend Ugh! Edited August 26, 2016 by Reefoholic Link to comment Share on other sites More sharing options...
Origami August 26, 2016 Share August 26, 2016 What was the source of the water? Ceiling leaks can be a real pain. After repairing the drywall, there's all that painting. It can go from room to room sometimes if the ceiling flows from room to room and the match isn't just right. Hope this goes quick and easy for you. Link to comment Share on other sites More sharing options...
Reefoholic August 26, 2016 Author Share August 26, 2016 What was the source of the water? Ceiling leaks can be a real pain. After repairing the drywall, there's all that painting. It can go from room to room sometimes if the ceiling flows from room to room and the match isn't just right. Hope this goes quick and easy for you. No idea what the source is. We haven't opened up the ceiling yet. However, the bathroom upstairs is bone dry so I am guessing a pipe is leaking in the ceiling? Link to comment Share on other sites More sharing options...
Origami August 26, 2016 Share August 26, 2016 No idea what the source is. We haven't opened up the ceiling yet. However, the bathroom upstairs is bone dry so I am guessing a pipe is leaking in the ceiling? Oh, that sucks. Water travels downhill, seeking a low point. Just because it pooled over that spot doesn't mean that the water is coming in from that area. With luck, having the bathroom right above, it's the likely source, though. A couple of gallons is a lot of water. So the water just appeared and has not come back (or continued)? Link to comment Share on other sites More sharing options...
Reefoholic August 26, 2016 Author Share August 26, 2016 Correct! The water drained and did not come back; that is the mysterious part about it. Having said that, I did not try running water in the bathroom just not to make things worse. I would rather the plumber find that out. It must have been pooling somewhere and the plaster finally gave in last night. I am not sure what triggered it since no one uses the guest bathroom unless we have people staying with us - we had friends stay over about a month ago. Link to comment Share on other sites More sharing options...
Origami August 26, 2016 Share August 26, 2016 Odd. Something really slow might have evaporated before punching through. No rain outside or anything where it might be coming in from outside? Link to comment Share on other sites More sharing options...


Recommended Posts