Soccer4500 May 6, 2013 Share May 6, 2013 Hi Guys - I’ve meant to do an update thread for a while since setting up the new tank, but haven’t gotten around to it. Thankfully, Laura (Sharkey18) chastised me enough last week to get my butt in gear and upload some pictures. First let me say that I’m fairly new to the hobby...I started up with a BioCube 14 about a year and a half ago, then got the bigger is better bug, and now have an 80G display in my living room. I’m still learning and trying to read as much as I can, so any advice is welcome! So, here’s what I’m currently working with (evolution from the original setup -> today follows). This tank has been up since Oct 2012. Hopefully, no crashes, and everything continues to grow out! Display: 80 Gallon 1” Acrylic Shallow Rimless (48” x “24” x 16”) Sump: 30 Gallon Acrylic Lighting: Two Kessil A350w Tuna Blue In-Tank Circulation: Vortech MP40wES, Sicce Voyager 4 Return: Eheim 1262 Skimmer: AquaC EV 180, powered by Eheim 1262 Chiller: JBJ Arctica 1/10 hp GFO: Two TLF Phosban 150’s running Rowaphos, powered by Mixi-Jet 900’s ATO: 20 Gallon rubbermaid; Spectrapure Power Liquid Level Controller, powered by a Tom’s AquaLifter Dosing: Kalk in ATO, Magnesium, also add’l B-ionic if necessary Temp: 77* Calc: 450 Alk: 10dKh Mg: 1250 pH: 8.2-8.35 Nitrates: 0 Phos: 0 Live Rock: ~110lbs Live Rock, mix of Fiji, Tonga, Vanuatu Corals: Mixed Reef - Softies, LPS, SPS Inverts: Tiger Pistol Shrimp (paired w/Y.W.G.), Skunk Cleaner Shrimp, Fire Blood Shrimp (I’ve named her Daenerys), 2 Peppermint Shrimp, Emerald Crab, Red Crab, Various Snails/Hermits Fish: Ocellaris + Black&White Clown (bonded pair), Flame Angelfish, Yellow Watchman Goby, Pajama Cardinal, 2 Firefish, Yellow Tang, Kole Tang Link to comment Share on other sites More sharing options...
Coral Hind May 6, 2013 Share May 6, 2013 Very nice! I'm glad Sharkey18 got you share your tank. Is the sump/equipment under the tank or located under the stairs? Link to comment Share on other sites More sharing options...
Soccer4500 May 6, 2013 Author Share May 6, 2013 The Build The Begininning So, in early 2012 I decided to step up my game from my FW Angelfish tank and give SW a go. Wanting to put the tank on my 2nd floor, I read some reviews and decided that a BioCube 14 would make a good nano tank. So, I picked a BioCube 14 up off of CL and began the cycling process with some supermarket shrimp and LR from Pristine Aquariums. After doing some research into what I wanted to put into the tank I realized how important lighting was to keeping corals, and that the stock BioCube power-compact lighting may not be enough for things like clams/SPS/etc. So, I gutted the hood and wired up a RapidLED DIY kit. Once the cycle ended I began adding livestock and corals... Over the course of a few months I ended up with my Clown pair, a Fishfish, and a YWG. I also had a Toadstool Leather that exploded in growth, some zoos, purple mushrooms, candy canes, and since I had the LED lighting I put in some acros and a small maxima to see how they fared. Being my first SW tank, I was thrilled that the softies and LPS were doing well. But, my SPS (orange monti, blue cali tort) wasn’t really growing much. I started running Purigen and ChemiPure Elite in the back of the tank...but that didn't help the LPS growth much. And I could never really get the skimmer tuned. Worst of all...because the water volume in the tank was so small, I couldn't keep the water stable enough. Replacing the evaporated water by hand daily was a P.I.T.A. And, my water temps went from 75 in the morning to 82 by mid afternoon...NOT GOOD!. Wanting something more stable, I saw a larger living room tank in my future and began the search. Link to comment Share on other sites More sharing options...
Soccer4500 May 6, 2013 Author Share May 6, 2013 The Living Room Tank Found a gentleman on Craigslist looking to sell his complete 90G setup...standard Oceanic RR 90g tank, pumps, stand/sump, skimmer, chiller + canopy/lights. Made it easy. Then the VERY. NEXT. DAY., in the search for live rock on CL, I came across an AWESOME shallow rimless tank. Really??? You’ve got to be kidding me...after I’ve already hauled this other tank into my garage. But, I couldn’t pass it up. One of the reasons I really wanted a SW tank to begin with is because I saw this incredibly cool “Volcano Tank” video on YouTube (I’m sure guys know which one I’m talking about - ). Soooo, I went and picked up the awesome Rimless setup, and re-posted the 90gal system (minus the pumps, skimmer, chiller) on CL. The Rimless setup that I bought on CL was actually owned by Gene V., a former Wamas member, who had to get out of the hobby. I believe his tank is actually an Adam B./Artfully Acrylic creation. I set the tank up in my living room. It is 48” long and 24” wide...with about 16” in water depth. Very easy to get in and work with. Positioning the tank in place took some work because it is a beast - 1” thick acrylic...no eurobraces... The stand is made of 2x4’s, with a plywood table-top, all primed and painted black. The tank bottom is not resting directly on the stand, but rather a ½” thick sheet styrofoam which is on top of the stand...it acts as a cushion to make sure the tank remains level. I filled it up with tap water to make sure that I had plumbed everything properly between the main and the sump, then I was good to go! Link to comment Share on other sites More sharing options...
Soccer4500 May 6, 2013 Author Share May 6, 2013 (edited) Awesome. Now...time to mix up some SW and get the cycling process going. I had some base rock that had been curing in the garage in a trash can with a small piece of live rock. I combined that with some of the live rock I acquired from Craigslist, and arranged it into an “M” shape in the display A piece of shimp from the supermarket kicked off the process. And, for in-tank circulation while the cycle is going I threw in a Tunze and a Maxi-Jet 1200. Those pumps definitely got the 'beneficial bacteria' moving around the tank and throughout the rock-work. But, I noticed a big aesthetic problem right away...the Tunze pump flow was SO direct/strong that it was blowing all of the sand around. I got Nature’s Ocean Live Sand thinking it might be heavier and loaded with live bacteria to keep it on the bottom of the tank. But no go...especially in a shallow dimension tank with a pump only 10" off the bottom. I’d need to get a different in-tank pump for flow, unless I went bare-bottom. I’d been told that a Vortech MP40wES wouldn’t work with this rimless tank b/c MP40's are only rated up to ¾” glass/acrylic thickness. More than that and the magnets would fail. My tank is 1” thick. Now, when I bought the first CL setup, it came with an MP40, which I hadn’t yet resold...so, out of curiosity I figured...why not give it a shot... SUCCESS!!! It holds! That is, unless I crank the pump all the way up to 100%. Which is honestly kinda overkill on this size tank anyway. But, I did put a very small amount of glue on the face-plates to attach to the acrylic...just in case I ever do need to crank it way up. On the opposite side of the tank I put a Sicce Voyager 4, which can also create a strong but gentle flow...but not disturb the softies that hate the Vortech's flow. And was a fraction of the cost of an MP40. Edited May 6, 2013 by Soccer4500 Link to comment Share on other sites More sharing options...
Soccer4500 May 6, 2013 Author Share May 6, 2013 Now that the cycle was going, it was time to muffle those sump noises. The wifey would not have them disturbing TV viewing in the living room. Fine tuned the standpipe in the overflow and got to work building a shell for the stand, using materials from Home Depot. I also got some 8ft metal electrical conduits from Home Depot and bent + painted them to hang the tank lighting. As you can see from an earlier photo, the rimless came with a set of dual PFO 400w Metal Halides, running Radiums. I did NOT know how much they could bring up a temperature in a room. Didn't even think about turning on the heat in the house...even though this was Oct/Nov. And, I also saw hints of my old issue with the BioCube...water temperatures creeping up - yikes! Link to comment Share on other sites More sharing options...
Soccer4500 May 6, 2013 Author Share May 6, 2013 Time to hook up the Chiller! I got this from the first CL buy as well. Added a SpectraPure ATO w/Tom's AquaLifter hooked up to a 20G Rubbermaid. Turned it all on to see how it went. I keep my house at 70 and the tank temp at 77. The chiller did its job, begrudgingly. It ended up coming on several times a day under the 400w Metal Halides. While the MH gave off great lighting (I mean, I could see the faint blue lighting being emitted from my living room window half a block away on my way home from work) the amount of heat being produced was really tough. Especially in the living room. So... Link to comment Share on other sites More sharing options...
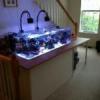
Soccer4500 May 6, 2013 Author Share May 6, 2013 Enter the Kessil A350w Tuna Blues. Can’t do the fun n' fancy light cycles like the Radions or AI’s... BUT, they still produce an AMAZING spectrum of light...with great tank coverage...and they can be fine tuned manually. I got two of the A350 wides and they cover my 4'x2' tank perfectly. And there's now problem with sufficient PAR hitting the sand bed for clams. The bonus: compact light, that has a very low profile and fits well with the minimalistic/non-bulky look of the rimless. I also got the skin up to mute sound of water trickling into the refugium. Link to comment Share on other sites More sharing options...
Soccer4500 May 6, 2013 Author Share May 6, 2013 I really liked the idea of a ledge/drink bar around the tank, as seen in Anthony’s (Fazio92) build thread. His setup is currently TOTM...and very well-deserved. Decided to give it a try with some shelving I found, held together by L brackets. It has a bit more depth than I would like (~8”), so maybe I’ll redo it with a thinner (~4”), more vintage looking piece of Oak. Link to comment Share on other sites More sharing options...
surf&turf May 6, 2013 Share May 6, 2013 Very nice. Link to comment Share on other sites More sharing options...
YHSublime May 6, 2013 Share May 6, 2013 Looking great! I'm in Arlington as well! Glad you decided to start posting up a thread! Link to comment Share on other sites More sharing options...
Soccer4500 May 6, 2013 Author Share May 6, 2013 Simultaneous to the build, I began adding fish/corals...some transferred from the old BioCube + new purchases...here are some photos about 3 - 4 mths removed removed from initial steup: Link to comment Share on other sites More sharing options...
Soccer4500 May 6, 2013 Author Share May 6, 2013 Very nice! I'm glad Sharkey18 got you share your tank. Is the sump/equipment under the tank or located under the stairs? Very nice. Looking great! I'm in Arlington as well! Glad you decided to start posting up a thread! Thanks all! Equipment is under the stand. I have some more photos of the sump setup that I'll try to add at some point along with more recent pics of the tank. Link to comment Share on other sites More sharing options...
Coral Hind May 6, 2013 Share May 6, 2013 The return pipe looks low inside the display. What stops it from siphoning back when the power is off? Link to comment Share on other sites More sharing options...
Soccer4500 May 6, 2013 Author Share May 6, 2013 The return pipe looks low inside the display. What stops it from siphoning back when the power is off? Nothing...unfortunately. It does siphon back into the sump when the power to the return is turned off (e.g. for water changes/skimmer cleanings). However, fortunately, there is more than enough room in the sump to accommodate for any backflow. And the way the return nozzle is positioned, it can't dip too low in the water...so the amount of water that actually does backflow on occasion isn't too great. Recently, when I purposefully cut power to the system (water changes/cleaning), I just temporarily raise the return nozzle so that it is out of the water and there is no backflow. Link to comment Share on other sites More sharing options...
Coral Hind May 6, 2013 Share May 6, 2013 I just wanted to mention that so you knew to check it. Nothing is worse than going out of town for the weekend and having the power go out and your sump overflow. Nice rock work by the way. Link to comment Share on other sites More sharing options...
Soccer4500 May 6, 2013 Author Share May 6, 2013 I just wanted to mention that so you knew to check it. Nothing is worse than going out of town for the weekend and having the power go out and your sump overflow. Nice rock work by the way. Thanks much...appreciate it! I've learned a lot just reading the boards (and occasional horror story) here on WAMAS - made sure it was the first thing I checked when doing the FW plumbing test. Link to comment Share on other sites More sharing options...
smallreef May 6, 2013 Share May 6, 2013 Looks good! Love the rimless look and your allowed to have it in the living room, so nice... I couldn't convince my husband of that,lol Link to comment Share on other sites More sharing options...
Shoelace May 7, 2013 Share May 7, 2013 Looks great. Rimless unite! Link to comment Share on other sites More sharing options...
Reefoholic May 7, 2013 Share May 7, 2013 The setup looks way cool! Link to comment Share on other sites More sharing options...
YHSublime December 17, 2013 Share December 17, 2013 Come on man, you can't just post up and then fade away! You picked up your WP's from me, I should have had you in for a tank visit, sorry about that, I imagine things were probably pretty busy at the time. You're welcome to come back and take a peek if you have a moment, and it's nice to have some other reefers just around the corner, surely you have some updates for us?! Link to comment Share on other sites More sharing options...


Recommended Posts
Create an account or sign in to comment
You need to be a member in order to leave a comment
Create an account
Sign up for a new account in our community. It's easy!
Register a new accountSign in
Already have an account? Sign in here.
Sign In Now