Larry Grenier June 13, 2012 Share June 13, 2012 Looking forward to your review on them Larry. Mine came two weeks ago, it's in the basement next to the tub of dead rock I put in salt water last weekend. I have pics, and will continue this thread soon. I let it run over-night in a bucked of change water and threw-in a little skimmate just for fun. Put it on the tank the next morning and it was pulling-out gunk by the next day :-) Quite and efficient. Definitely best bang for the buck. I might add a drain to the cup just to make it a little better. Thanks for the "Tip". Link to comment Share on other sites More sharing options...
londonloco July 1, 2012 Author Share July 1, 2012 Been awhile since I've upgraded this thread. On May 28th I started the rock cooking: Smaller Rocks: Larger Rocks: What was left in box, John over at reefcleaners is first class: Clean tub: Added water, salt, powerhead and heater: Soaking Rock: It's been a month, have had to add RO water several times. Haven't tested any, I plan on changing water later this week. It's crazy busy here between kids, work, etc., since I won't have time until late August to deal with this tank, I emailed Adam a few weeks ago telling him if he had any other jobs that needed to get out, mine could be put on the back burner. I think he was relieved I'm still undecided on the rest of the equipment to buy: return pump, lighting, ato and powerheads to start. I am seriously considering the Tunze 6095 with the 7096 controller, any comments on these? Link to comment Share on other sites More sharing options...
ArtFully Acrylic (Adam B) July 3, 2012 Share July 3, 2012 Yes, yes...was quite relieved actually....and I think my wife appreciated it even more as it gave me a little elbow room for some of the growing "honey do" list . Still can't wait to finish it all up and see it grow to completion though Loni! Link to comment Share on other sites More sharing options...
londonloco June 29, 2013 Author Share June 29, 2013 Time to resurrect this thread. I primed the stand last October using Valspar indoor/outdoor bonding primer: The holidays, the birth of my second grand child, weekend trips, etc.... all got in the way it's progress. Decided it was time I made it a priority, so the past few weeks I've been working on the stand. I used the same color paint as the walls of the den for the inside of the stand: It's a nice mustard yellow, once I used 3 coats of Minwax hi gloss polyurethane I'm very satisfied with the results: Link to comment Share on other sites More sharing options...
londonloco June 29, 2013 Author Share June 29, 2013 Next was the outside of the stand. I found a Valspar "sand" paint I really liked it but hesitated due to the textured finish. I wasn't sure if it would hold up to salt water as Valspar says "not for use in kitchens or bathrooms." After a few days and three unanswered emails to Valspar, I decided to go for it, could be a BIG mistake, meh, I went for it anyway. The pics don't really show the texture, it is very different, and I really like it. Everyone that walks into this house is forced to give a comment on it, and I'm happy to say they are very favorable. Now let's just hope I holds up. Due to the texture, I decided to use a spray sealer instead of roll on. I used four light coats of this to seal it: Satin finish, I'm not entirely convinced it's sealed good enough. I might buy a liquid can and roll a coat or two of the same Polycrylic later on, right now I've got other items to finish. Link to comment Share on other sites More sharing options...
londonloco June 29, 2013 Author Share June 29, 2013 While I was waiting on everything to dry, I decided to work on my electrical board. First, I had to cut the plywood down to 23"x30", I haven't used a circular saw in many years. I am determined this reef would be ALL mine, no help from my DH, who was not happy, he didn't like the idea of me, and a rotating circular saw, cutting down 1/2" plywood. He sent our 18yo son out to "supervise" which was fine, we laughed thru the whole process. And yes, I cut the dam board, not real straight, but it's done but forgot to take pics of the big moment.... After sanding: I primed it: and painted it the same color as the inside of the stand: It's sitting in my garage, waiting for two more coats of polyurethane. Link to comment Share on other sites More sharing options...
londonloco June 29, 2013 Author Share June 29, 2013 For the past few months I've been collecting equipment: Eheim 1262 for the return: Apollo Reef LED 5000+: Eheim 100W heaters x2: LED cabinet lights, not sure which one I'm using, or where I'm putting them: American DJ 4 outlight bar, which might be too thick to fit where it needs to go: Still to come is my order from Bulk Reef supply: Apex Controller with Standard pH Probe - Neptune Systems Advanced Leak Detection Module: ALD - Neptune Systems 3 Ft DIY 1/4" Screen Top Netting Kit Hanna Checker Alkalinity Colorimeter I also ordered a WP25 from Fish-street, hoping it's not too much flow for my tank which is 18" high. We'll see.... Link to comment Share on other sites More sharing options...
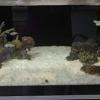
londonloco June 29, 2013 Author Share June 29, 2013 I also moved my rock from the basement, where it has been sitting, in the bin, for over a year, to the garage: and covered it due to lots of activity in my garage during the summer: I did test the little bit of water left in the bin for phosphate with my Hanna meter, it was .61. Not good. Thinking about trying SeaKlear Spa Phosphate Remover Jim mentioned to me last year. Link to comment Share on other sites More sharing options...
londonloco June 29, 2013 Author Share June 29, 2013 I bought this to put under my sump: Just teasing, kind of. I actually did buy it for under the sump, but turning it over, it's black: Link to comment Share on other sites More sharing options...
londonloco June 29, 2013 Author Share June 29, 2013 The stand is in the house again, I turned my never used dining room into a staging area for the tank project. Put the sump into the stand, this is where I am tonight: Stand with doors on it: Stand with sump and PS in it: Link to comment Share on other sites More sharing options...
smallreef June 29, 2013 Share June 29, 2013 Good work in the last few days.... Link to comment Share on other sites More sharing options...
londonloco June 29, 2013 Author Share June 29, 2013 I still have to set up electrical board, bend some conduit to hang my lights, let the ps run overnight in a bucket of vinegar, deal with plumbing the herbie, and decide on a scape. I am also considering going with Zeovit. Start up cost is almost 350$ if you include the basic four in medium size bottles and the vertex RX-Z 1.5L reactor: I keep going back and forth on Zeovit, mostly due to the cost, but my tank is only 58 gallons, products should last me awhile. I'm ok with a daily dosing regime, been doing it for years with my fw tanks. I've read several threads here on Wamas, RC and the Zeovit forum. Can I get everyone's opinion here...should I go for it? Link to comment Share on other sites More sharing options...
YHSublime June 29, 2013 Share June 29, 2013 Check out Brad's build, he's doing it with what looks like spectacular results. Link to comment Share on other sites More sharing options...
londonloco June 29, 2013 Author Share June 29, 2013 Check out Brad's build, he's doing it with what looks like spectacular results. I've seen his build, def in the + column. Link to comment Share on other sites More sharing options...
surf&turf June 30, 2013 Share June 30, 2013 Very nice! Link to comment Share on other sites More sharing options...
fscbishop June 30, 2013 Share June 30, 2013 nice following along Link to comment Share on other sites More sharing options...
rtsusc83 June 30, 2013 Share June 30, 2013 Nice and patient build. Dont know if I can be that patient! Keep us up to date. Link to comment Share on other sites More sharing options...
sachabballi reef June 30, 2013 Share June 30, 2013 Adam's work is impeccable !!! Tagging along Link to comment Share on other sites More sharing options...
londonloco June 30, 2013 Author Share June 30, 2013 Had a little time today to work on the tank build. I painted the side molding the wrong color: but it was an 5 min easy fix: I also marked the electrical board where I wanted it to sit, thinking I'm going to leave a gap at the bottom as well as the top. This way, if I have cords coming from the inside ceiling of the stand (stand lights maybe?) I can run that cord thru the top of the board. Made sure I had enough room to fit the plug thru the gaps: Tomorrow my BRS order will be here I'll configure the board then. I also put together my protein skimmer, since it's a cheap chinese knock off, it didn't come with directions, luckily this is not my first reef, was easy to figure out once I found the barb fitting that fell behind the buffet it was sitting on: I'll run it thru a vinegar bath tomorrow when I home. Do have a questions: how much vinegar, and how long do I let it run? I was thinking 8 hours or so...but not sure. Link to comment Share on other sites More sharing options...
YHSublime June 30, 2013 Share June 30, 2013 I'll run it thru a vinegar bath tomorrow when I home. Do have a questions: how much vinegar, and how long do I let it run? I was thinking 8 hours or so...but not sure. I'm not 100% positive on this, but I would run it in a vinegar bath for about 24 hours. Will that skimmer fit in a 5 gallon bucket... if so... perfect. Do a vinegar/ro solution, not sure what the "perfect" combo is here, but I would do about a cup of vinegar to each gallon. If you don't have a lot of it on hand, try costco or sams club, and then stock up. I use it for cleaning most of my pumps and powerheads, and it's cheap as chips compared to everything else in the hobby! Link to comment Share on other sites More sharing options...
swimmatte June 30, 2013 Share June 30, 2013 Just went through this thread. I'm liking what I'm seeing. Good progress! Link to comment Share on other sites More sharing options...
ArtFully Acrylic (Adam B) June 30, 2013 Share June 30, 2013 Clever work making the one removable side an outfacing electrical area Loni =). Will have nice easy access there! Its been so long since I last saw this build leave. I'm actually laughing at some of the pics that were taken from my garage before I got the dedicated work shop lol. I look forward to seeing your build progress....surprised there are no pics of the infamous ArtFully Acrylic Glass Tank up yet hahahahahahaha. You should see if they will somehow let you edit that main starting post to the thread so you can fix up the details since I know some of them changed way back when. Such as the fact that the tank is 36x24x18 whereas the stand is 42x24 =). It will be fun to watch! TTYL! Link to comment Share on other sites More sharing options...
londonloco July 1, 2013 Author Share July 1, 2013 I'm not 100% positive on this, but I would run it in a vinegar bath for about 24 hours. Will that skimmer fit in a 5 gallon bucket... if so... perfect. Do a vinegar/ro solution, not sure what the "perfect" combo is here, but I would do about a cup of vinegar to each gallon. If you don't have a lot of it on hand, try costco or sams club, and then stock up. I use it for cleaning most of my pumps and powerheads, and it's cheap as chips compared to everything else in the hobby! Thanks YH, exactly what I was looking for, I have a BIG jug of white vinegar I can use.... Just went through this thread. I'm liking what I'm seeing. Good progress! TYVM...it's been over a year coming! Clever work making the one removable side an outfacing electrical area Loni =). Will have nice easy access there! Its been so long since I last saw this build leave. I'm actually laughing at some of the pics that were taken from my garage before I got the dedicated work shop lol. I look forward to seeing your build progress....surprised there are no pics of the infamous ArtFully Acrylic Glass Tank up yet hahahahahahaha. You should see if they will somehow let you edit that main starting post to the thread so you can fix up the details since I know some of them changed way back when. Such as the fact that the tank is 36x24x18 whereas the stand is 42x24 =). It will be fun to watch! TTYL! Big smiles Adam, great to hear from you again. I will be emailing you about some other smaller builds I have in mind I had the webmaster change the title, but forgot about my first post. I'll def see what they can do about changing the first post. Link to comment Share on other sites More sharing options...
brad908 July 1, 2013 Share July 1, 2013 Build is looking good. I recommend zeovit, just take it slow. Link to comment Share on other sites More sharing options...
londonloco July 2, 2013 Author Share July 2, 2013 (edited) Felt like Christmas in July today: Apex: ALD: WP25: Hanna Alkalinity: Screen cover: This afternoon I ordered the rest of my testing kits, a ZEOvit reactor and a few bottles of ZEOvit to get me started. I also had a few minutes to plan out the electrical board: Decided to cut it down from 30" long to 22" long. This gives me 10+ inches on the bottom of the stand to add dosing jugs. We're having out of town company and my daughter is having a "small" pool party here on the 4th, this build will have to wait until the weekend to continue Have a wonderful 4th everyone.... Edited July 2, 2013 by londonloco Link to comment Share on other sites More sharing options...


Recommended Posts
Create an account or sign in to comment
You need to be a member in order to leave a comment
Create an account
Sign up for a new account in our community. It's easy!
Register a new accountSign in
Already have an account? Sign in here.
Sign In Now