Siege
-
Posts
28 -
Joined
-
Last visited
Siege's Achievements
Hatchling (3/13)
-
Does anyone know if Marine Scene had a change in management or something recently? I'm getting back into the hobby after being out for a couple of years, so I swung by the store the other day, and... wow. Red cyano all over the tanks, everything in the beautiful display across from the entrance was bleaching... I've always loved their shop, but man, it looked rough in there. Anyone know what's up?
-
That's what I'm beginning to see. I've been reading up on DSBs and I noticed that a lot of people who keep them don't run a skimmer, chemical media, or dose anything. It seems to me that doing as much natural filtration as possible seems like a winning idea, and a straight-through sump seems like the best way to do that in my case... so I guess I'm sold. For now, I guess for now I'll plan to run my skimmer in the first chamber, but may eventually replace it with either a HOT model (or do away with it altogether) and pack that chamber with LR rubble. DSB, a bit more LR, and chaeto in the center, return in the last chamber. Pics of your setup would be much appreciated. I love pics. I live in Oakton close to Reston Town Center, but as much as I'd love to see your rig in person, I have two small kids and a wife that works longer hours than I do, all of which puts a cramp on my ever going anywhere ;-)
-
Yeah, it seems that a straight-though flow will make life a lot easier. The plumbing is certainly simpler, the fuge is bigger, and a dsb becomes possible. I'm leaning more towards the straight-though design, but I guess the reason I'm hesitant about it because I see a lot more in(fuge)->out<-in(skim) setups than I do in(skim)->fuge->out and it's impossible to know what will work best for me until I've tried it.
-
That's what I said... or at least intended to. "Split the drain." The emergency drain will go directly to the return chamber, well enough above the waterline to make noise if in use. Sent from my Droid using Tapatalk
-
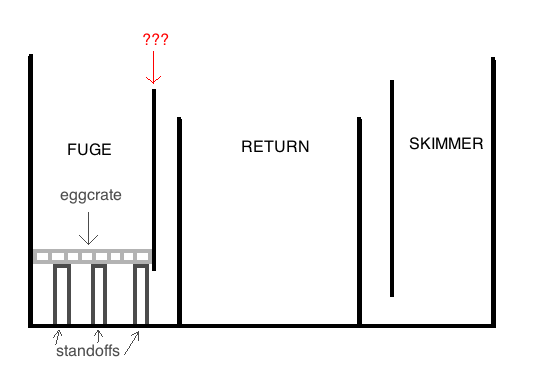
I know the baffles are meant to trap bubbles, but since I haven't set this up yet, I'm not sure how big of a problem bubbles are going to be. I'm also planning a "Herbie" style overflow setup, which is supposed to virtually eliminate bubbles in the sump anyway (aside from what might be produced by the skimmer, which will be behind a baffle no matter what I do). I'm not keen on making changes if I don't have to, and I can think of two different ways to use this sump as-is: 1) As I've marked it. Split the drain to the two outer chambers and return from the middle. I'd use the standoff/egg crate side as the fuge packed with smaller pieces of LR and a layer of chaeto on top. I could probably get about 20lbs of LR in there, but no DSB. 2) Do a straight flow through like trockafella. Skimmer on one side, fuge in the middle, return on the opposite side. I wouldn't be able to control the flow through the fuge area, but it does give me a bigger fuge with room for a DSB. Decisions, decisions...
-
So I have a sump that I'm a little confused about. It's an acrylic 29 long for my 50 breeder and is already assembled. I got it from GC with the tank, which isn't up yet (I'm finally done finishing the stand... stupid cold weather). Anyway, If I were designing a sump from scratch, I wouldn't do it exactly like this, but I'd do something very close. Here's what it looks like now (this is a lousy sketch and not to scale): My concern is with the leftmost baffle on the fuge chamber, as well as the standoffs and egg crate. I don't think any of them are necessary, and I'm wondering why the designer put them there. I'm thinking I could either pack the fuge with LR and/or chaeto, but that's about it. I was thinking about doing a DSB in the sump, but that baffle would make it inconvenient to do so. Any thoughts on whether I should use it as-is, or try to modify it? As I said, it's acrylic, so I can't simply pop the extra baffle out. I'd have to cut it or drill it.

-
So, I was just setting up my new Typhoon RO/DI system and I have it filling a regular 5 gallon jug right now. No more trips to the LFS for water for me! But as I was setting it up, I was thinking that I'm going to need a bigger water storage vessel. I know a lot of people use big plastic trash cans, but I immediately thought of using a rain barrel. They're specifically designed for holding water, they usually have spigots pre-installed, and they're nice and big. Anyone using one to hold their RO/DI? I was thinking of this guy.
-
I picked this up on Saturday and only barely managed to tuck the entire thing in my car. Got it home, unpacked it, and went over the entire rig with a fine toothed comb. Some initial thoughts: * The tank is well made, solid, and very heavy. A lot of people have criticized GC of over-liberal use of silicone, but I don't see it. It's a standard glass tank, and not rimless, so maybe that's the difference. * The starphire panels (I have them installed on the front and sides), make a BIG difference. Glad I went with them. * The overflow is enormous. It's 10"x6", or a total of 22 linear inches. The drain pipe is, I think, 2". According to RC's overflow calculator, that will accommodate 1450 gph, more than 3x what I actually need. * They don't want you to actually fill it for 3 weeks after the manufacturing date. Probably has something to do with letting the silicone cure, but that seems like a long time to me. * The stand is not that well made. It's solid and sturdy, but the craftsmanship isn't there. It's mostly red oak plywood, but the back panel and top of the canopy are a cheaper grade, probably pine. The oak plywood is chipped in a number of spots. * The roof of the canopy is hollow. I'll have to install some kind of cross brace to suspend lights from. * The mitres on the decorative edges of the lift-off front and side doors are very poorly done. They don't line up at all. * The front of the canopy slides up and off, but that piece is not cut straight and there is a large gap when it is slid into place. All in all, I'm happy with the tank, but I do wish I'd built my own stand. I did what I could to clean it up, and it looks better now. I've added some veneer edging to the exposed plywood sides and covered the gap in the canopy's front panel by adding some quarter-round trim. After going over it with some 450 grit sandpaper and a couple of coats of varnish, it does look a lot nicer, but it's not the pristine and beautiful piece of furniture I'd have liked it to be. Of course, the goal is for people to eventually pay attention to the contents of the tank and not what it's sitting on, but still. Plans: * LR and LS will come in the form of "The Package" from TBS once the tank has been tested and installed. * Lighting will be a DIY LED array. I'm assembling parts now. Equipment on hand: * I have an acrylic 29 sump, baffled into three chambers. * I have an RKL to use as the brains of the tank. * I have two Fluval E-Series heaters, one 200W and one 300W to keep it warm. * I have a Rio 1400+ to at least get things started in the flow department, but I'm sure I'll need a much bigger pump and a decent powerhead before long. * I have an Eshopps PSK-75 to help keep things clean.
-
Current FTS: Yup, the tank is on backwards. 2011-02-27 The tank is a Starphire 50 breeder from Glasscages. It measures 36x18x19, although the actual water volume is exactly 40 gallons. It is sitting on a custom red oak stand (also from Glasscages) which measures 36" tall.
-
Got the call from glasscages today... My new tank will be delivered on Saturday morning! Hurray! Sent from my Droid using Tapatalk
-
An update for your section on mounting LEDs. There are two additional non-solder options of which I am aware: http://www.rapidled.com/servlet/the-121/Solderless-Connector-for-CREE/Detail http://www.shapeways.com/shops/awesome_stuff I have not yet used the one in the top link, but full disclosure: I designed the one in the later link. I actually came up with it before I knew about the RapidLED model, and I'll be comparing the two for my upcoming build 'cuz I hate soldering these things. :-)
-
Heh, well... I'm a carpetbagger Yankee from up North, so... Anyway, I'm glad to be here. I actually have a few pieces of equipment I need to find new homes for, so I'm heading over to the FS section now.
-
Thanks... I'm in that weird state where I've spent the first chunk o' money and now I can't wait to get started.
-
WooHoo! My guess is that I should have waited until after I validated my email address before I ordered my subscription. They probably both updated the same value. Ah, well... thank you for the quick fix! Membership's first benefit, apparently. ;-)
-
How's that for lucky. :-)